IdP Federation for Google Workspace Zero Trust Policy Enforcement
Federate Google Workspace to SonicWall Cloud Secure Edge (CSE) so Google delegates sign-in to the CSE policy engine, enforcing device trust and zero trust policy before Google completes authentication to SaaS applications
- Last validated: Aug 3, 2026
- Overview
- Why use CSE as the identity provider for Google Workspace
- Prerequisites
- Step 1: Create the IdP-Routed Application in CSE
- Step 2: Add CSE as a Third-Party SSO Profile in Google Workspace
- Step 3: Prevent Lockout and Redirect Loops
- Step 4: Route a Pilot Population (Recommended)
- Verify the Sign-In
- Step 5: Route All Users
- Additional Configurations
- Expected Behaviour
Overview
This guide explains how to federate Google Workspace to SonicWall Cloud Secure Edge (CSE) so that CSE enforces zero trust policies across the SaaS applications that Google Workspace brokers. An upstream policy engine (CSE) is inserted into the sign-in chain so that device posture and zero trust policy are evaluated before authentication completes.
In Google Workspace this is achieved with an SSO profile that points at CSE as a third-party identity provider. The authentication chain becomes:
SaaS app -> Google Workspace -> CSE (device trust + zero trust policy) -> Google Workspace -> SaaS app
When a user signs in, Google redirects the sign-in to CSE. CSE evaluates the device certificate and the assigned web policy, and only on success returns an assertion to Google, which then completes sign-in to the requested application.
How Google Workspace selects the identity provider. Google Workspace applies SSO profile assignments that are keyed to who the user is — their organizational unit (OU) or group — not to the application being accessed. There is no per-application routing in Google Workspace, so a phased rollout is performed by user population (OU or group), not by application.
Doc status: CSE-side steps were reviewed on 2026-06-29 and corrected on 2026-07-14 against the sibling IdP federation guides. Google-side steps and behavior were verified on 2026-07-14 against Google’s current documentation. Screenshots were captured on 2026-07-14 from the current CSE Command Center and Google Admin console. The Google Admin console steps follow Google’s own documentation and should be confirmed against the live admin console, which can change without notice.
Why use CSE as the identity provider for Google Workspace
Google Workspace SSO proves who the user is — it validates the password and any MFA — but it does not evaluate the device the user is signing in from. Federating Google Workspace to CSE inserts a device-trust and policy check into that sign-in, so access depends on the device and policy, not on the credential alone.
- Device posture, not just identity. A valid credential can still originate from an unmanaged, jailbroken, or compromised device. CSE requires a registered device with a valid certificate that meets the Trust Level your policy defines — computed from trust factors such as disk encryption and OS version — before sign-in completes.
- One control point for every brokered app. Because CSE is inserted at the Google SSO layer, a single configuration enforces zero trust across every SaaS application Google fronts — with no per-application integration — and it is evaluated on every login.
- Resistance to credential attacks. Stolen passwords, phished sessions, and account takeover fail at the device check even when the credential itself is correct.
- Passwordless option. The device certificate can stand in for the password, removing the phishable secret entirely (see Passwordless authentication under Additional Configurations).
- Consistent policy for apps with no native device trust. Access decisions are centralized in one CSE policy engine (role and Trust Level) rather than relying on each SaaS vendor’s own controls.
The result is that Google Workspace SSO changes from “the right person signed in” to “the right person, on a trusted device, meeting policy, signed in” — applied uniformly and enforced before access is granted.
Prerequisites
- A CSE tenant that can publish SaaS applications (Internet Access > SaaS Apps) using the IdP Routed template.
- A Google Workspace tenant with the Security Settings administrator privilege (required to configure SSO with a third-party IdP).
- User accounts that already exist in Google Workspace. Google Workspace SSO authenticates existing accounts only — it does not auto-provision users. Account lifecycle must be handled separately (see Provisioning under Additional Configurations).
- At least one break-glass super administrator account that is excluded from SSO (see Step 3).
Values to exchange
Each side generates values that must be entered into the other. Google generates its values only after the SSO profile is saved.
| Value | Owned by | Used in |
|---|---|---|
| OIDC: Client ID, Client secret, Issuer / discovery URL | CSE (Step 1) | Google OIDC SSO profile (Step 2, Option A) |
| OIDC: Redirect URI (shown after the profile is saved) | Google (Step 2, Option A) | CSE application from Step 1 (entered during Step 2, after saving) |
| SAML: SSO URL, IdP Entity ID / Issuer, X.509 signing certificate | CSE (Step 1) | Google SAML SSO profile (Step 2, Option B) |
| SAML: ACS URL and Entity ID (SP details, shown after the profile is saved) | Google (Step 2, Option B) | CSE application Redirect URL (SAML ACS) / Audience URI from Step 1 (entered during Step 2, after saving) |
Step 1: Create the IdP-Routed Application in CSE
Create the web policy and the application in CSE that together expose the CSE policy engine as an identity provider to Google. These are two separate objects in two console locations.
1.1 In the CSE Command Center, navigate to Private Access > Access Policies, select + Create Policy, and create a Web Policy that defines the zero trust requirements (for example, a registered device meeting a Trust Level).
1.2 Navigate to Internet Access > SaaS Apps and select Publish SaaS Application, using the IdP Routed template.
1.3 Select OIDC or SAML as the authentication protocol (see the tip below).
1.4 Name the application (for example, Google Workspace Policy Engine).
1.5 Attach the web policy from Step 1.1 and set its enforcement mode. Permissive mode allows devices that do not meet the policy (for example, not-yet-registered devices) to fall back; Enforcing mode allows no fallback. Begin in Permissive mode for the pilot and switch to Enforcing after validation (Step 5).
1.6 Register the application. If the SAML form requires the Service Provider fields (Redirect URL (SAML ACS) and Audience URI) at registration, enter placeholder values and update them with Google’s SP details after Step 2, Option B.
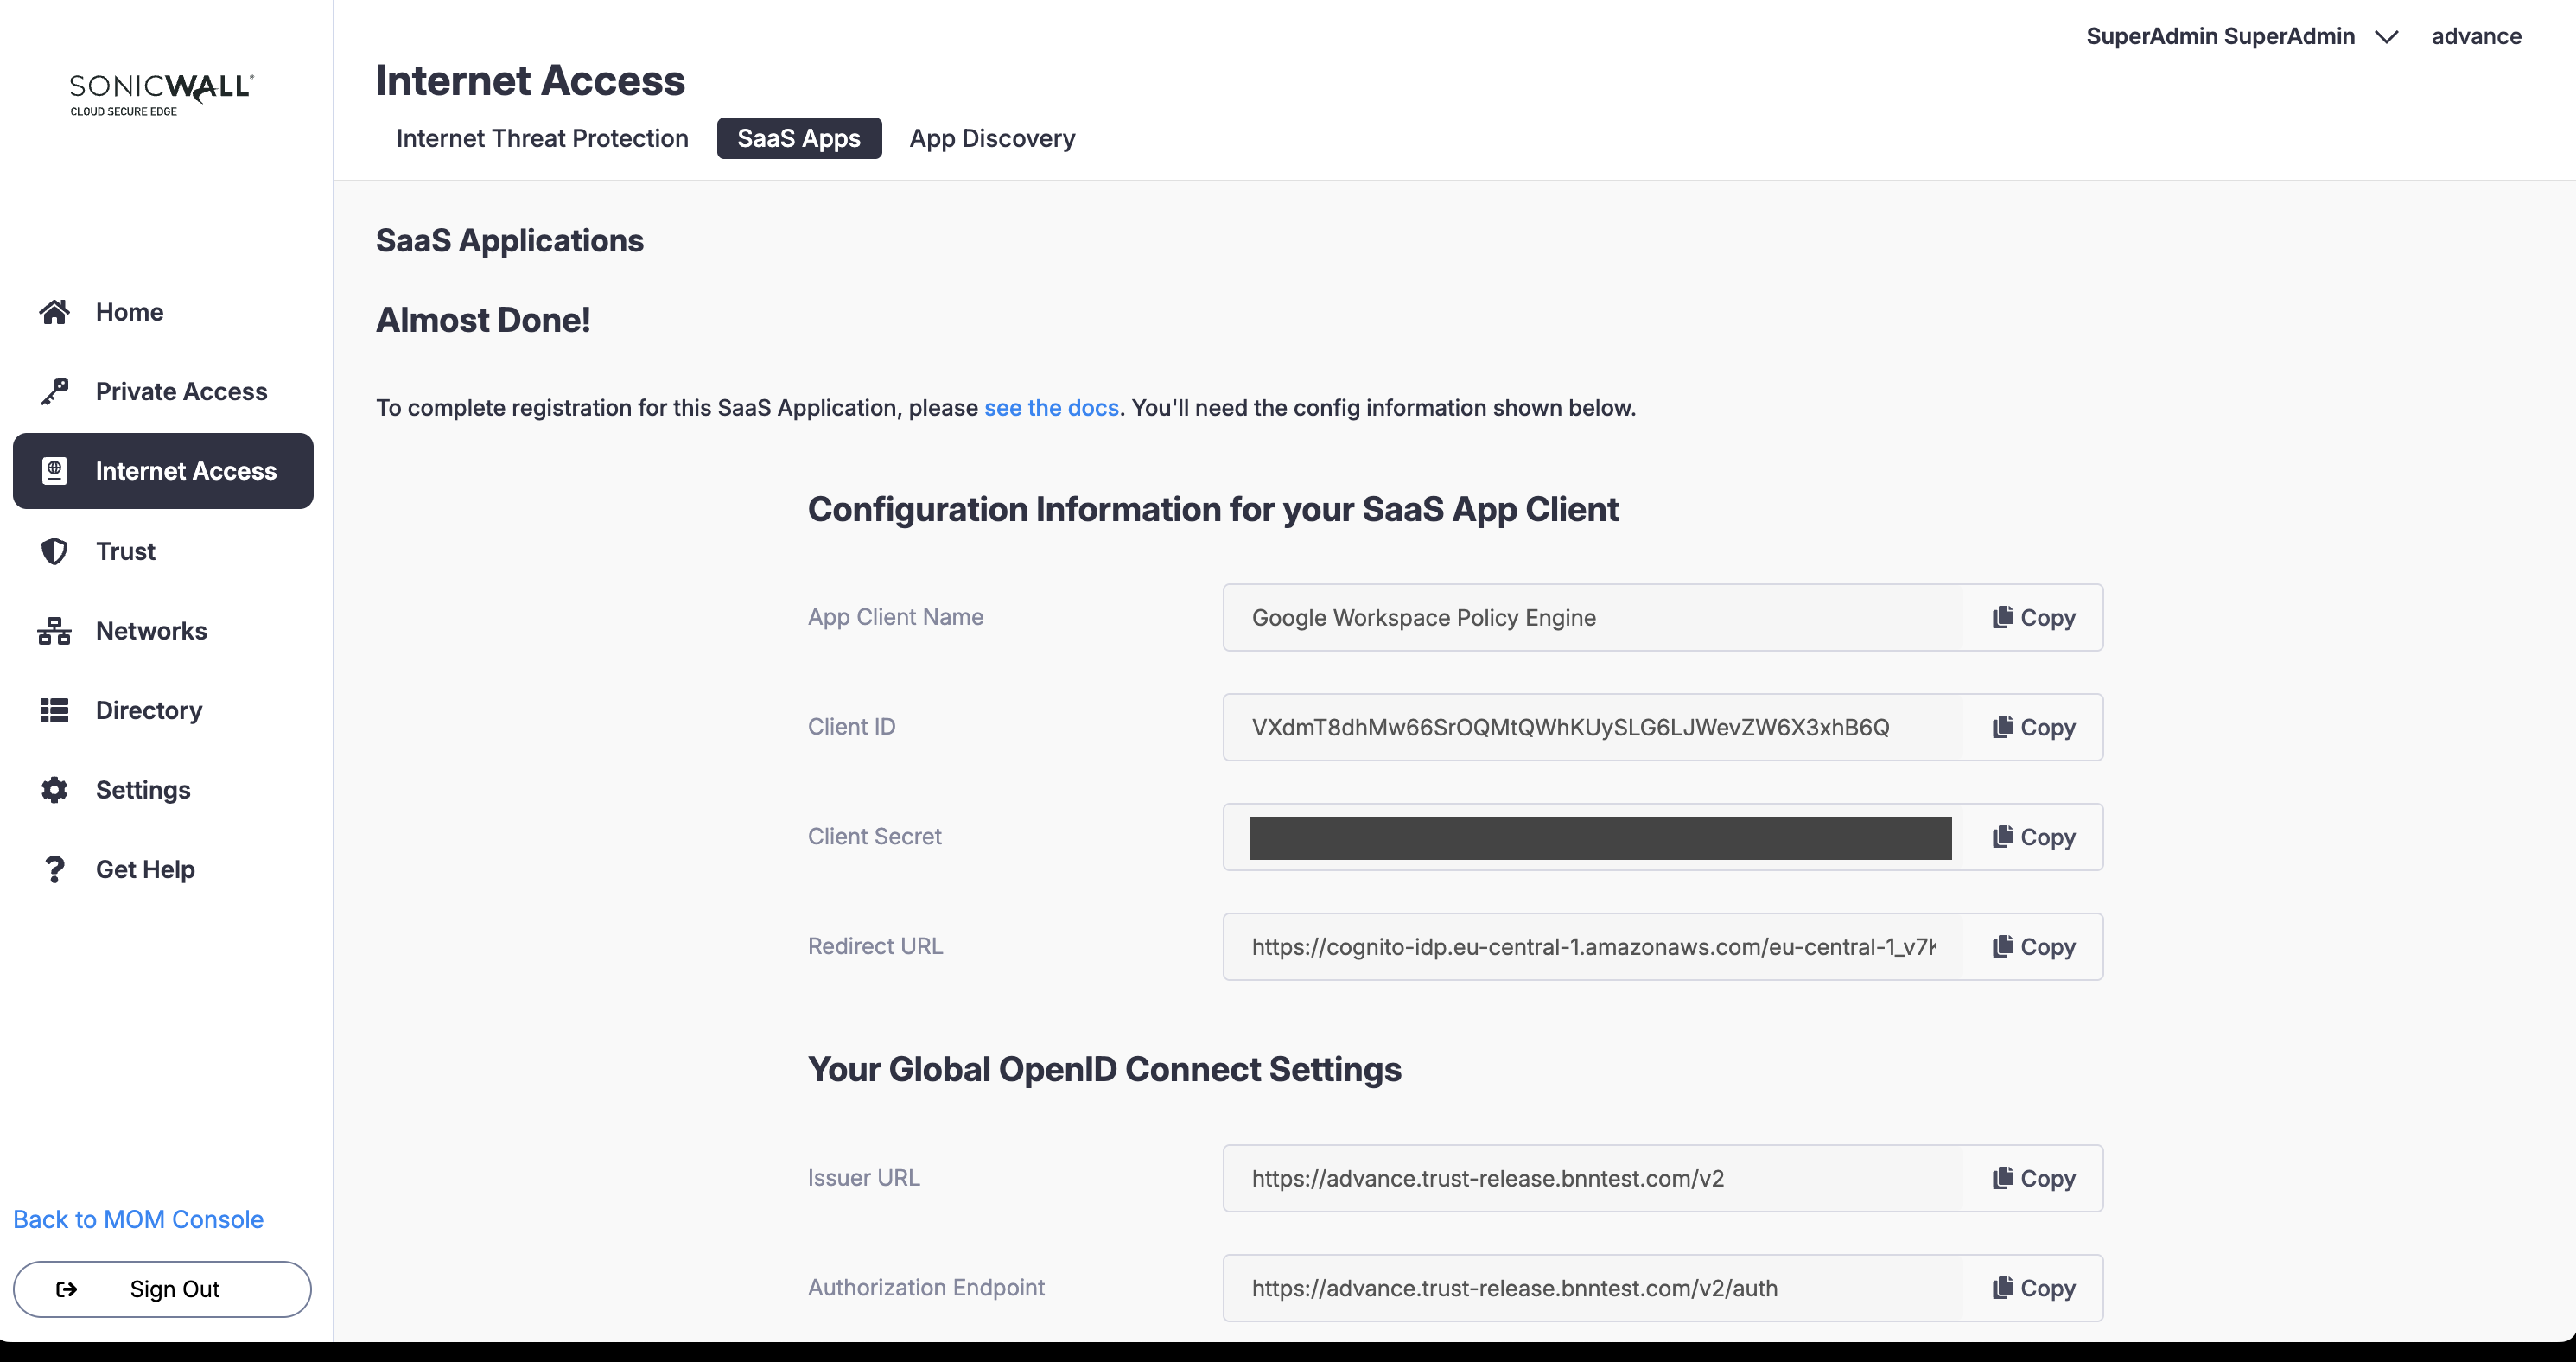
1.7 Open the published application to retrieve the federation values that Google Workspace requires. CSE can federate to Google over OpenID Connect (OIDC) or SAML 2.0:
- OIDC — copy the Client ID, Client secret, and Issuer / discovery URL. You must also register the redirect (callback) URI that Google provides for its OIDC profile (Step 2, Option A) as an allowed redirect URI in this application.
- SAML — copy the Sign-in (SSO) URL and IdP Entity ID / Issuer, and download the signing certificate. These are also available from the application’s Metadata URL (the downloaded metadata XML contains the SSO URL, Entity ID, and X.509 certificate). You must configure this application with Google’s Service Provider details (see Step 2).
The values appear on the post-registration confirmation screen and remain available afterward on the application’s Overview tab:
Tip: Either protocol works. Custom OIDC profiles are generally available in Google Workspace; use an OIDC SSO profile unless your organization standardizes on SAML, in which case use a SAML profile — both are supported.
Step 2: Add CSE as a Third-Party SSO Profile in Google Workspace
In this step you register CSE as the third-party identity provider that Google Workspace delegates sign-in to.
- In the Google Admin console, go to Menu > Security > Authentication > SSO with third-party IdP (direct link:
https://admin.google.com/ac/security/sso). - In the Third-party SSO profiles section, click Add OIDC profile (or Add SAML profile).
- Name the profile (for example,
CSE Policy Engine).
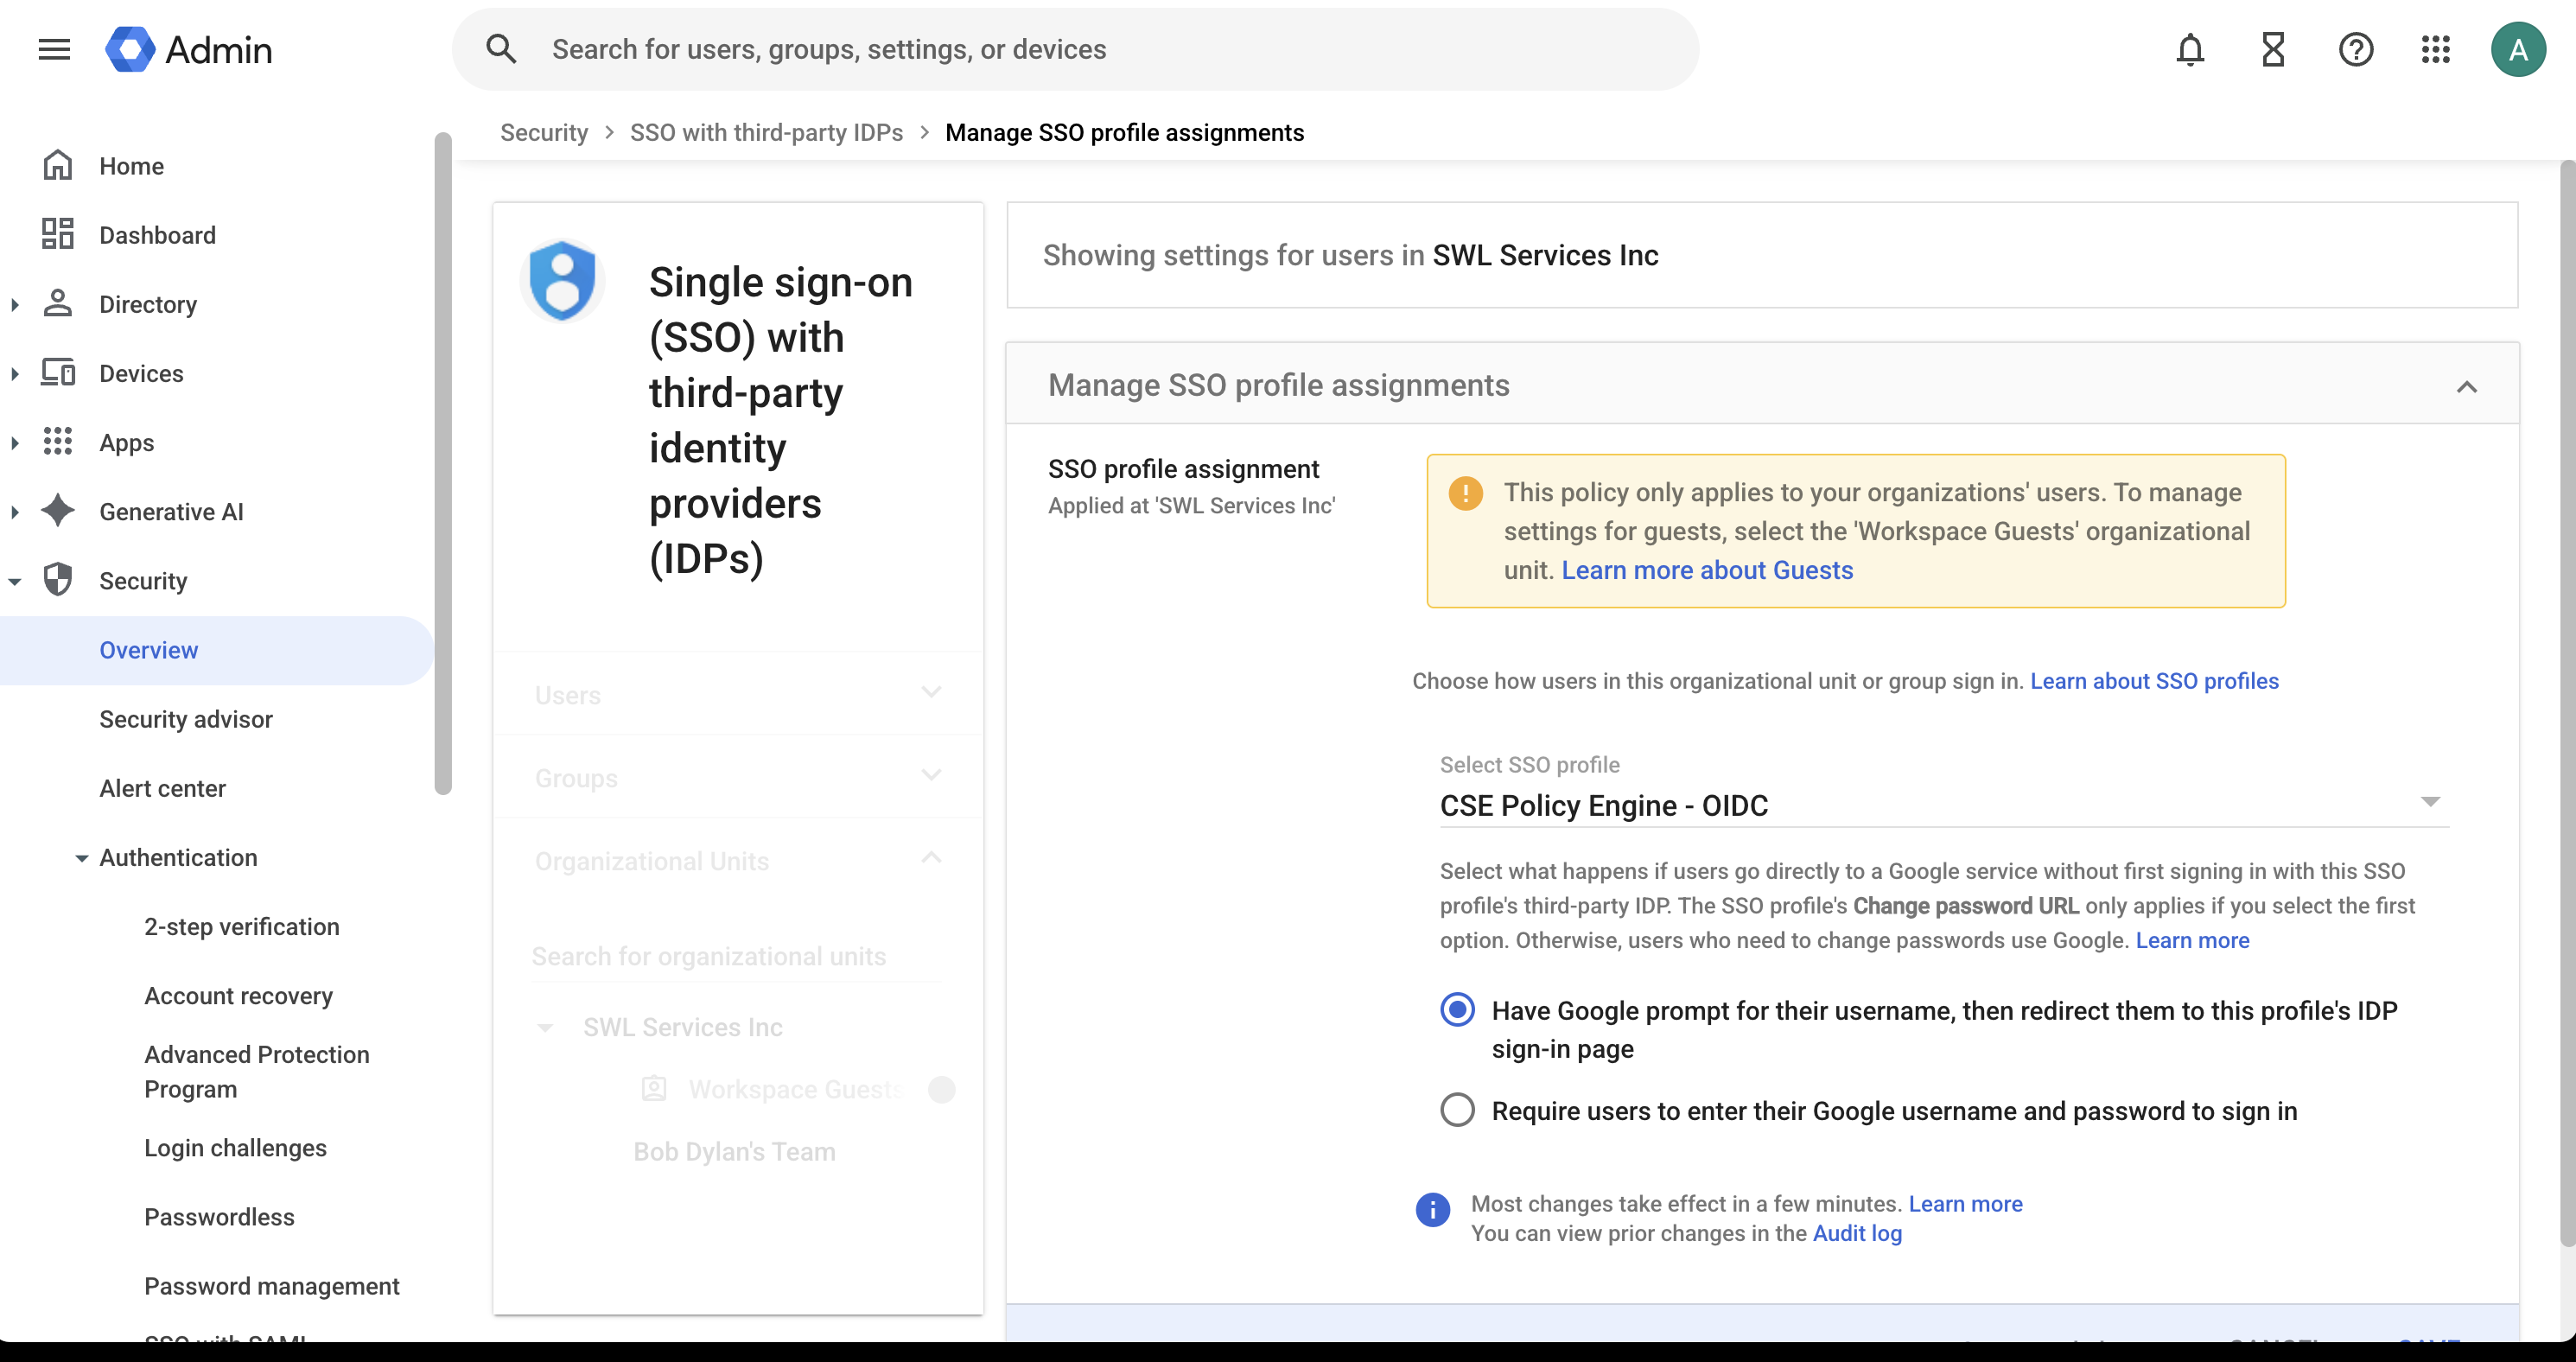
Google generates its values only after you save. The OIDC redirect URI appears on the new profile’s settings page after you click Save, and the SAML SP details (ACS URL and Entity ID) appear in the saved profile’s SP details section — neither is shown on the creation form.
Option A — OIDC profile
Enter the values retrieved from CSE in Step 1.7. The labels differ between the two consoles — map them as follows:
| Google OIDC profile field | Value from the CSE application |
|---|---|
| Client ID | Client ID |
| Client secret | Client Secret |
| Issuer URL | Issuer URL (under Your Global OpenID Connect Settings). Do not use the Authorization Endpoint — Google discovers the endpoints from the issuer |
| Change password URL | Leave blank unless you run a password self-service page |
Click Save, then copy the redirect URI that Google displays for this profile:
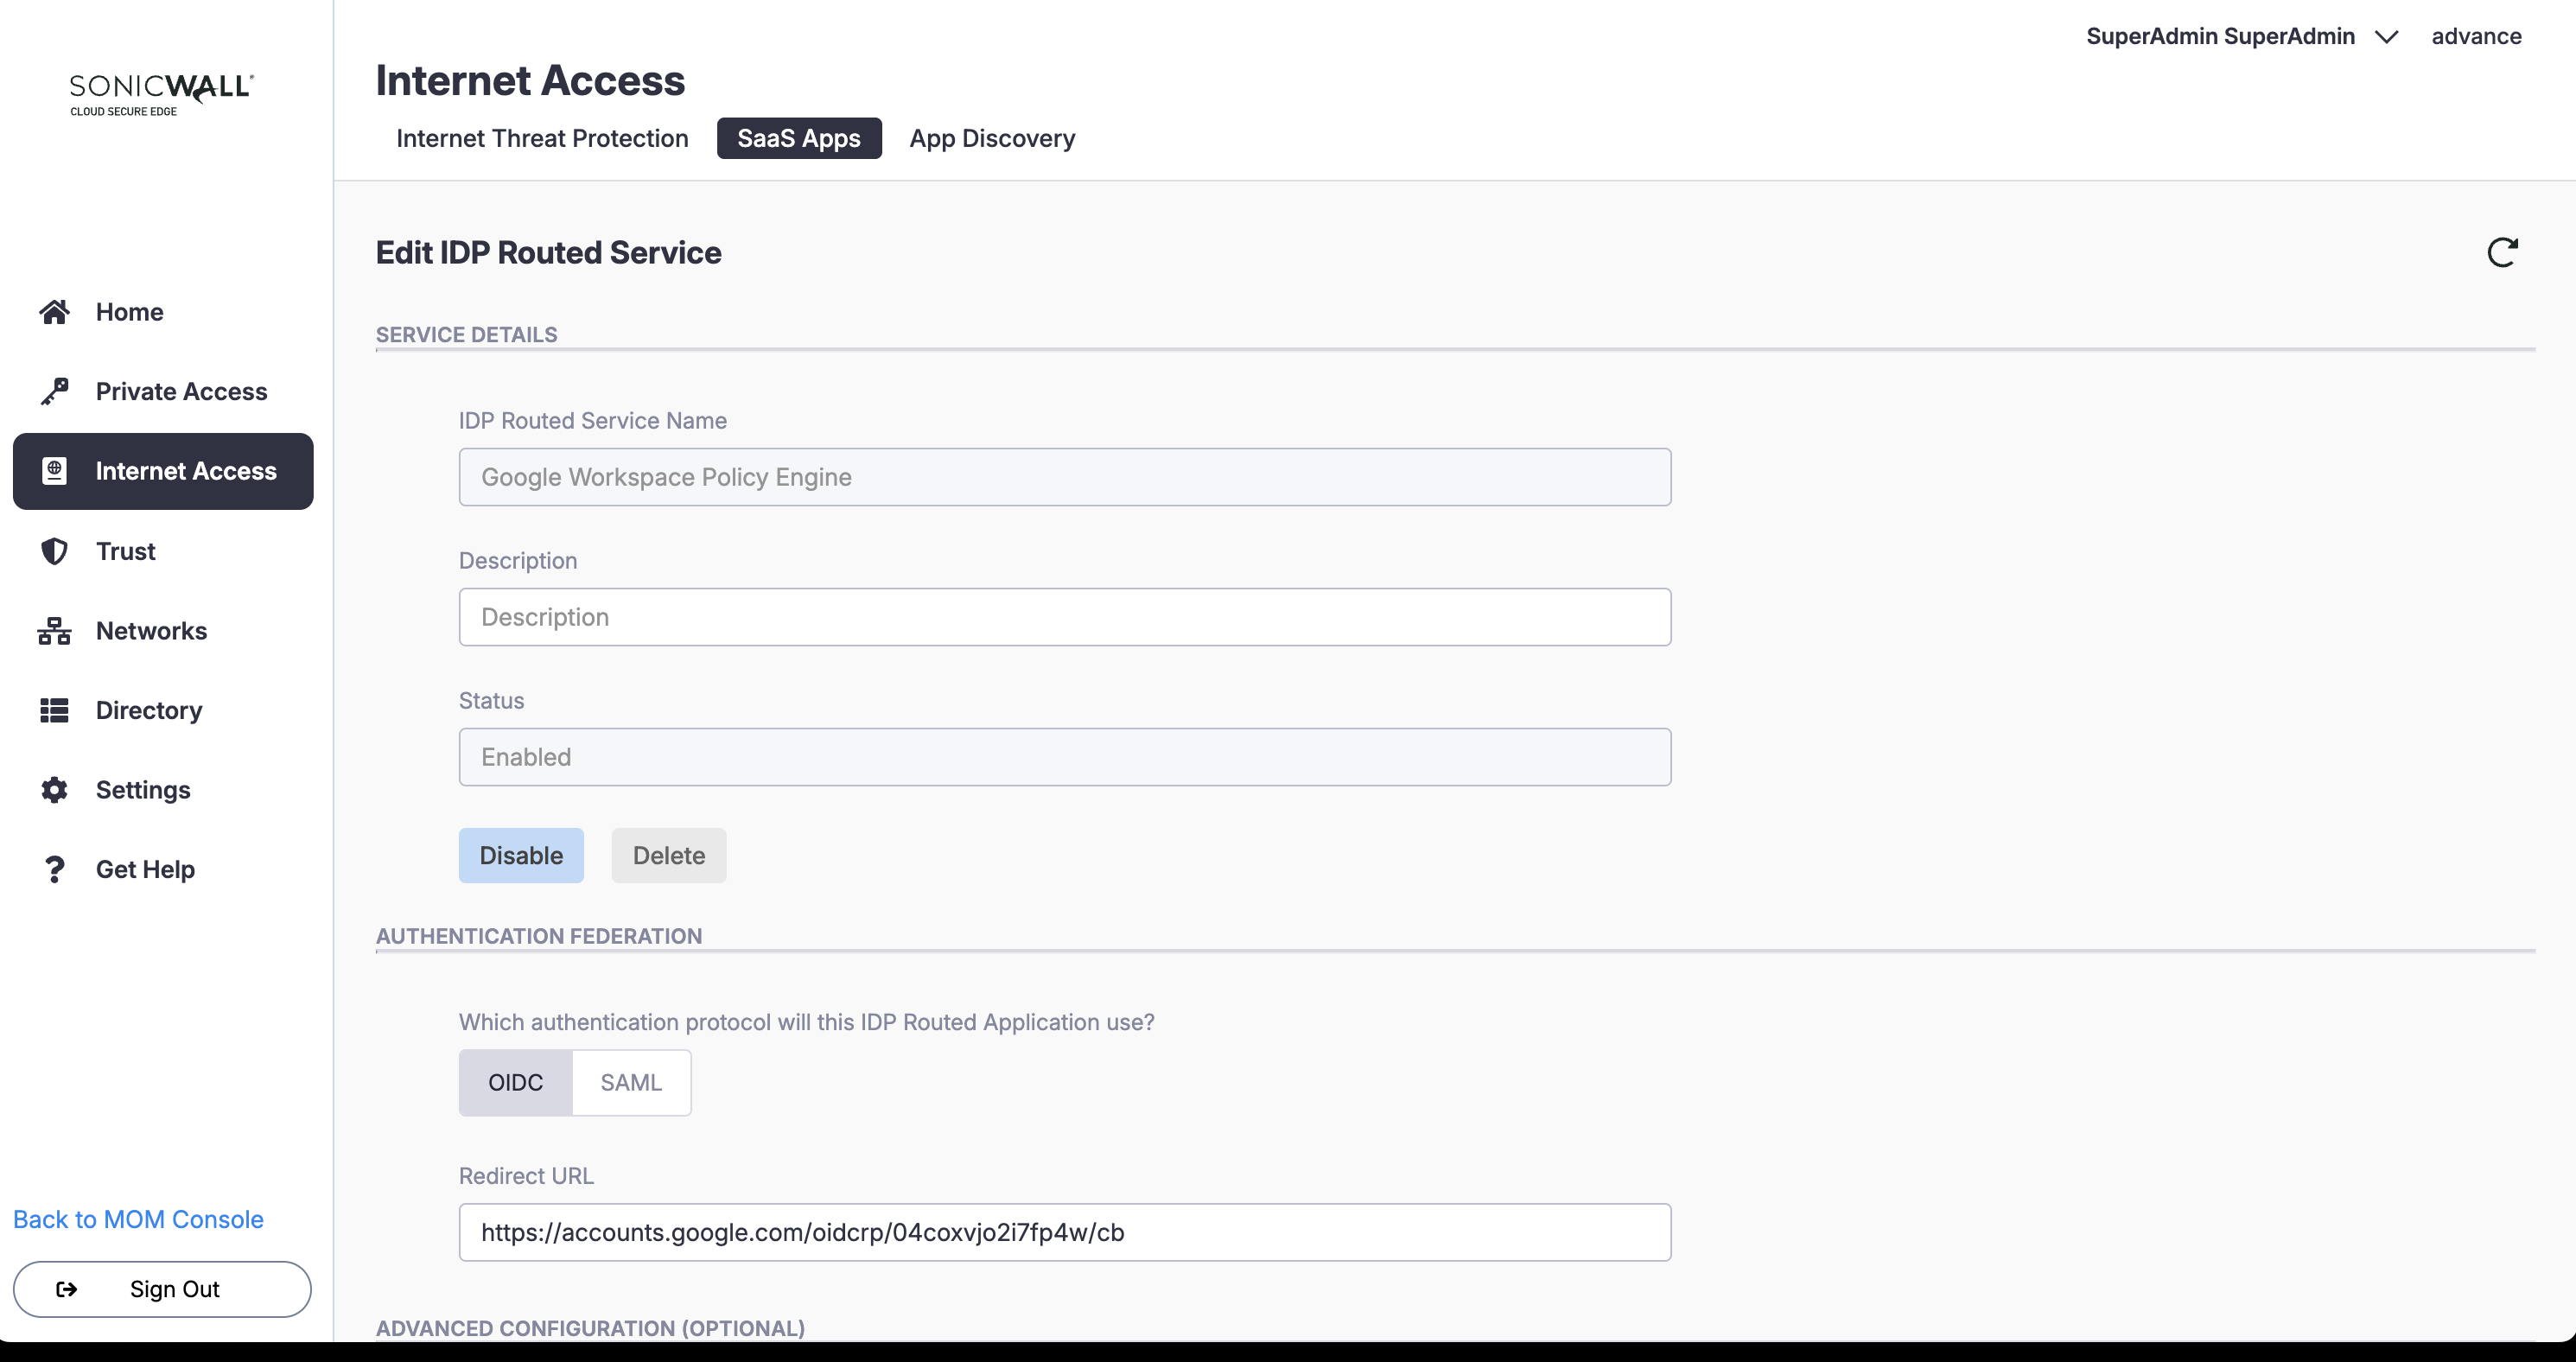
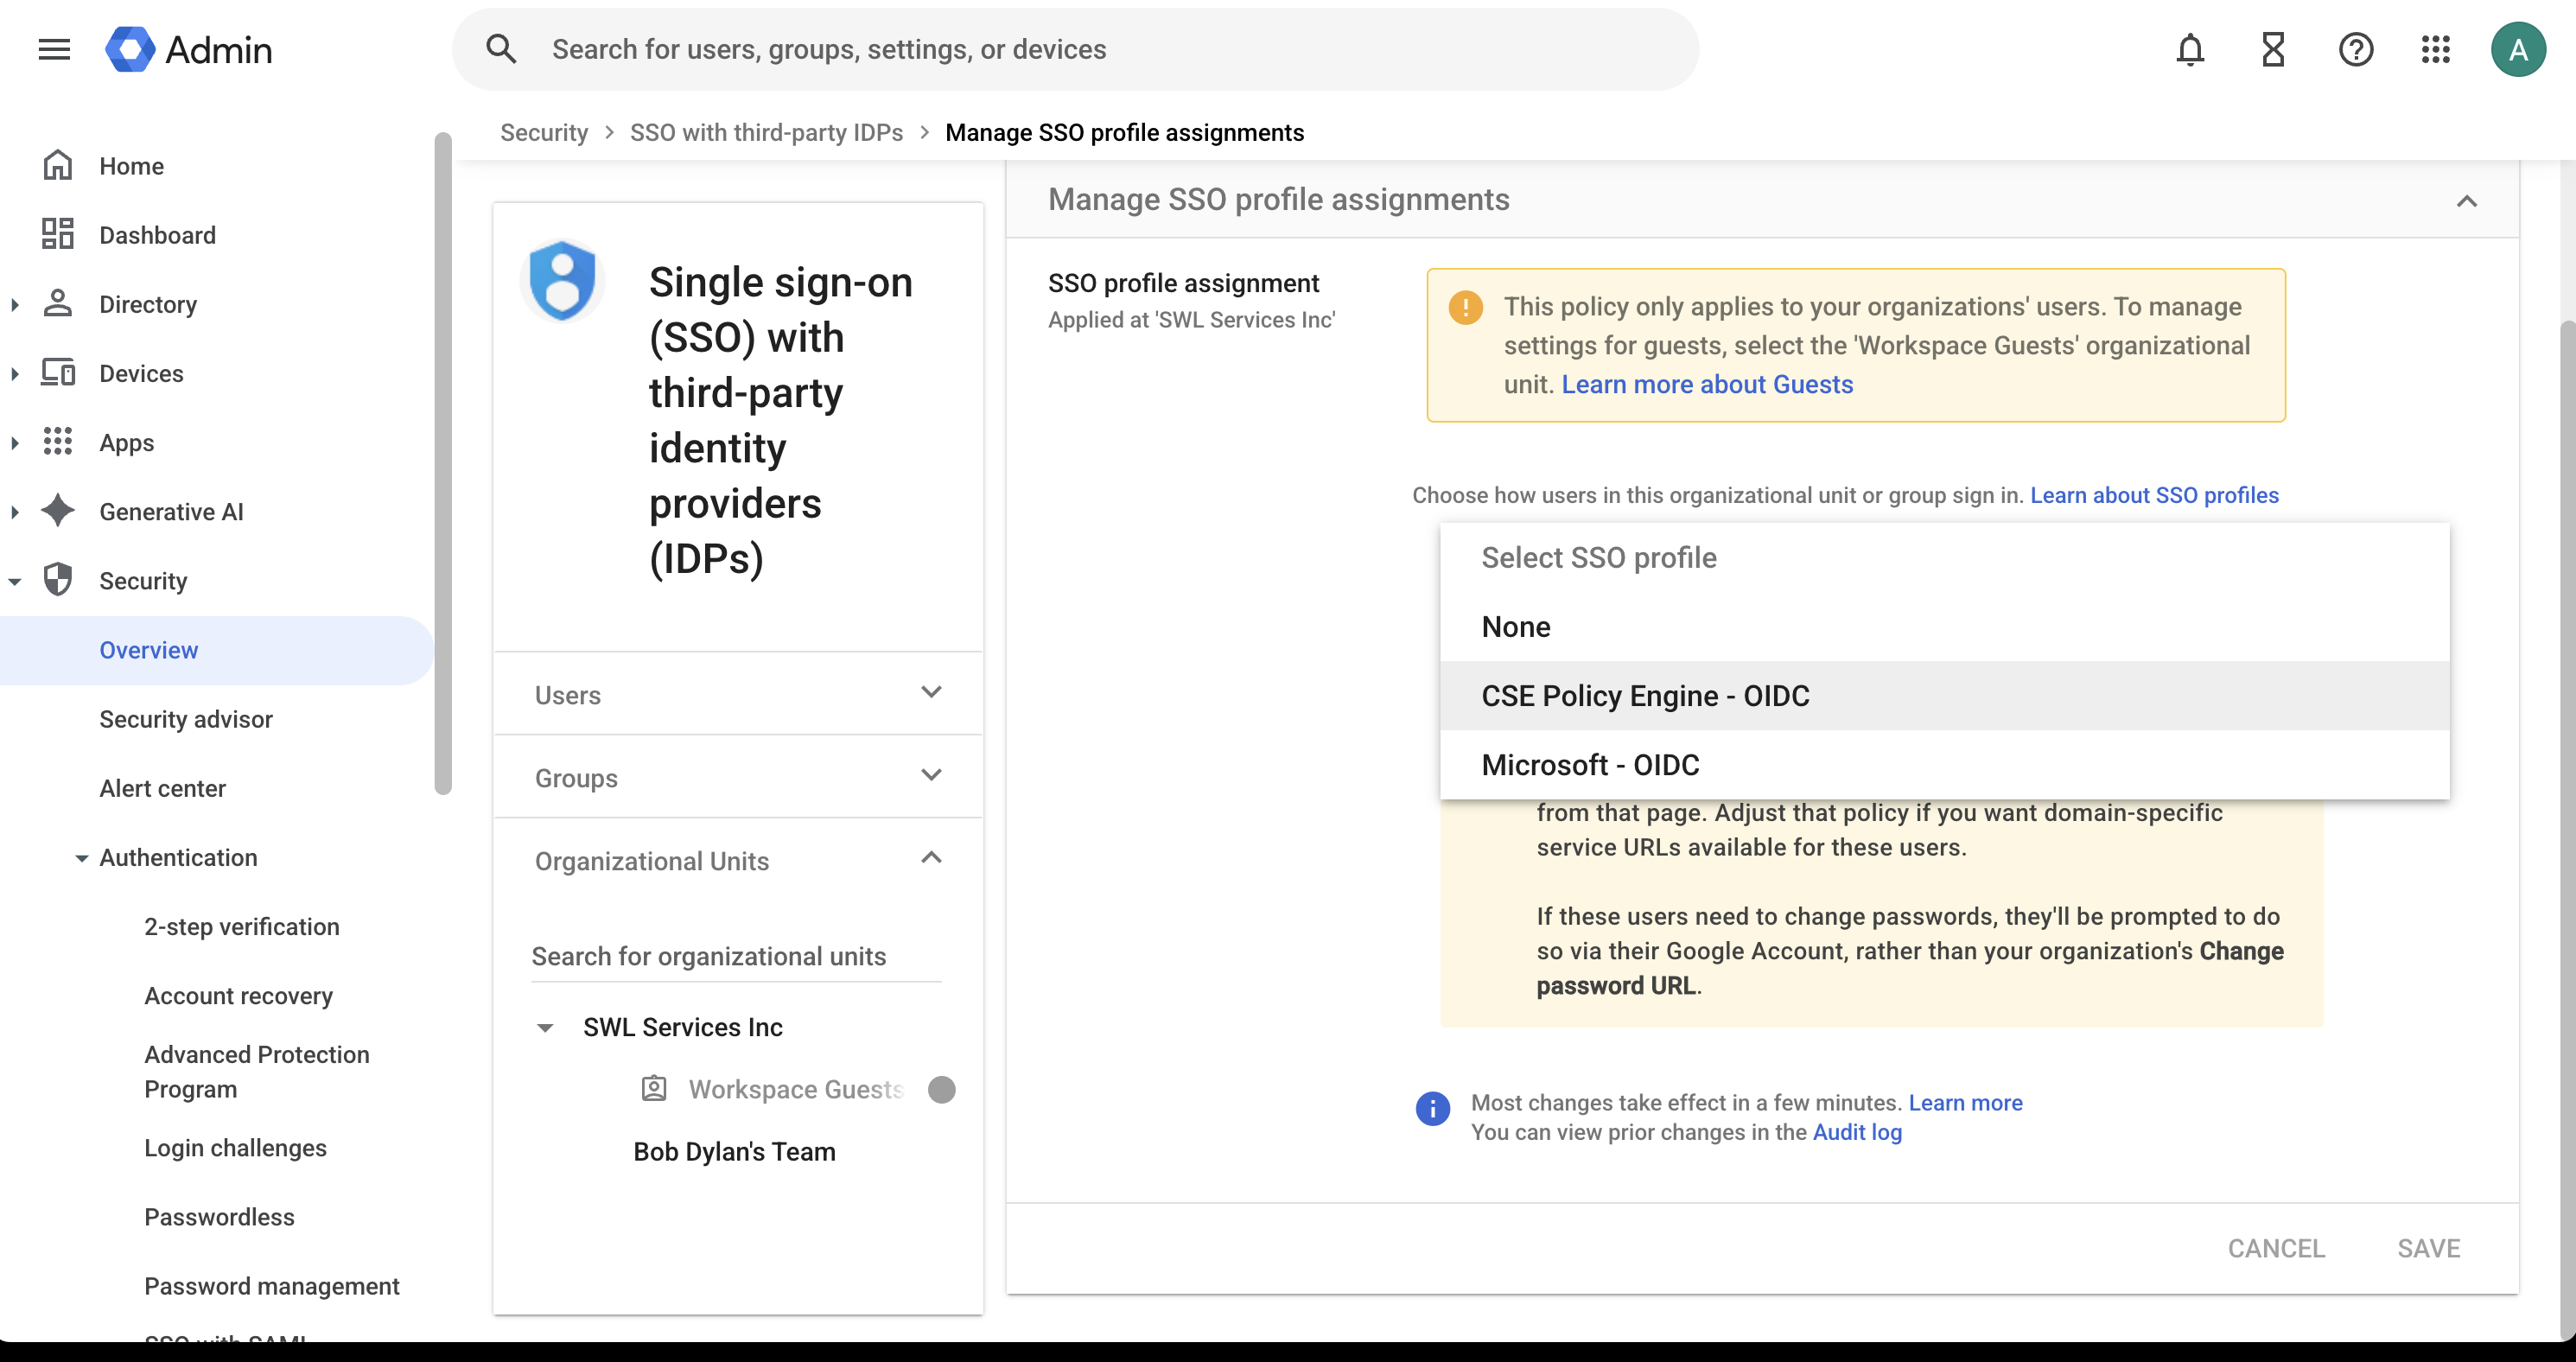
Register it as the allowed redirect URI in the CSE application from Step 1 — edit the application and enter it in the Redirect URL field (the same screen carries the OIDC/SAML protocol selection from Step 1.3):
Note: Google requires the OIDC authorization code flow, and the email claim returned by CSE must exactly match the user’s primary Google Workspace email address.
Option B — SAML profile
Enter the IdP values retrieved from CSE in Step 1.7 — map the labels as follows:
| Google SAML profile field | Value from the CSE application |
|---|---|
| IdP entity ID | The CSE IdP Entity ID / Issuer (required) |
| Sign-in page URL | The CSE Sign-in (SSO) URL (required) |
| Sign-out page URL | Leave blank (optional) |
| Change password URL | Leave blank (optional) |
| Verification certificate | Upload the CSE signing certificate (X.509, PEM or DER; up to two certificates to support rotation) |
Click Save, then open the saved profile’s SP details section and copy Google’s Service Provider values into the CSE application:
| Google value | Modern SSO profile format | Where it goes in CSE |
|---|---|---|
| ACS URL | https://accounts.google.com/samlrp/acs?rpid=<RPID> |
Redirect URL (SAML ACS) |
| Entity ID | https://accounts.google.com/samlrp/metadata?rpid=<RPID> |
Audience URI (Service Provider Entity ID) |
Warning: Copy the ACS URL and Entity ID verbatim from the SP details section of your profile — the <RPID> value is unique to each profile. Do not construct these URLs by hand. The legacy org-wide SSO profile uses different values (ACS https://accounts.google.com/a/<domain>/acs — the older https://www.google.com/a/<domain>/acs form is also accepted — and Entity ID google.com, or google.com/a/<domain> if the domain-specific issuer option is enabled).
Note: The SAML assertion from CSE must use the NameID format urn:oasis:names:tc:SAML:1.1:nameid-format:emailAddress, and the NameID value must be the user’s primary Google Workspace email address (the value is case-sensitive).
Step 3: Prevent Lockout and Redirect Loops
This step prevents infinite redirect loops and administrator lockout. In Google Workspace, loop and lockout prevention is built in and reinforced with an exemption.
- Super administrator bypass (built in). When a super administrator signs in at
admin.google.com, Google requires the full Google administrator email and Google password — not the SSO credentials — and does not redirect them to the third-party SSO sign-in page. With the modern multi-IdP SSO profiles, super administrators always fall back to Google-password sign-in; only the legacy org-wide profile can still route super administrators through SSO in some cases (IdP-initiated sign-in, or domain-specific service URL auto-redirect). This is the native break-glass path if CSE is misconfigured or unavailable. - Dedicated break-glass account. Maintain at least one super administrator account that is never routed through CSE. Place it in an OU or group that is assigned None in Step 4, and enable 2-Step Verification on it.
- Keep device onboarding off the federated path. A user whose device is not yet registered with CSE fails the device-trust check and cannot sign in to Google at all — including to complete CSE device registration, if that flow itself authenticates via Google. Place new-hire and device-onboarding populations in an OU or group assigned None (or use a Permissive-mode policy) until their devices are registered.
- Recovery path. If access is lost, recover at
https://accounts.google.com/signin/recovery, or use the Apps Admin Toolbox recovery form (https://toolbox.googleapps.com/apps/recovery/form) with DNS domain-ownership verification. Another super administrator can also reset the password from the Admin console.
Warning: Do not assign the CSE SSO profile to the OU that contains your break-glass administrators, and confirm super-administrator access works before broadening the rollout. Validate sign-in with a single pilot user (see Verify the Sign-In) before assigning the profile to a wider population.
Step 4: Route a Pilot Population (Recommended)
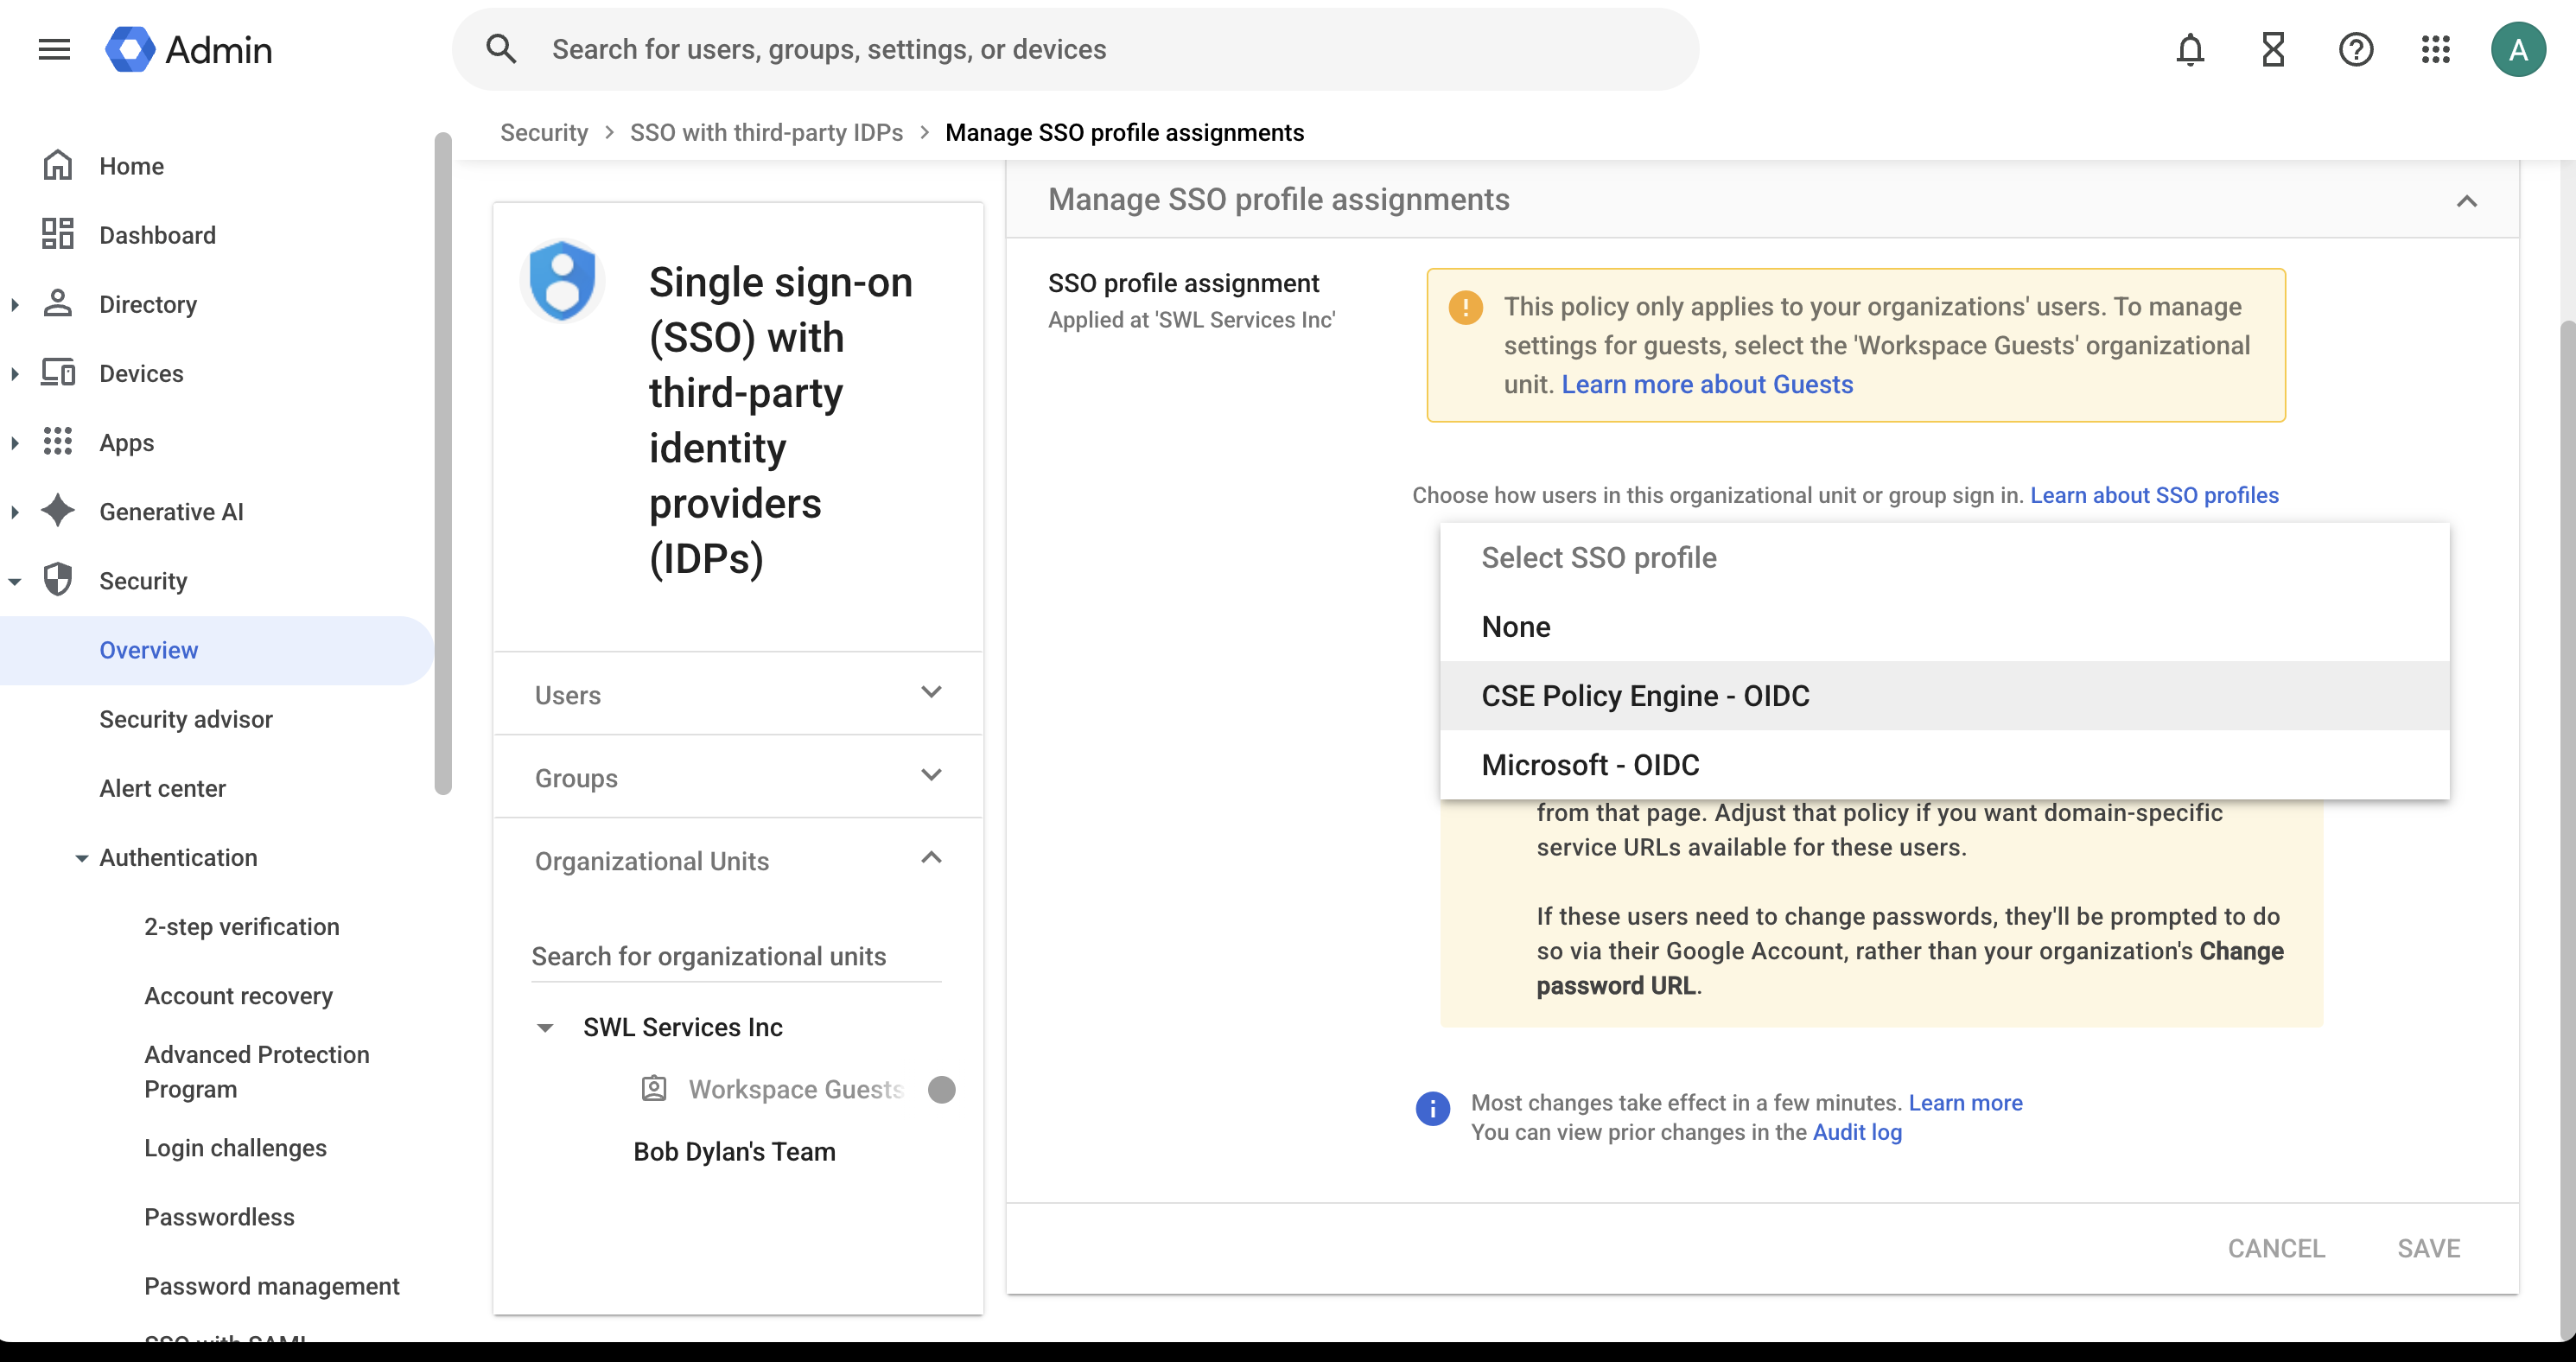
The SSO profile created in Step 2 has no effect until it is assigned. Assigning it to a small pilot OU or group is both the activation step and the test mechanism — complete this step and Verify the Sign-In before routing all users. Because Google routes by user population rather than by application, a phased rollout is performed by OU or group.
- In Security > Authentication > SSO with third-party IdP, open Manage SSO profile assignments.
- Select a pilot organizational unit or group.
- In the Select SSO profile dropdown, choose the
CSE Policy Engineprofile (the dropdown lists None — Google credentials — and each named profile). Keep the default Have Google prompt for their username, then redirect them to this profile’s IdP sign-in page. - Leave all other OUs and groups set to None (Google credentials) or Inherit, and Save.
Note: A group assignment overrides an organizational unit assignment for users who belong to that group, which lets you pilot CSE for a specific group regardless of OU placement. SSO profiles cannot be assigned on a per-user basis (a group containing a single user is the closest equivalent).
Verify the Sign-In
After assigning the profile to the pilot population:
- Allow time for the assignment to propagate (typically minutes, but Google states changes can take up to 24 hours).
- In an incognito/private browser window on a registered, trusted device (register the pilot device with the CSE desktop app beforehand), go to
https://accounts.google.comand enter the pilot user’s email address. Confirm that Google redirects to the CSE sign-in page, the device-trust check passes, and the sign-in returns to Google and completes. - Repeat from an unregistered device (or one that fails policy) and confirm sign-in is blocked at CSE (with an Enforcing-mode policy) or falls back per your Permissive-mode design.
- In the Admin console, confirm the sign-ins under Reporting > Audit and investigation > User log events (login events show the SSO profile used).
Sessions persist. SSO profile assignment is evaluated only at sign-in. Users who are already signed in keep their sessions until sign-out or session expiry — an already-signed-in tester sees no redirect (a false negative), and devices that fail CSE policy are not cut off immediately after rollout. Test in a fresh incognito window, and force re-authentication where needed via Directory > Users > user > Security > Sign-in cookies > Reset (this signs the user out of all sessions), or by shortening session length policies.
Step 5: Route All Users
Once the pilot is validated, broaden enforcement to all users.
- Confirm the web policy’s enforcement mode is set intentionally: keep Permissive if unregistered devices must still be able to fall back during migration, and move to Enforcing once the fleet is registered (Step 1.5).
- In Manage SSO profile assignments, assign the
CSE Policy Engineprofile at the root organizational unit so it applies to all users by inheritance. - Keep the break-glass and onboarding OUs or groups from Step 3 assigned to None.
All assigned users now authenticate through CSE, and zero trust policy is enforced before Google completes sign-in to any brokered SaaS application. Remember that existing sessions persist until they expire or are signed out (see Verify the Sign-In).
Additional Configurations
Passwordless authentication
CSE can authenticate users by device certificate without a password. Edit the IdP-routed application created in Step 1 and enable Passwordless Authentication (under the application’s Advanced Configurations); Google receives only the resulting assertion. See Passwordless authentication.
User exemptions
To exclude specific users from CSE enforcement, assign their OU or group to None in Manage SSO profile assignments so that they continue to authenticate with their Google credentials. For the legacy org-wide SSO profile, Network masks (IP ranges in CIDR notation) can additionally restrict which source IP addresses are redirected to SSO; network masks apply only to the legacy profile and only to domain-specific service URLs.
Client behavior to validate
Validate every sign-in surface during the pilot, not only desktop browsers:
- Mobile account setup and native apps. Adding the Google account on Android or iOS and signing in inside native Google apps (Gmail, Drive) performs the SSO flow in an embedded webview, where client-certificate (mutual TLS) prompts — the basis of CSE device trust — may not work. A rollout that passes desktop-browser testing can still strand mobile users; validate on the mobile platforms your users run.
- Google Cloud. Interactive sign-ins to
console.cloud.google.comandgcloudby assigned users also route through CSE. Service accounts are not affected (they do not perform interactive SSO).
MFA and 2-Step Verification
If CSE (or an upstream identity provider) already enforces multi-factor authentication, Google’s 2-Step Verification can produce a duplicate prompt. Control this with Post-SSO verification:
- Go to Menu > Security > Authentication > Login challenges.
- Open Post-SSO verification.
- To avoid duplicate MFA, set the policy to bypass additional challenges and 2-Step Verification for users who sign in through the CSE SSO profile.
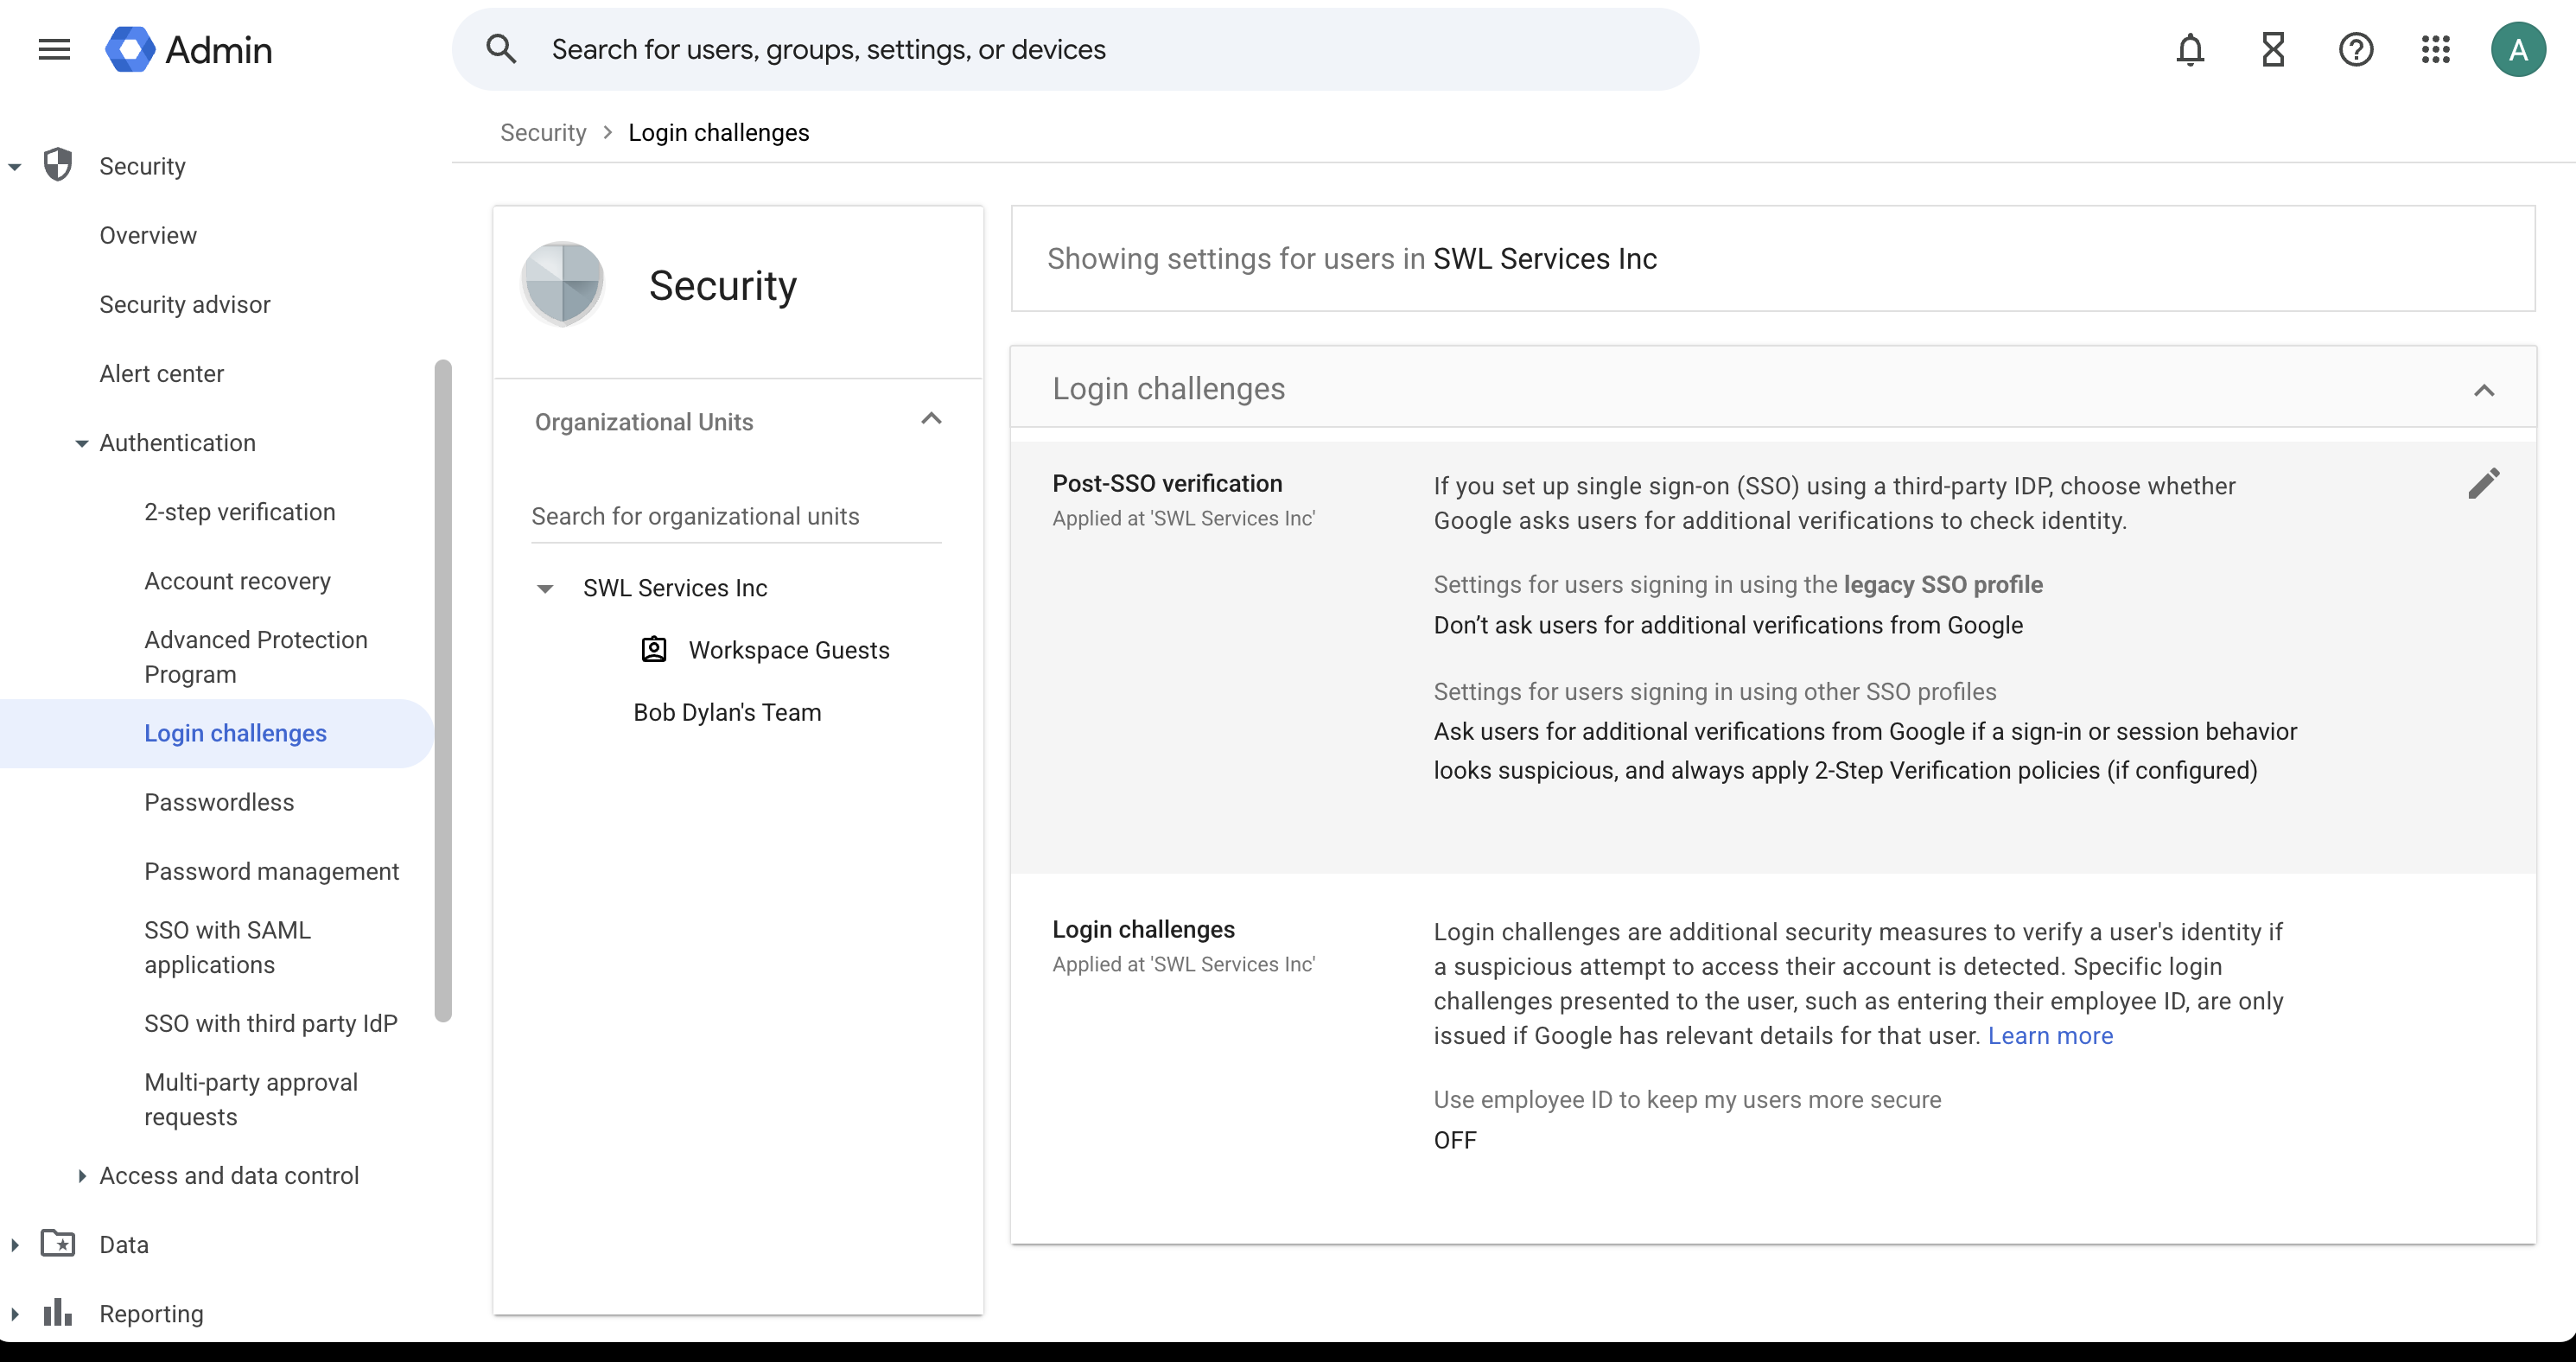
Note: Defaults differ by profile type. The legacy SSO profile bypasses post-SSO challenges by default, whereas the modern SSO profiles apply post-SSO challenges by default. Set the policy explicitly to match your design.
Provisioning
Google Workspace SSO performs authentication only — it does not create accounts. During sign-in, Google matches the assertion’s NameID (or OIDC email claim) to an existing Google Workspace account. Pair SSO with a provisioning mechanism such as Google Cloud Directory Sync (GCDS), Google’s Directory Sync (beta), or inbound SCIM provisioning so that accounts exist before users attempt to sign in.
Expected Behaviour
- A user on a registered, trusted device is redirected from Google to CSE, satisfies the web policy, and CSE returns an assertion. Google completes sign-in to the SaaS application.
- A user on an untrusted or unregistered device is redirected to CSE but fails the web policy. With an Enforcing-mode policy, CSE does not issue an assertion, and the user cannot complete sign-in to the application until the device meets policy.
- A user with an existing session is unaffected until the session ends — enforcement applies at the next sign-in, not retroactively.
- A super administrator signing in at
admin.google.comis not redirected to CSE and retains direct access with the Google password, preventing lockout.