Service Tunnel Troubleshooting
General diagnostic process for resolving Service Tunnel issues
- Updated on
- 20 minutes to read
- Overview
- Steps for macOS users
- Step 1: Determine whether your WireGuard Service is running
- Step 2: Determine whether your Service Tunnel is Connected
- Step 3: Contact Support
- Step 4: (Optional) Troubleshooting connectivity
- Steps for Windows users
- Step 1: Determine whether Tunnel Service is running
- Step 2: Determine whether your Service Tunnel is Connected
- Step 3: Contact Support
- Step 4: (Optional) Troubleshooting connectivity
Overview
Service Tunnel troubleshooting provides steps to take if you come across issues that may involve your Service Tunnel not working, resources not being available, DNS issues, delayed access to resources, etc.
Admins can find more information on our recommended Service Tunnel deployment method here.
The doc below offers a general diagnostic process for both macOS users and Microsoft users. Troubleshooting docs related to specific Service Tunnel issues are linked in this section.
Steps for macOS users
If you’re on a macOS device and you’re unable to access resources protected via Service Tunnel, complete the following troubleshooting steps.
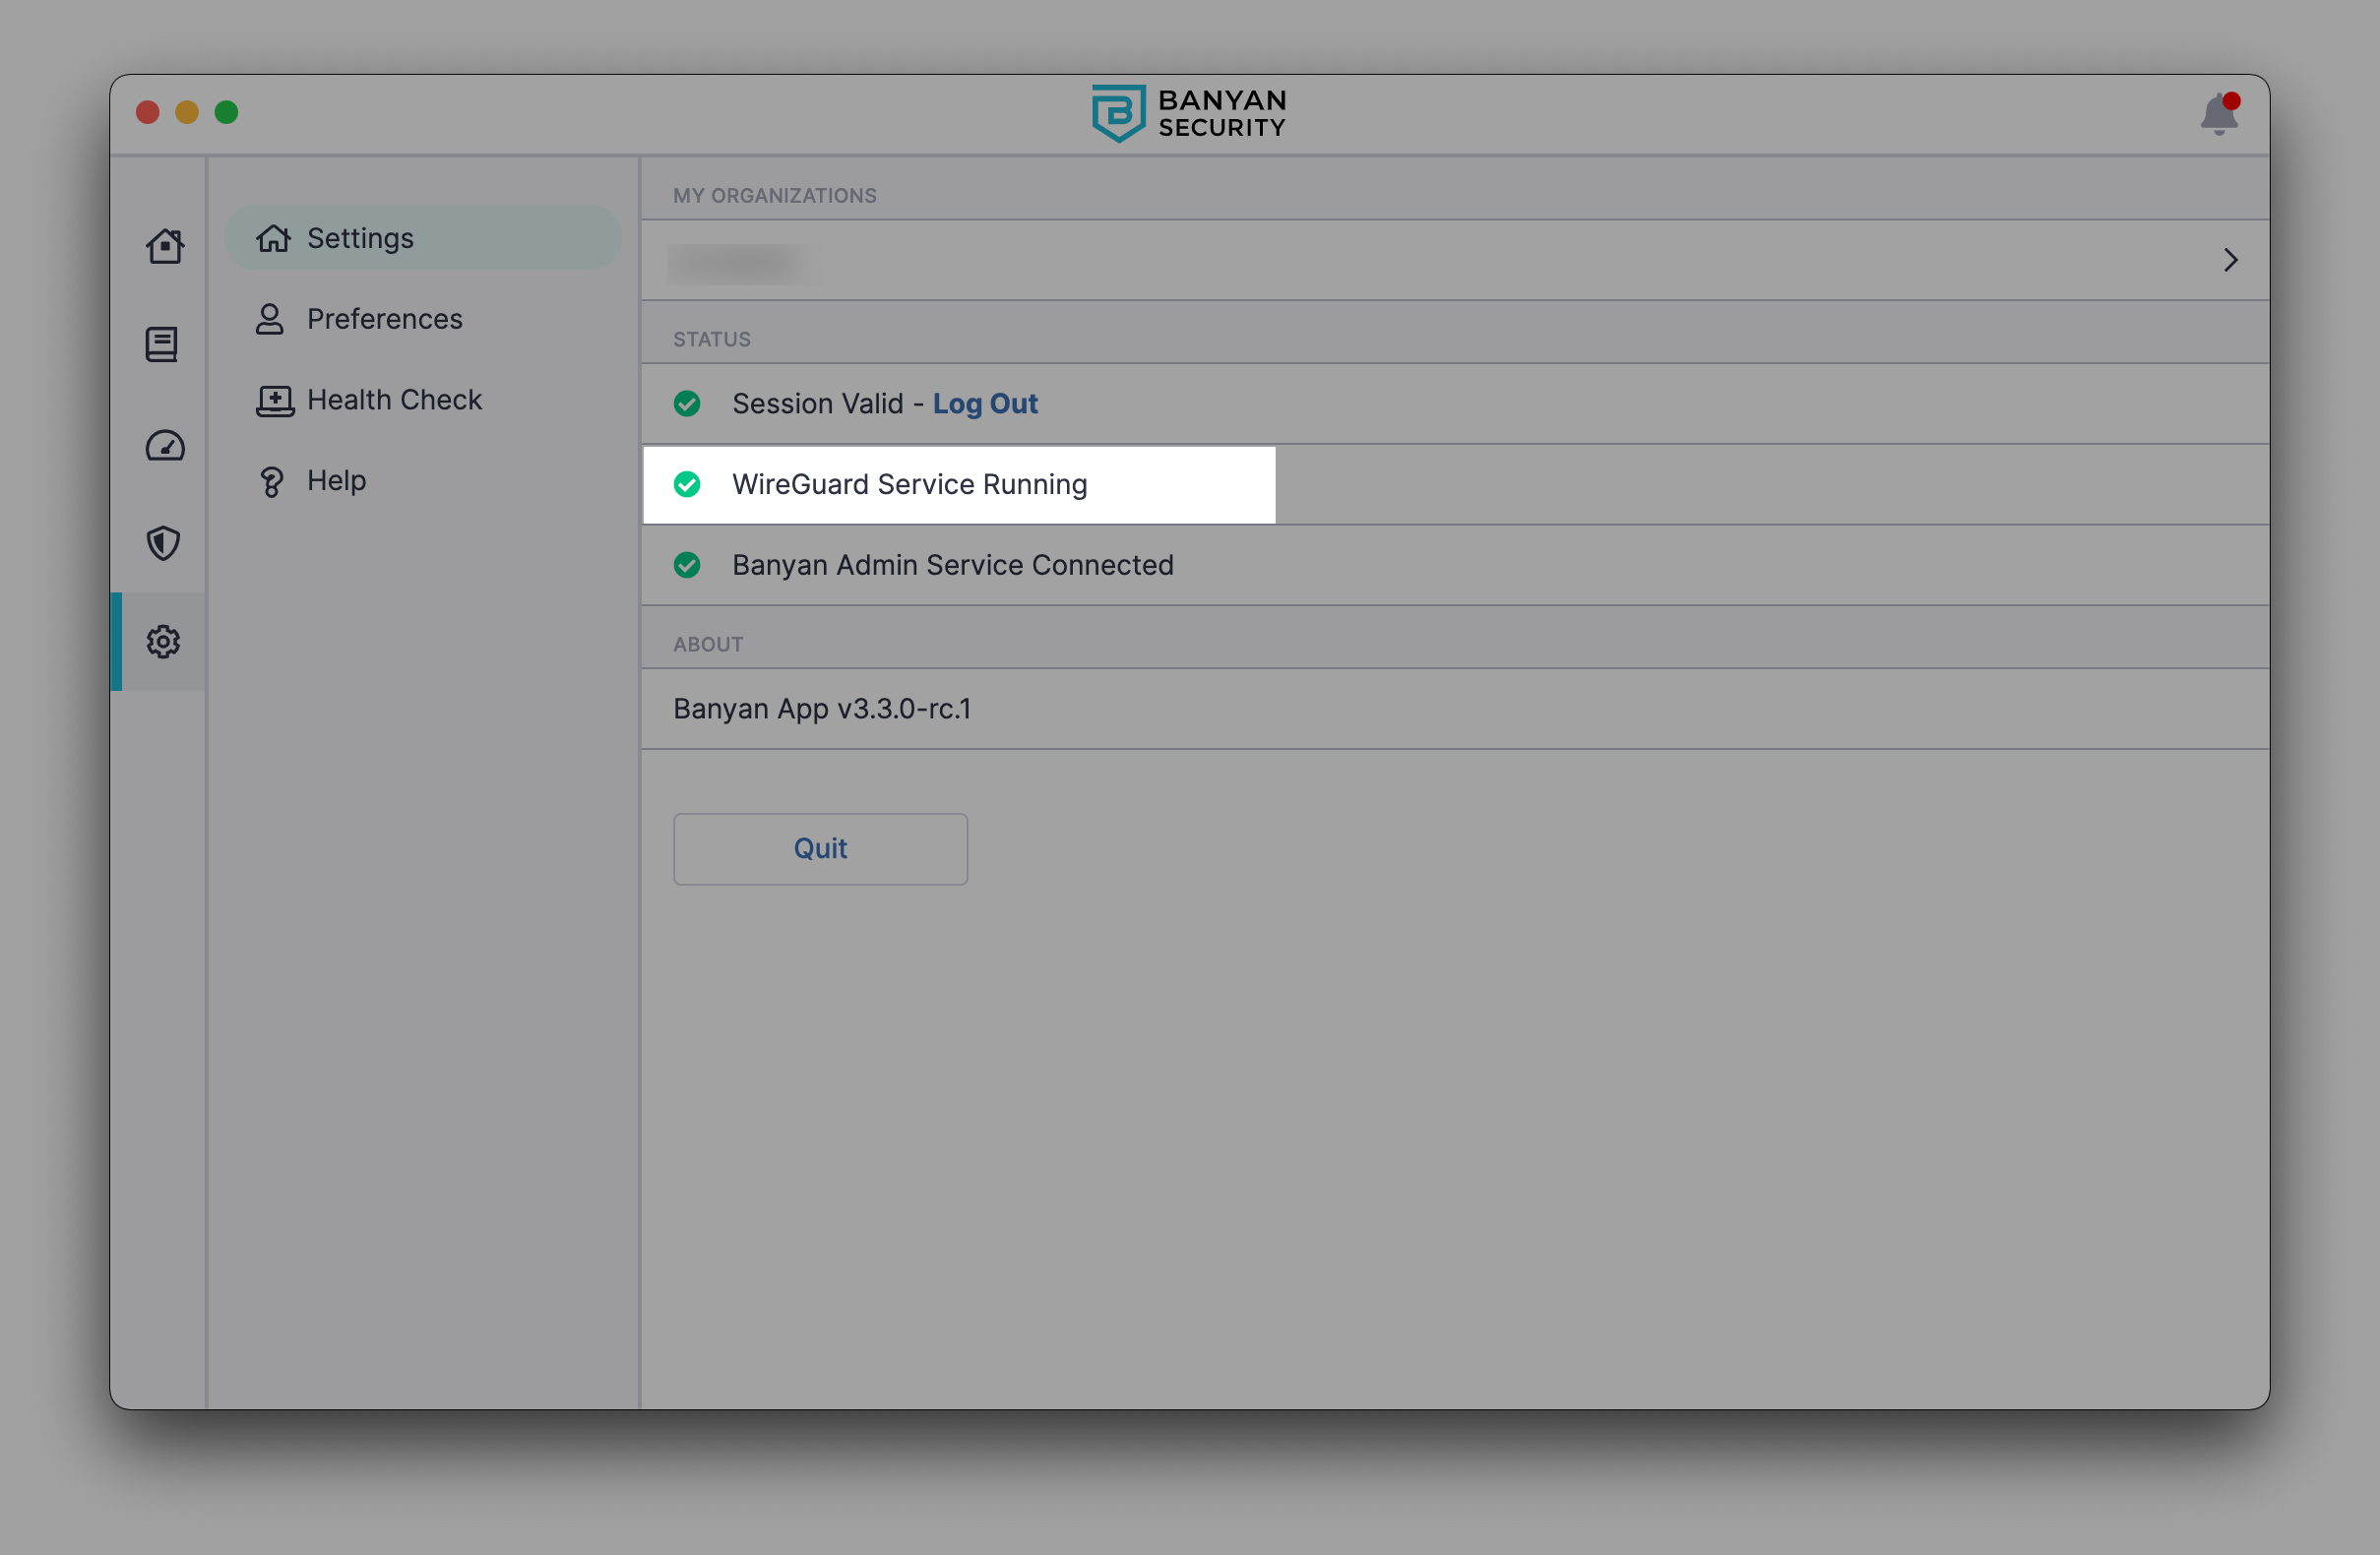
Step 1: Determine whether your WireGuard Service is running
1.1 In the desktop app, navigate to Settings, and confirm that your WireGuard Service is running.
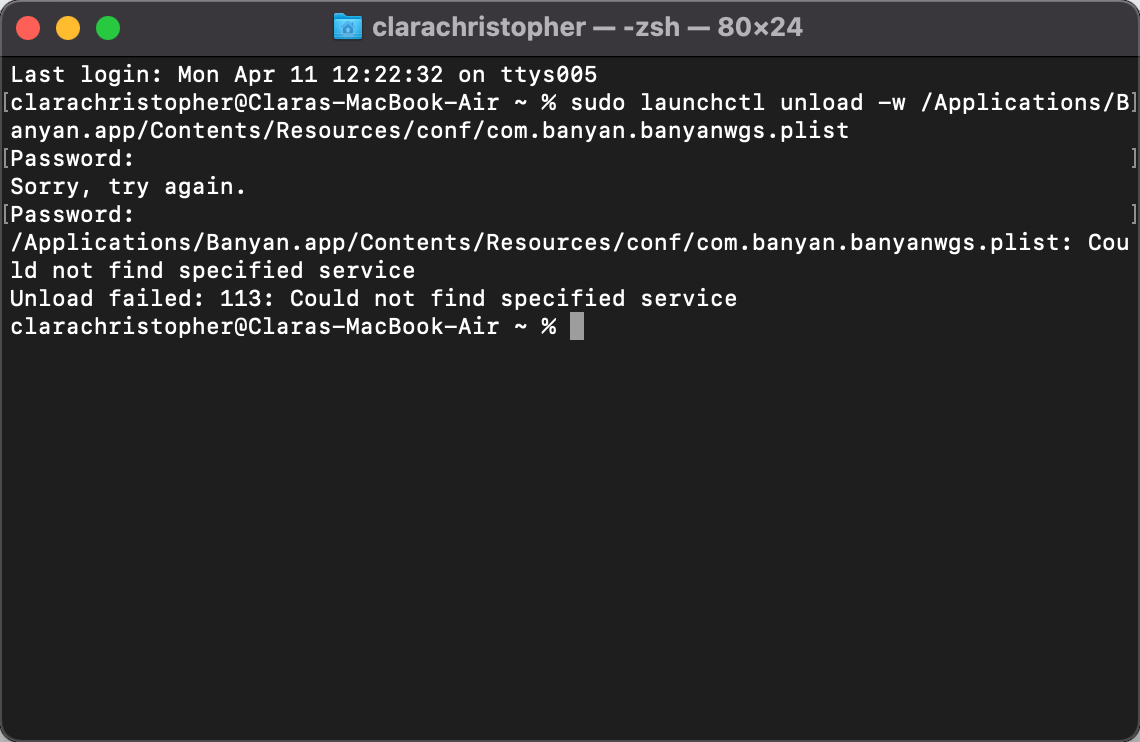
1.2 If your WireGuard Service is not running and you’re using CSE desktop app version 3.28.1 or older, open your Terminal and run the following commands:
sudo launchctl unload -w /Applications/Banyan.app/Contents/Resources/conf/com.banyan.banyanwgs.plist
sudo launchctl load -w /Applications/Banyan.app/Contents/Resources/conf/com.banyan.banyanwgs.plist
If your WireGuard Service is not running and you’re using CSE desktop app version 4.0.0 or later, open your Terminal and run the following commands:
sudo launchctl unload -w /Applications/SonicWall Cloud Secure Edge.app/Contents/Resources/conf/com.sonicwall.csewgs.plist
sudo launchctl load -w /Applications/SonicWall Cloud Secure Edge.app/Contents/Resources/conf/com.sonicwall.csewgs.plist
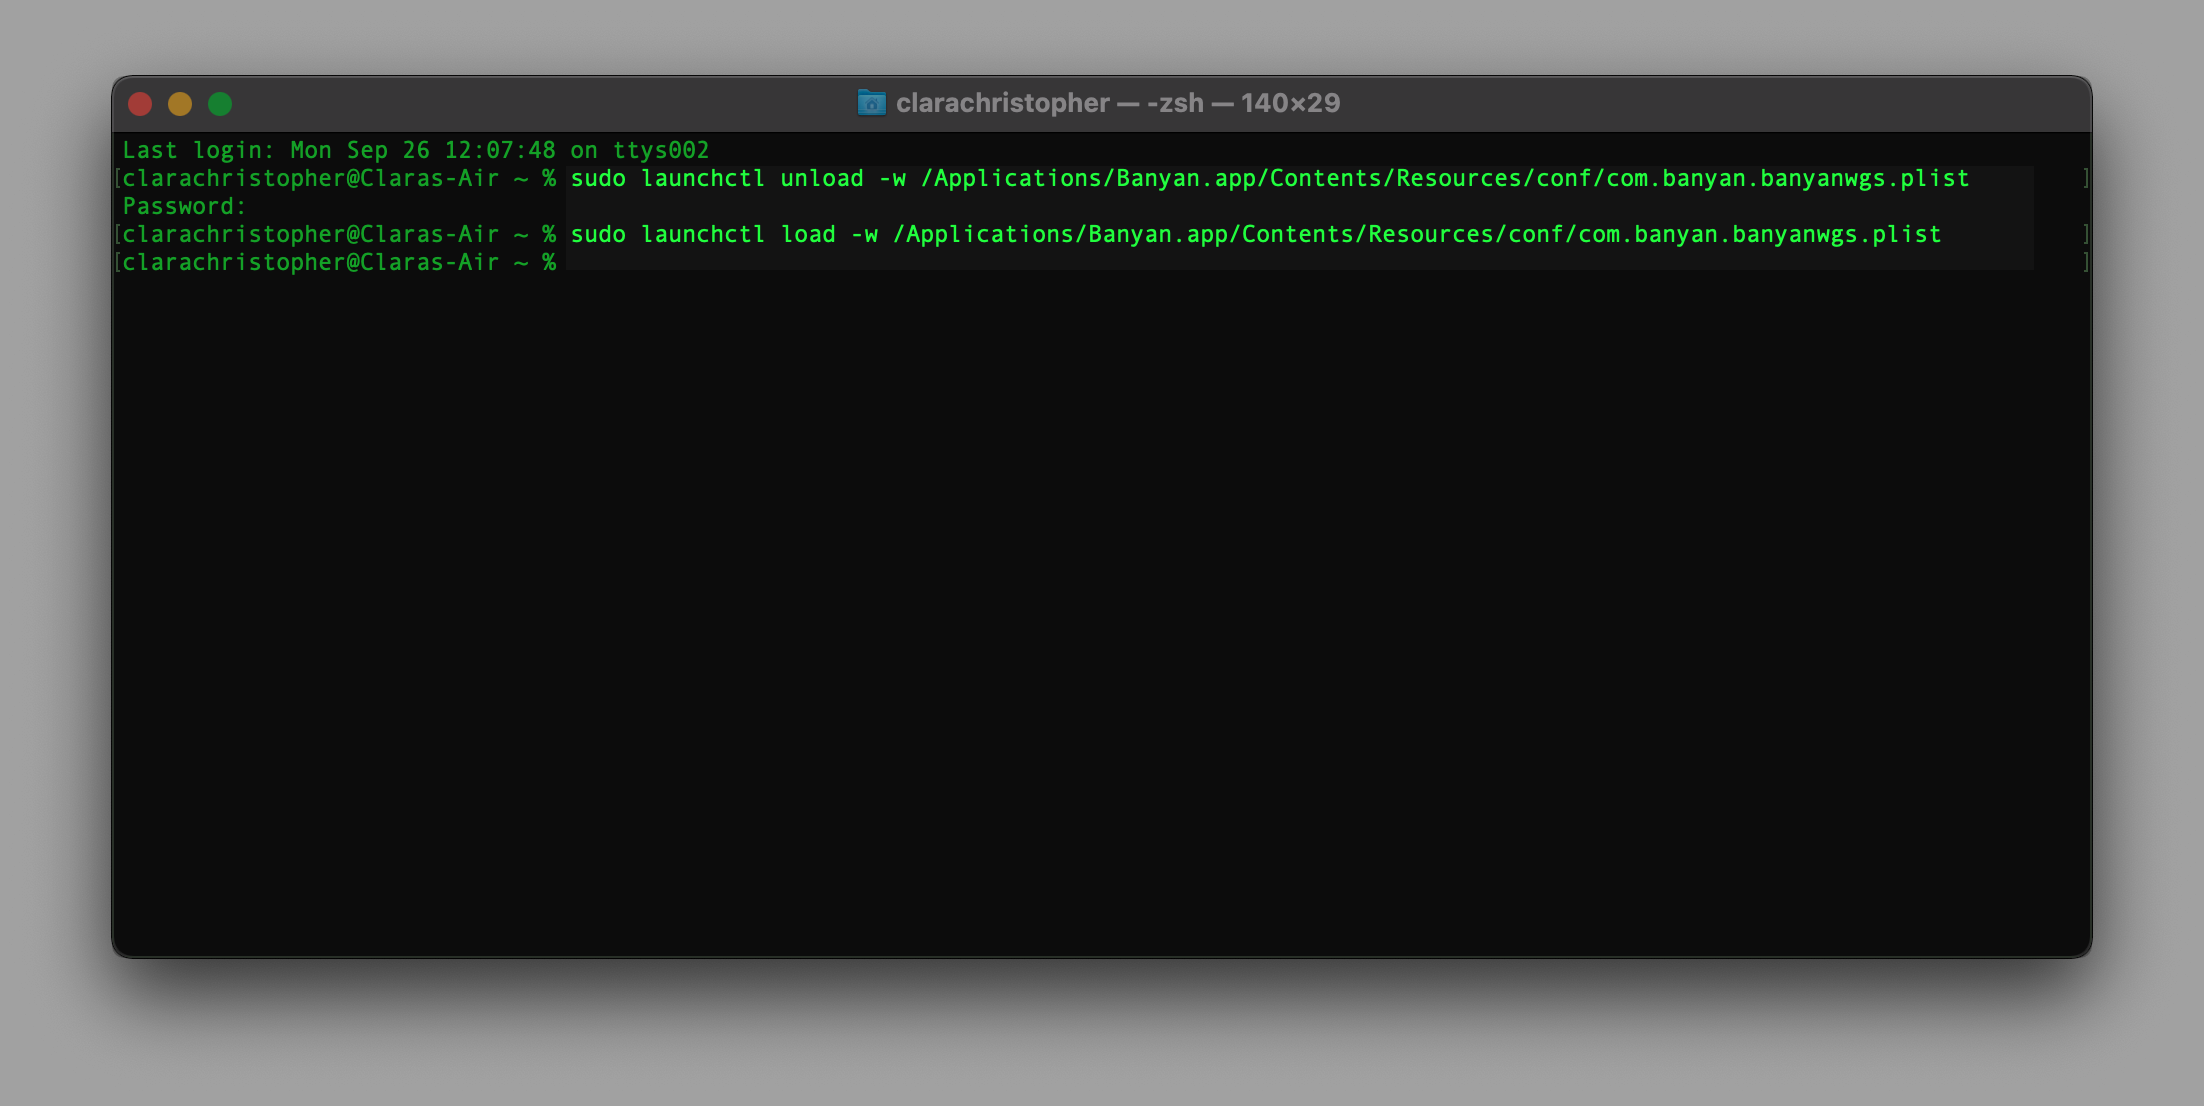
Note: If the above command fails with the error message below, uninstall and reinstall the app. If uninstalling and reinstalling the app doesn’t resolve the issue, see Step 3 below.
1.4 Confirm whether your Service Tunnel process is running by verifying that the WireGuard Service is running (in the WireGuard Service Running status under Settings). If WireGuard Service is not running, see Step 3 below.
Step 2: Determine whether your Service Tunnel is Connected
2.1 Navigate to the Home Page in the desktop app, and select your preferred Service Tunnel from the dropdown menu.
2.2 Click the blue ‘Power’ button to ensure that your Service Tunnel is connected.
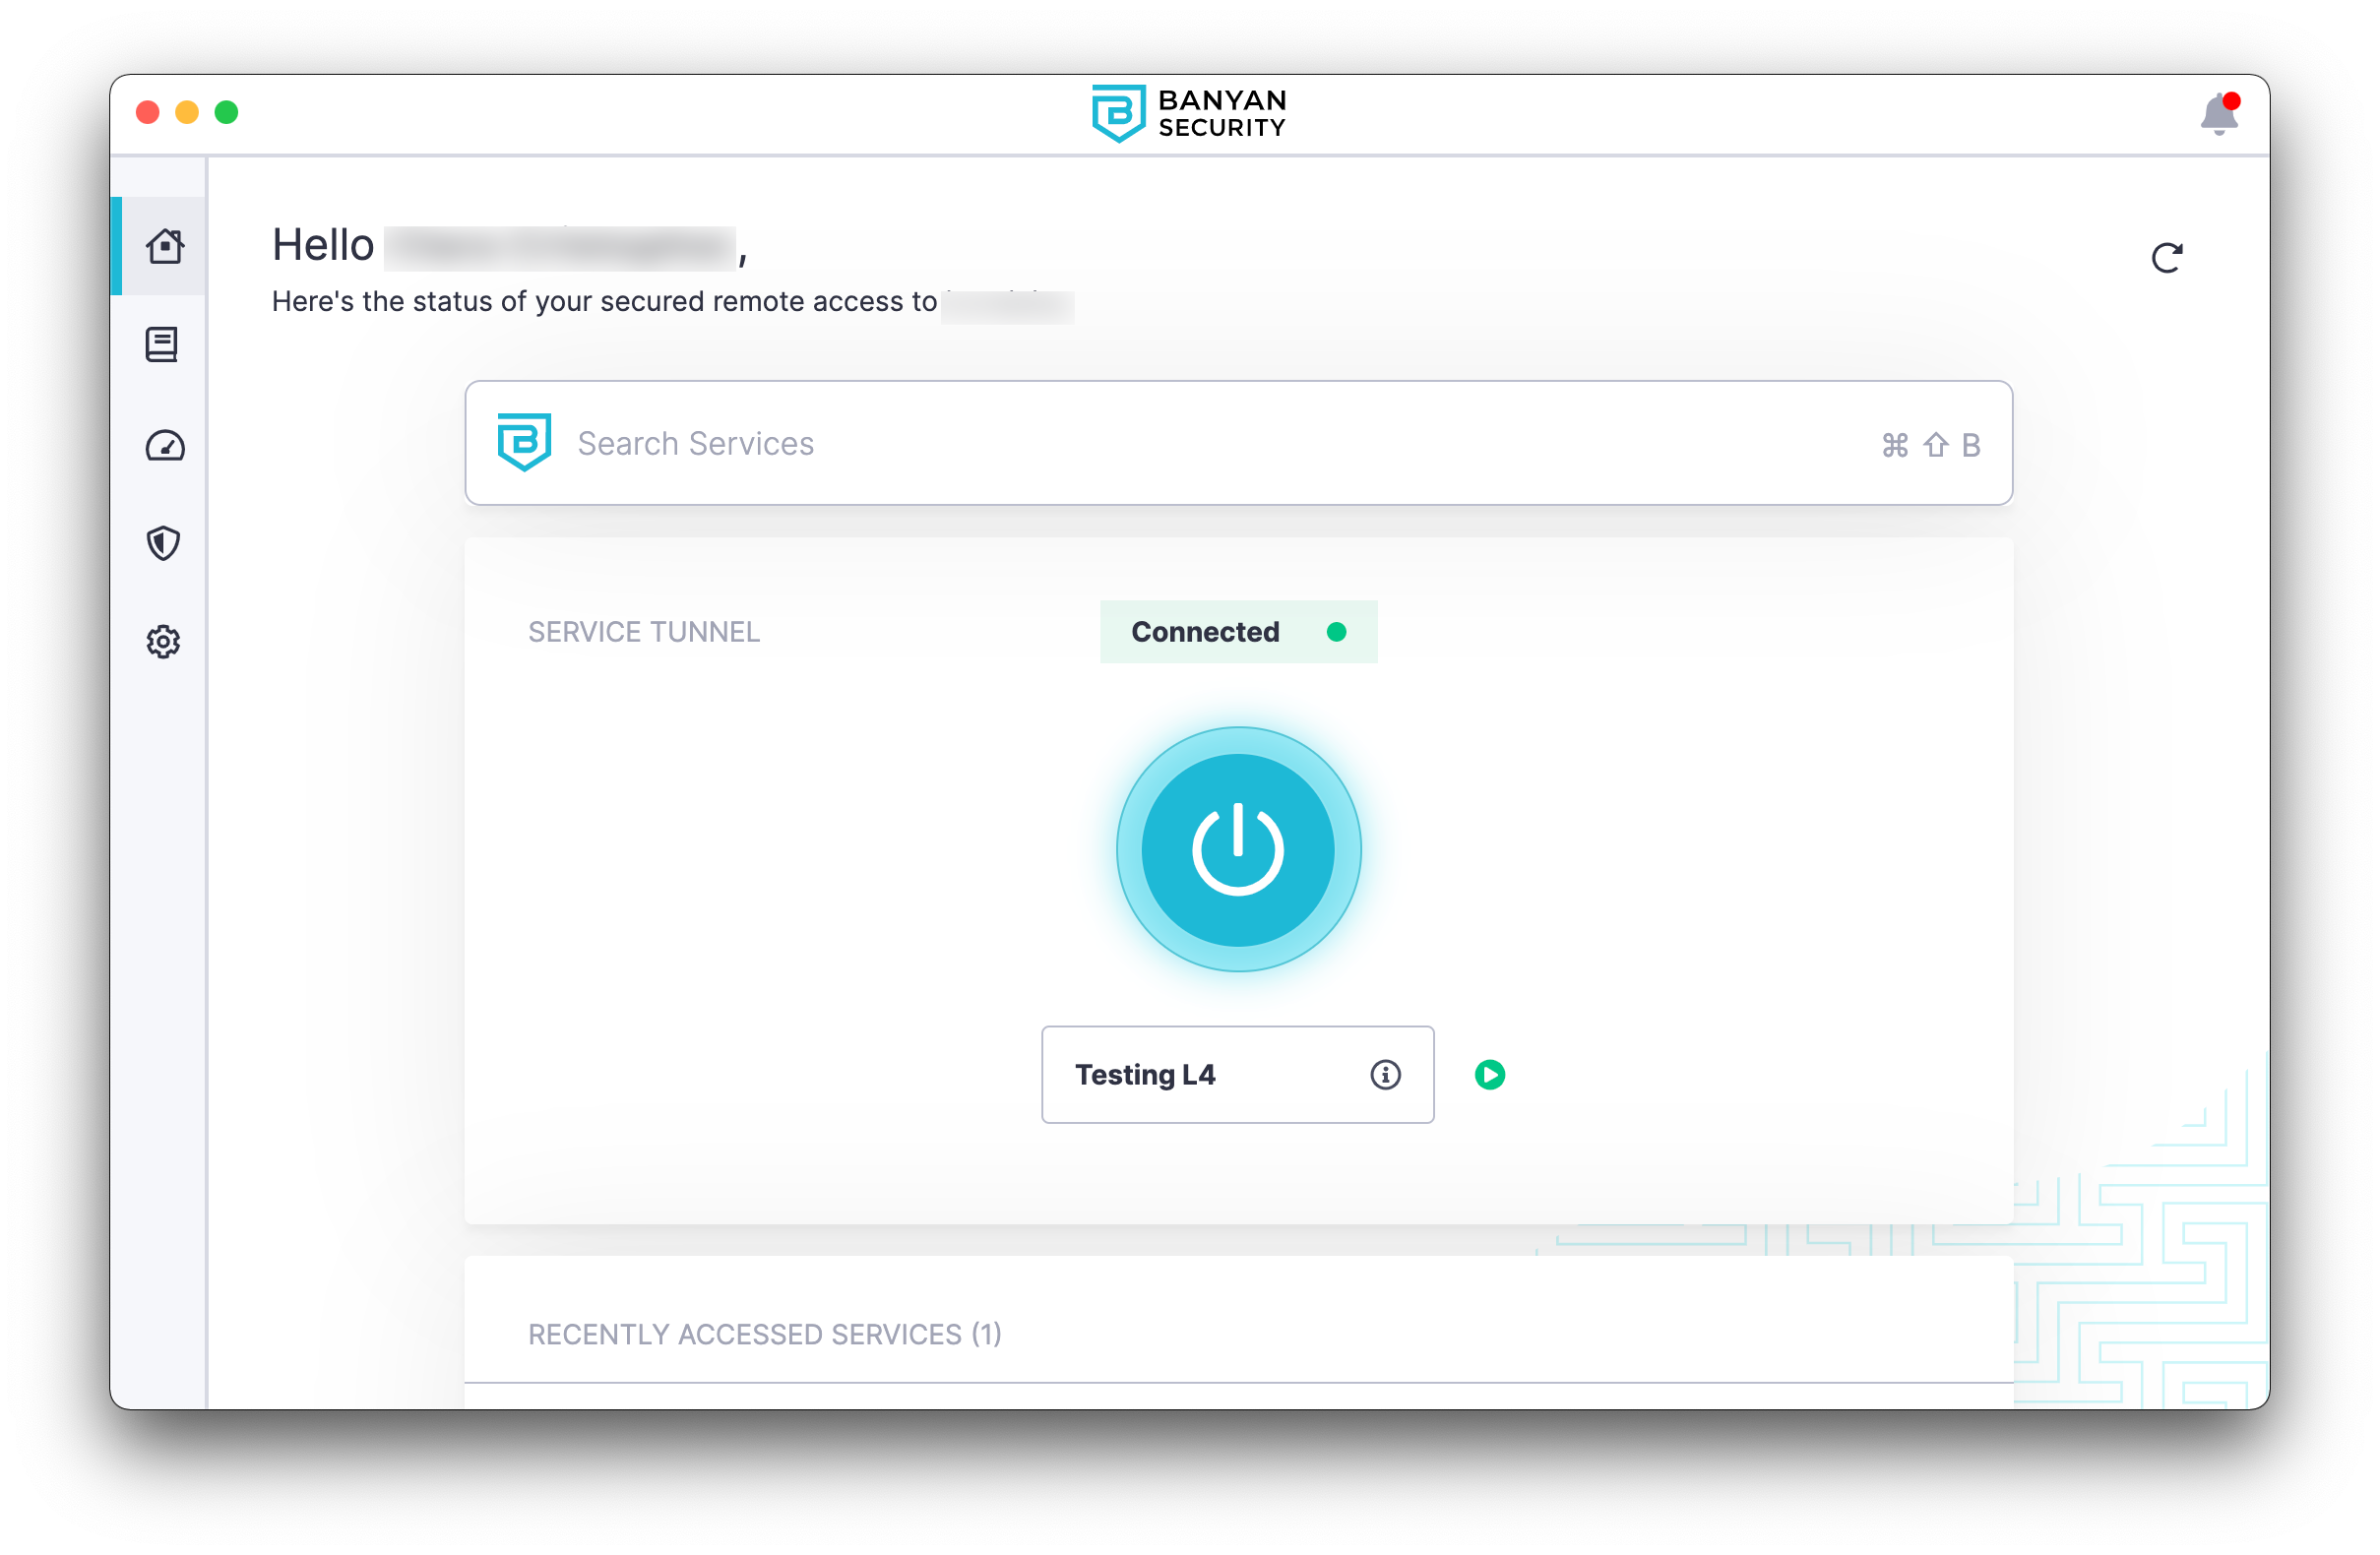
2.3 If Autorun is configured for your Service Tunnel, it should already be connected.
2.4 If your Service Tunnel shows as Connected and you’re still unable to access resources, see Step 3. If you need to troubleshoot connectivity issues, see Step 4.
Step 3: Contact Support
3.1 Complete the following steps:
(a) Open the desktop app.
(b) Navigate from Settings > Health Check.
(c) Select Run Diagnostic Tool.
(d) Select Send Log Files to SonicWall CSE Support.
Step 4: (Optional) Troubleshooting connectivity
4.1 If using CSE desktop app version 3.28.1 or older, run the following command on Terminal to validate the WireGuard service configuration:
sudo /Applications/Banyan.app/Contents/Resources/bin/wg
If using CSE desktop app version 4.0.0 or later, then use the following command:
sudo /Applications/SonicWall\ Cloud\ Secure\ Edge.app/Contents/Resources/bin/wg
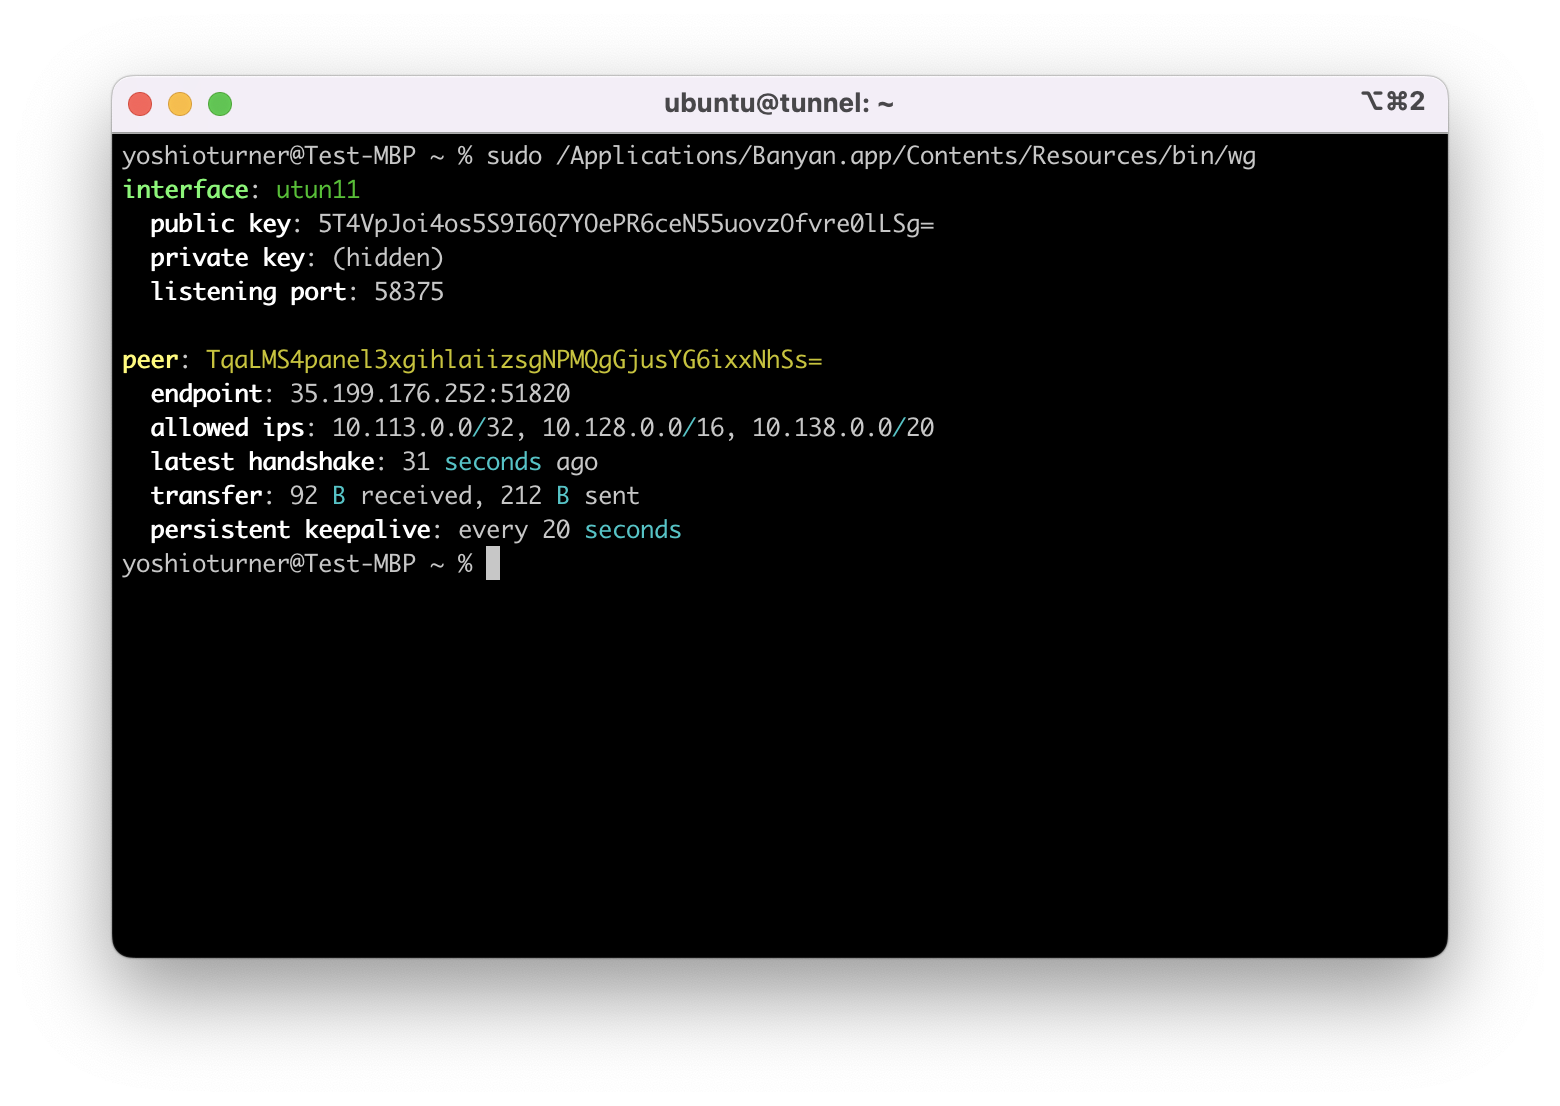
Output details:
-
peer: you should see the public key of the Access Tier (this can be confirmed by running the same
wgcommand on the Access Tier) -
endpoint: this should be in the following format– IP:Port
- Verify that the IP address shown here is pointing to the Access Tier’s public IP address (if it doesn’t match the IP address, check the DNS entry for Access Tier’s domain name).
- Verify the port shown is the same as the configured UDP Port Number on the Access Tier (also confirm this same port is open on the cloud provider side, e.g., Firewall configuration on GCP, Security Group configuration on AWS, etc.).
-
allowed ips: Confirm these CIDRs match the Backend CIDRs on the Access Tier Service Tunnel configuration (if the CIDRs don’t match, ensure that the configuration is correct).
-
latest handshake: This parameter indicates that the handshake was successful and that the tunnel is working. The value is periodically updated and it should not be more than 180 seconds. A higher value indicates that the tunnel is not currently working. (If you don’t see this section, it means that the tunnel was not established and needs further troubleshooting).
-
transfer: Every time you run this command, confirm that both counts are incremented (if both the received and sent counters are not incrementing, this would indicate that there are connectivity issues between client and the Access Tier, i.e. the Firewall or Security Group rules).
If the parameters in your output match the description, proceed to the next step.
4.2 Check your connectivity to the Access Tier:
Ensure that you’re able to ping the CIDR with /32 from the allowed ips section (from the output of the above command):
ping <IP address> (Example: ping 10.113.0.0)
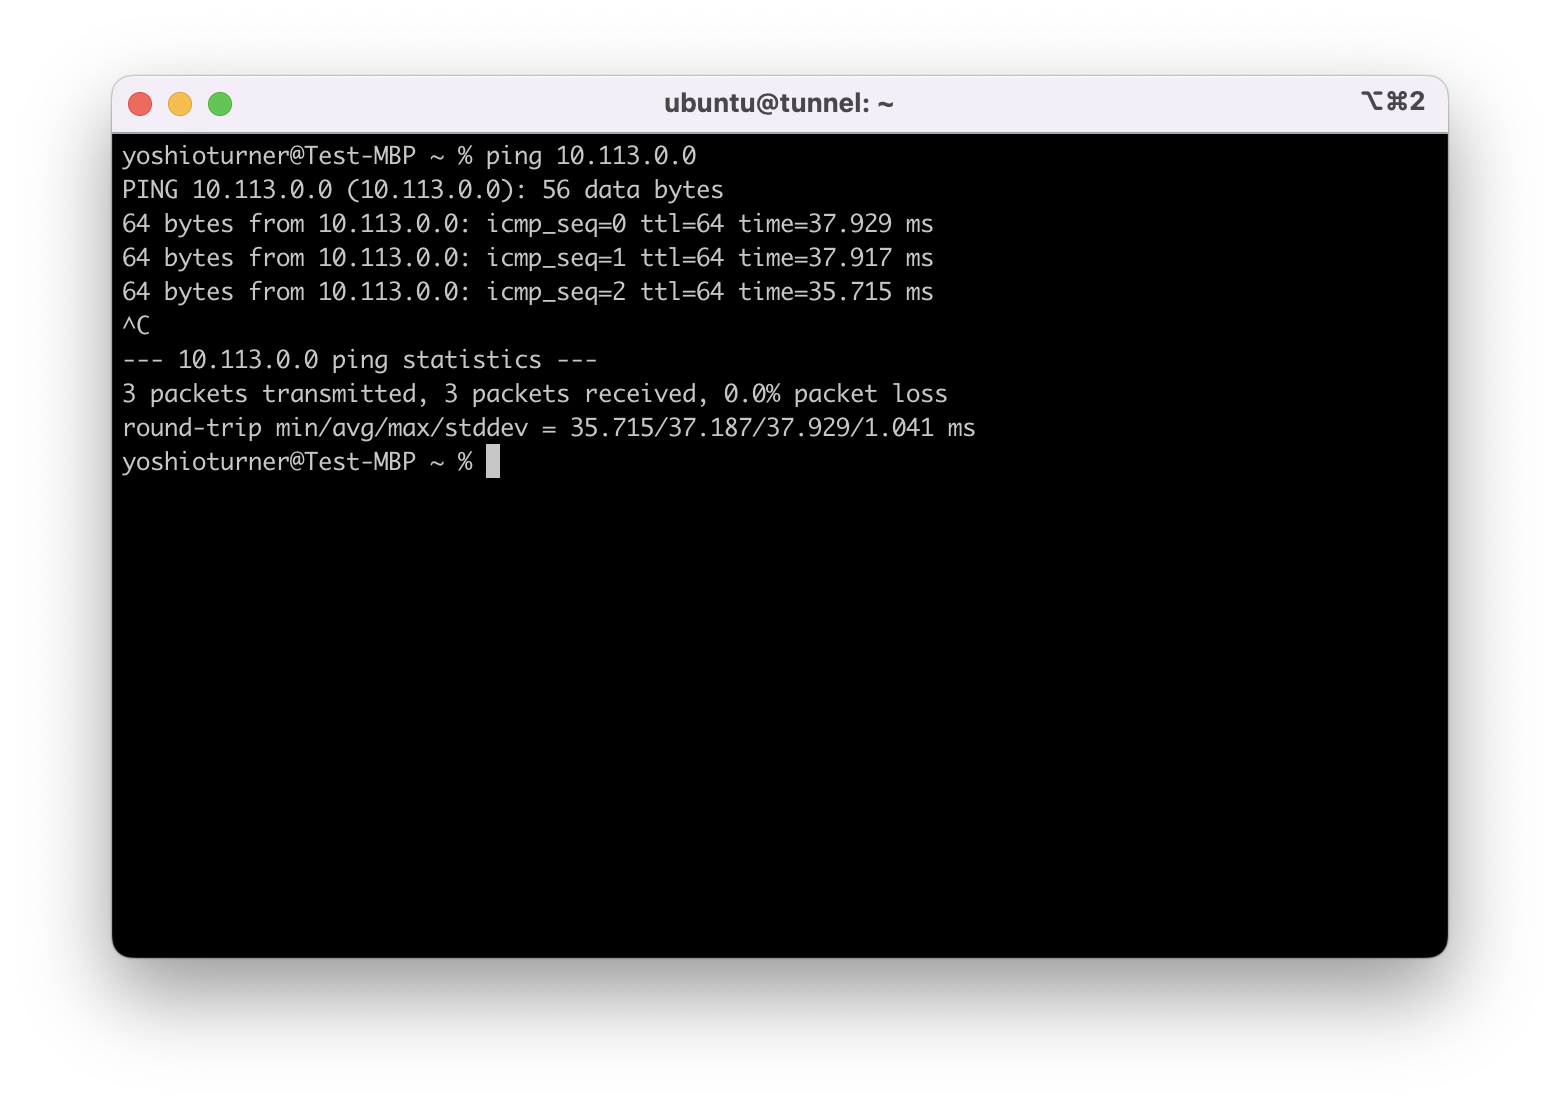
4.3 If the ping command fails, ensure that ping is enabled. If it is, check your network connectivity. If this is working, proceed to the next step.
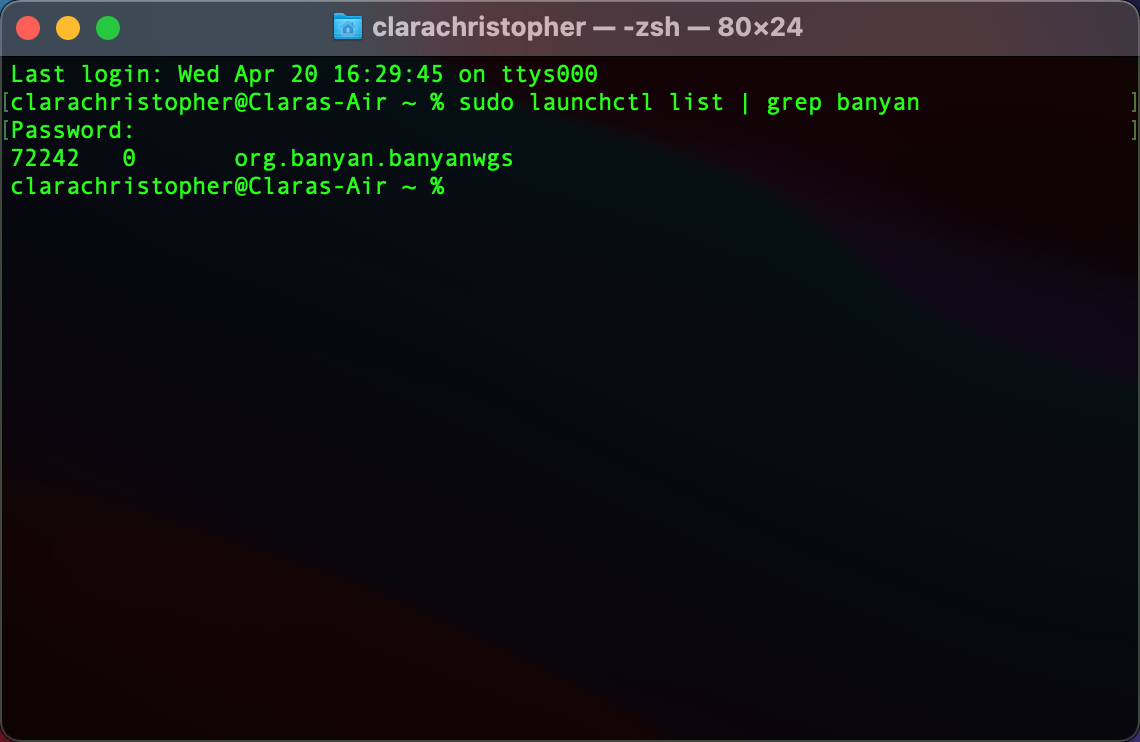
4.4 Verify that the banyan-wgs or sonicwall-cse-wgs service is running, using the following command:
sudo launchctl list | grep banyan
4.5 Now you have verified all Service Tunnel related configuration items. If all of the above are working correctly, and you’re still unable to access the resource(s) behind it, verify that you are able to resolve the host name or ping the IP address of your CSE-protected resource.
If you can’t resolve the host name, proceed to the next step.
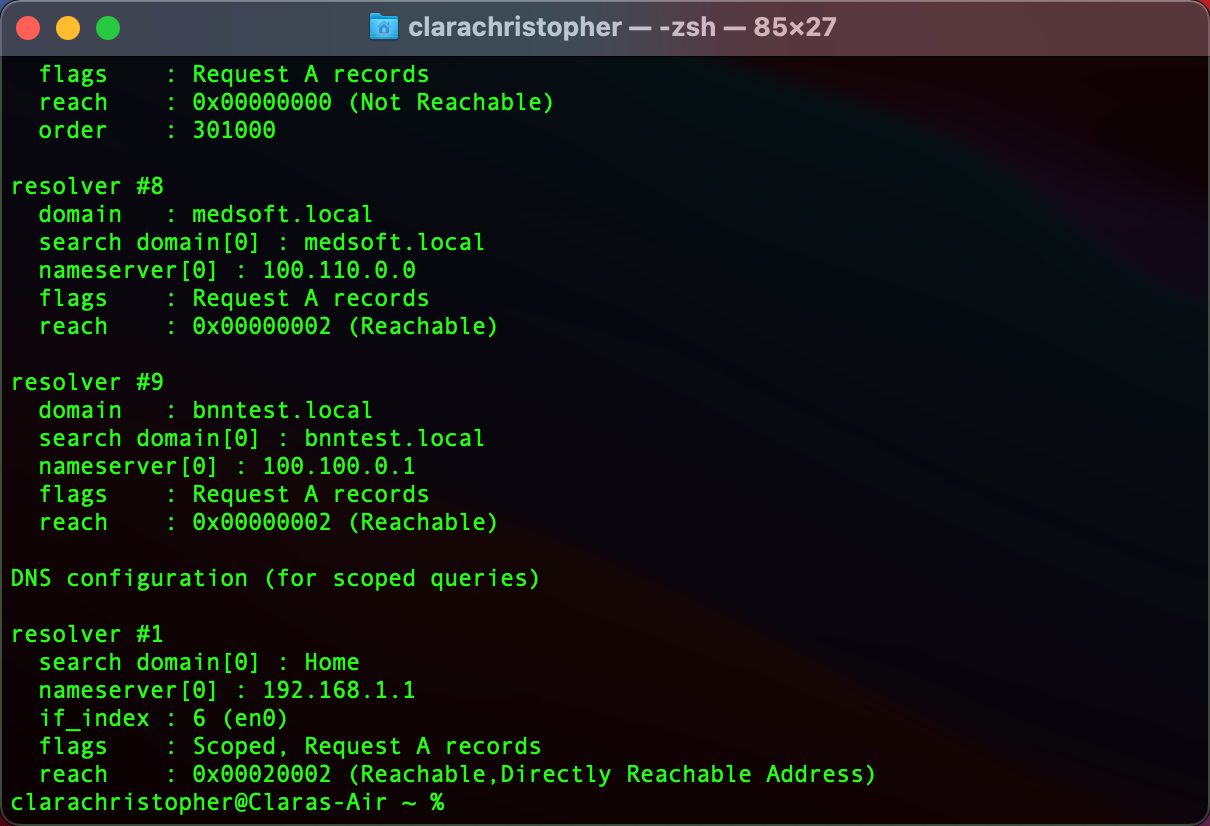
4.6 Verify DNS configuration:
Run the command below to verify that the domain and nameservers match the Service Tunnel configuration:
scutil --dns
4.7 Verify connectivity:
Once you’ve confirmed that the DNS resolution works, confirm whether you can send traffic to the IP addresses and ports behind the Service Tunnel. Some of the commands to verify the connectivity are as follows:
pingnccurltcpdump/wireshark
4.8 If none of the above steps work, send your logs to support (as mentioned in Step 3).
Steps for Windows users
If you’re on a Windows device and unable to access resources protected via Service Tunnel, complete the following troubleshooting steps.
Step 1: Determine whether Tunnel Service is running
1.1 In the desktop app, navigate to Settings and confirm that the status of your WireGuard Service is WireGuard Service Running:
1.2 If the WireGuard Service is not running, run the Command Prompt (as an Admin) and run the following commands:
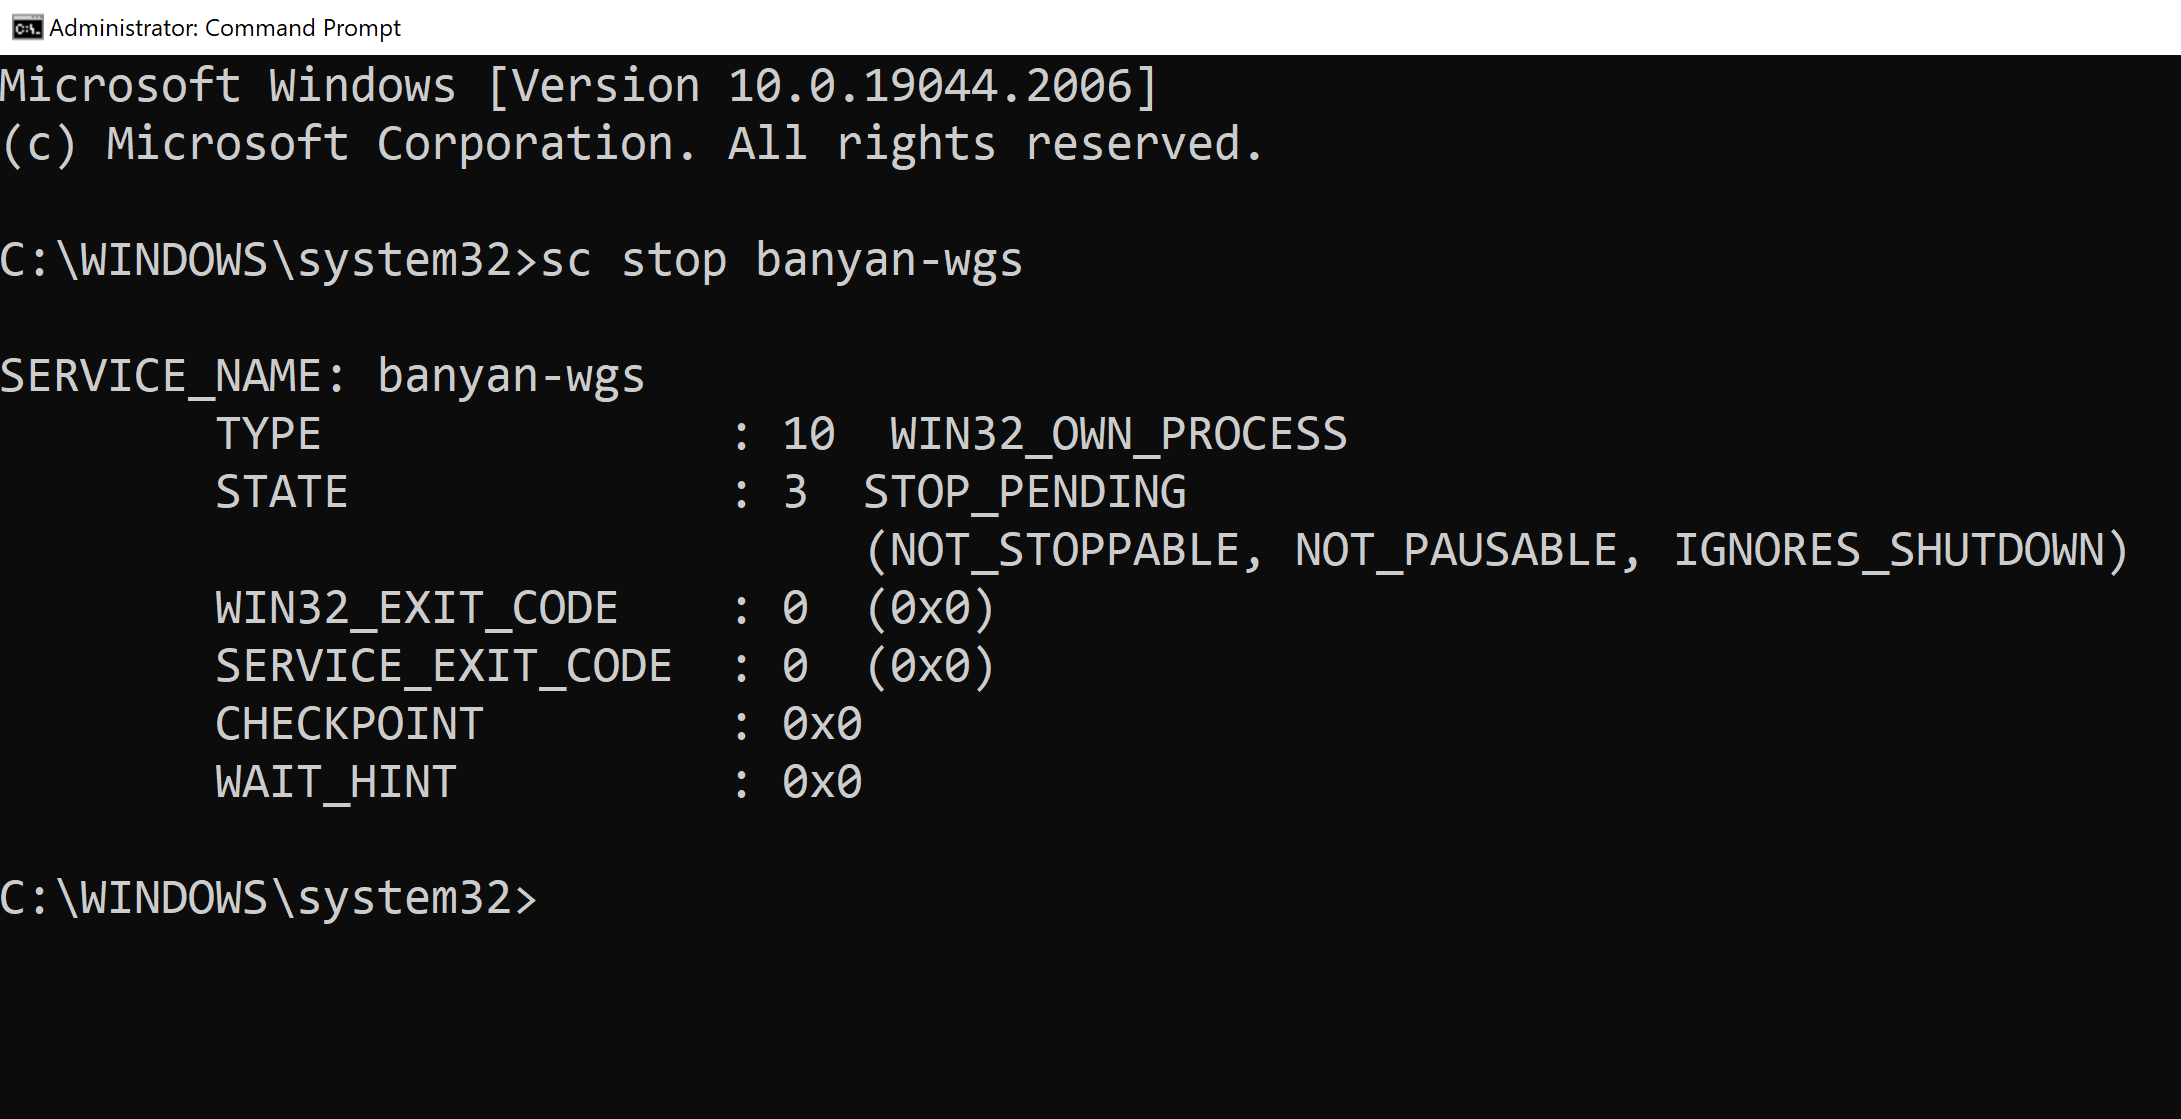
sc stop banyan-wgs
If using CSE desktop app version 4.0.0+, then use the following command:
sc stop sonicwall-cse-wgs
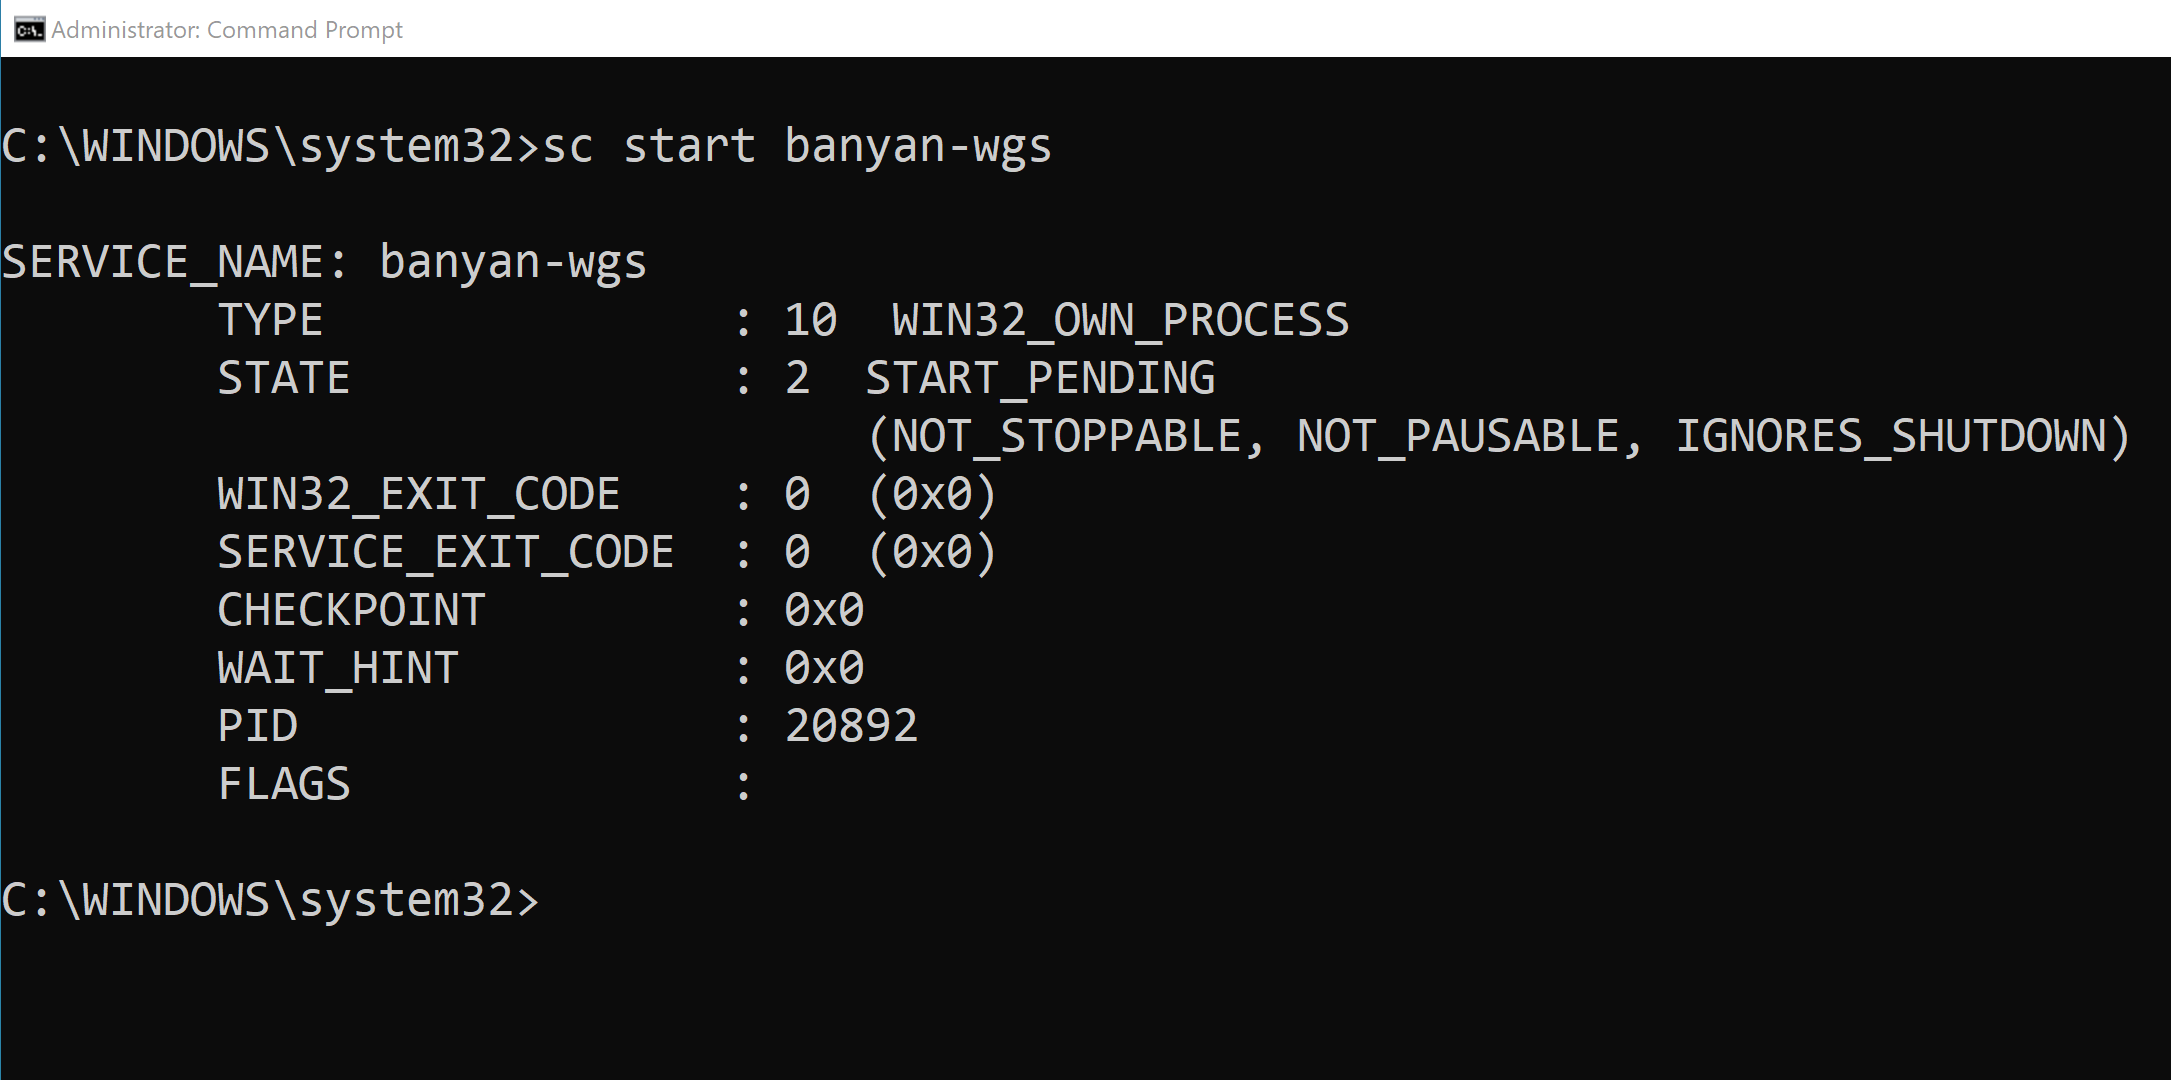
sc start banyan-wgs
If using CSE desktop app version 4.0.0+, then use the following command:
sc start sonicwall-cse-wgs
Note: If the above commands fail, uninstall and reinstall the CSE Desktop app. If uninstalling and reinstalling the desktop app doesn’t resolve the issue, refer to Step 3 below.
Confirm whether your Service Tunnel process is running by verifying the WireGuard Service Running status under Settings. If it isn’t running, see Step 3 below.
Step 2: Determine whether your Service Tunnel is Connected
2.1 Navigate to the Home Page in the desktop app, and select your preferred Service Tunnel from the dropdown menu.
2.2 Click the blue ‘Power’ button to ensure that your Service Tunnel is connected.
2.3 If Autorun is configured for your Service Tunnel, it should already be connected.
2.4 If your Service Tunnel shows as Connected and you’re still unable to access resources, see Step 3. If you need to troubleshoot connectivity issues, see Step 4.
Step 3: Contact Support
3.1 Complete the following steps:
(a) Open the desktop app.
(b) Navigate from Settings > Health Check.
(c) Select Run Diagnostic Tool.
(d) Select Send Log Files to SonicWall CSE Support.
Step 4: (Optional) Troubleshooting connectivity
4.1 Run the following commands on the Windows command prompt to validate your Service Tunnel configuration:
-
Navigate to
C:\Program Files\SonicWall Cloud Secure Edge\resources\bin(use this file path only if on desktop app version4.0.0or later); -
Run
wg
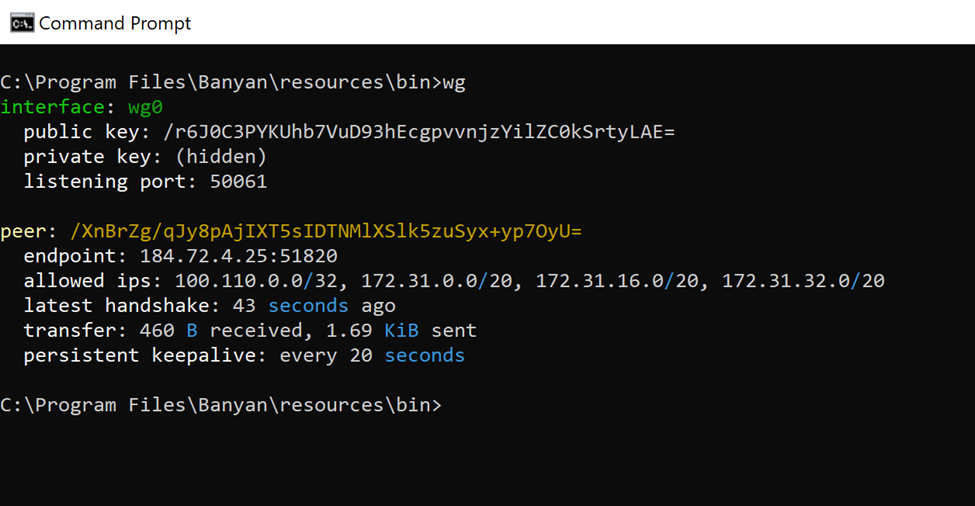
Output details:
-
peer: You should see the public key of the Access Tier (this can be confirmed by running the same
wgcommand on the Access Tier) -
endpoint: this should be formatted as follows– IP:Port Verify that the IP address shown here is pointing to the Access Tier’s public IP address (if it doesn’t match the IP address, check the DNS entry for Access Tier’s domain name). Verify the port shown is the same as the configured UDP Port Number on the Access Tier (also confirm this same port is open on the cloud provider side, e.g., Firewall configuration on GCP, Security Group configuration on AWS, etc.).
-
allowed ips: Confirm these CIDRs match the Backend CIDRs on the Access Tier Service Tunnel configuration (if the CIDRs don’t match, then please make sure the configuration is correct)
-
latest handshake: This parameter indicates that the handshake was successful and that the tunnel is working. The value is periodically updated and should not be more than 180 seconds. A higher value indicates the tunnel is not currently working. (If you don’t see this section, it means the tunnel was not established and needs further troubleshooting).
-
transfer: Every time you run this command, confirm both counts are incremented (if both the received and sent counters are not incrementing, this would mean connectivity issues between client and the Access Tier i.e. the Firewall or Security Group rules).
If the parameters in the output match the description, proceed to the next step.
4.2 Check your connectivity to the Access Tier:
Ensure that you’re able to ping the CIDR with /32 from the allowed ips section from output of the above command:
ping <IP address> (Example: ping 100.110.0.0)
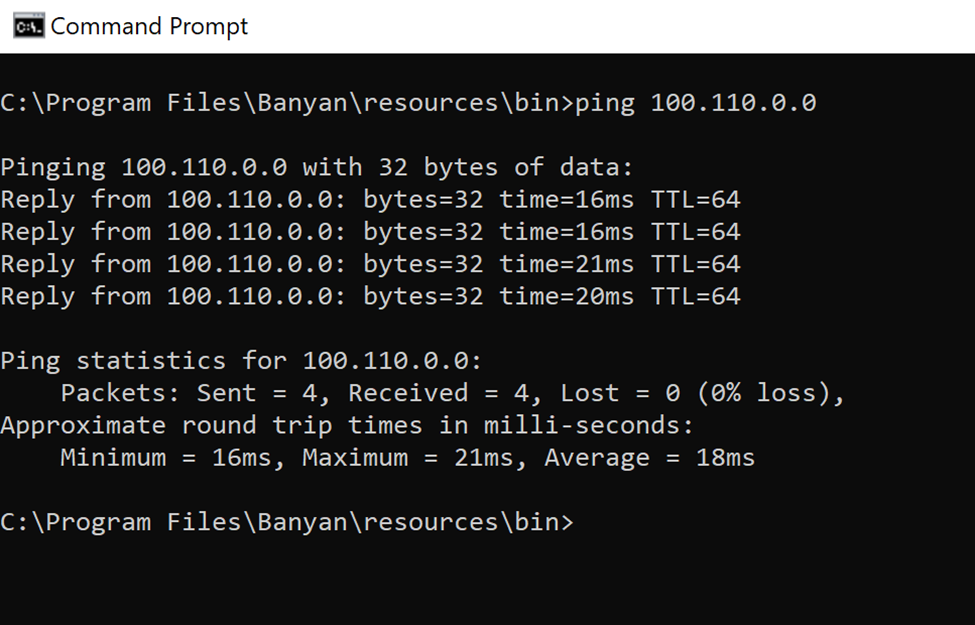
4.3 If the ping command fails, ensure that ping is enabled. If it is enabled and ping doesn’t work, check your network connectivity. If it’s working, proceed to the next step.
4.4 Confirm the WireGuard Service is running through the following command if on desktop app version 3.28.1 or older:
sc query banyan-wgs
If using CSE desktop app version 4.0.0+, then use the following command:
sc query sonicwall-cse-wgs
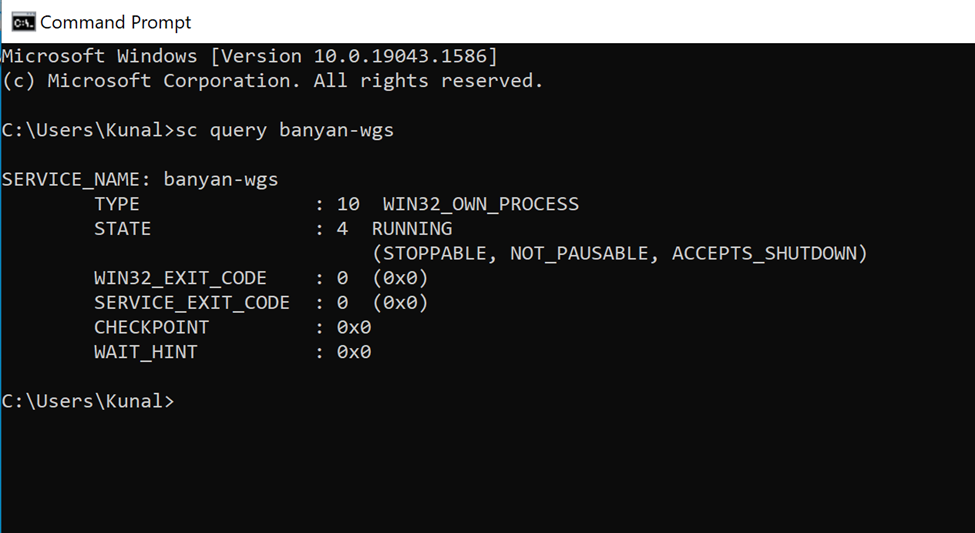
If it is running, you should get an output with the STATE parameter as RUNNING.
4.5 Now you have verified that all the Service Tunnel related configuration items are correct. If all of the above are working correctly and you’re still unable to access the resource(s) behind it, verify whether you’re able to resolve the host name or ping the IP address of the respective CSE-protected resource.
If you can’t resolve the host name, proceed to the next step.
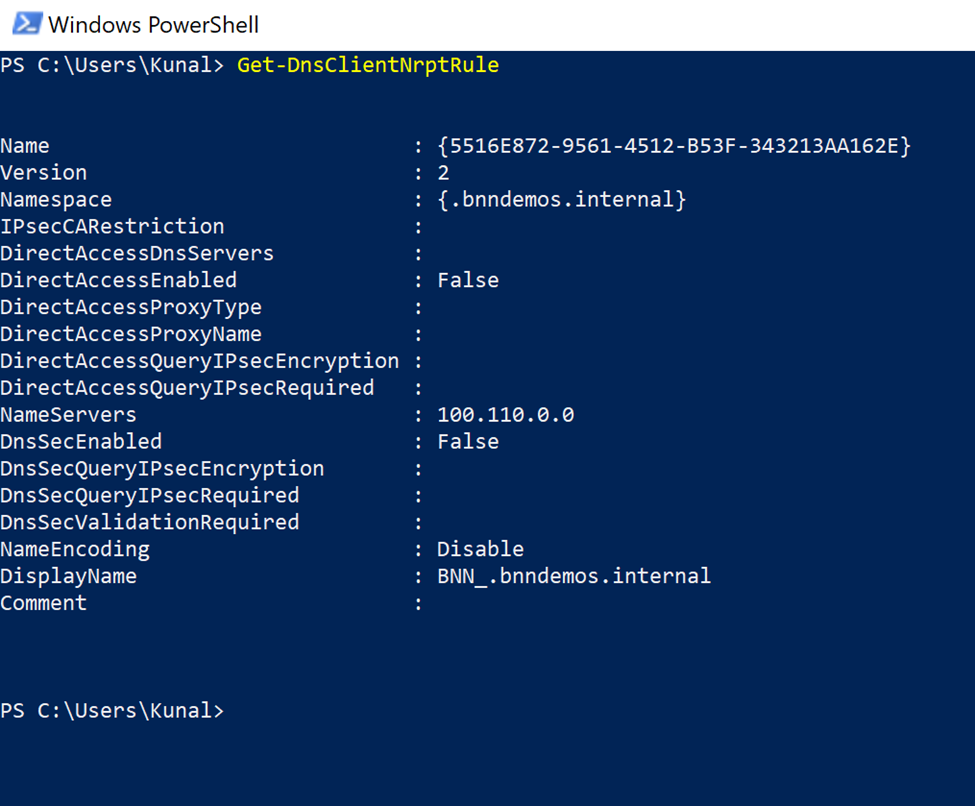
4.6 Verify DNS configuration:
Run the command below to verify whether the Domain and NameServers match the Service Tunnel configuration (this command needs to be run on Windows PowerShell):
Get-DnsClientNrptRule
4.7 Verify connectivity:
Once you’ve confirmed the DNS resolution works, confirm whether you can send traffic to the IP addresses and ports behind the Service Tunnel. Some of the commands to verify the connectivity are as follows:
pingnccurltcpdump/wireshark
4.8 If none of the above steps work, see Step 3.