Use IdP Federation to enforce zero trust policies on all SaaS Applications integrated with Okta
Use federation capabilities in Okta to enforce Cloud Secure Edge (CSE) policies on and enable Passwordless for your SaaS apps
- Last validated: Aug 3, 2026
- 15 minutes to read
-
Contributors


Overview
This guide details the steps required to set up Okta with SonicWall Cloud Secure Edge (CSE) to enable policy enforcement and Passwordless authentication for any SaaS app.
Doc status: CSE-side steps were re-verified against the CSE console on 2026-07-14, and third-party console steps were updated against vendor documentation on the same date. The third-party IdP console steps follow the vendor’s own documentation and should be confirmed against the live admin console, which can change without notice.
How It Works
sequenceDiagram
    autonumber
    participant UA as Web Browser
    participant SP as SaaS Application
    participant IDP as Okta SSO
    participant TP as CSE TrustProvider
    UA->>SP: Access application
    SP->>IDP: Generate SAML request
    IDP->>TP: IdP routing rule
    TP->>TP: Device and policy check
    TP->>TP: Passwordless authentication
    TP->>IDP: Issue Trust Token
    IDP->>UA: Prompt MFA (if required)
    IDP->>SP: Issue SSO token
    SP->>SP: Create user session
    SP->>UA: Set app session cookie
    UA->>SP: Access application
In the IDP-routed authentication flow, you configure your Okta to federate authentication requests to CSE. CSE provides policy enforcement and can also perform Passwordless authentication.
This integration relies on an OpenID Connect (OIDC) trust between Okta and CSE: CSE is added to Okta as an external OpenID Connect Identity Provider, and Okta routing rules send selected authentication traffic to CSE. The goal is that CSE evaluates device trust and policy before Okta completes the user’s sign-in to the target SaaS application.
Prerequisites
- Configure Okta for CSE Service Access to create a directory of users for accessing CSE services
- Configure Okta for CSE Device Registration to enable device registration with Okta
Steps
1. Create a SaaS Application in CSE
Organizations can create one IdP Routed SaaS App for all Okta applications or create multiple IdP Routed SaaS apps for groups of applications such as High Security vs Medium Security.
The web policy and the SaaS application are two separate objects in two console locations.
1.1 Navigate from Private Access > Access Policies > + Create Policy, and then select Web Policy to create the web policy that defines your zero trust requirements.
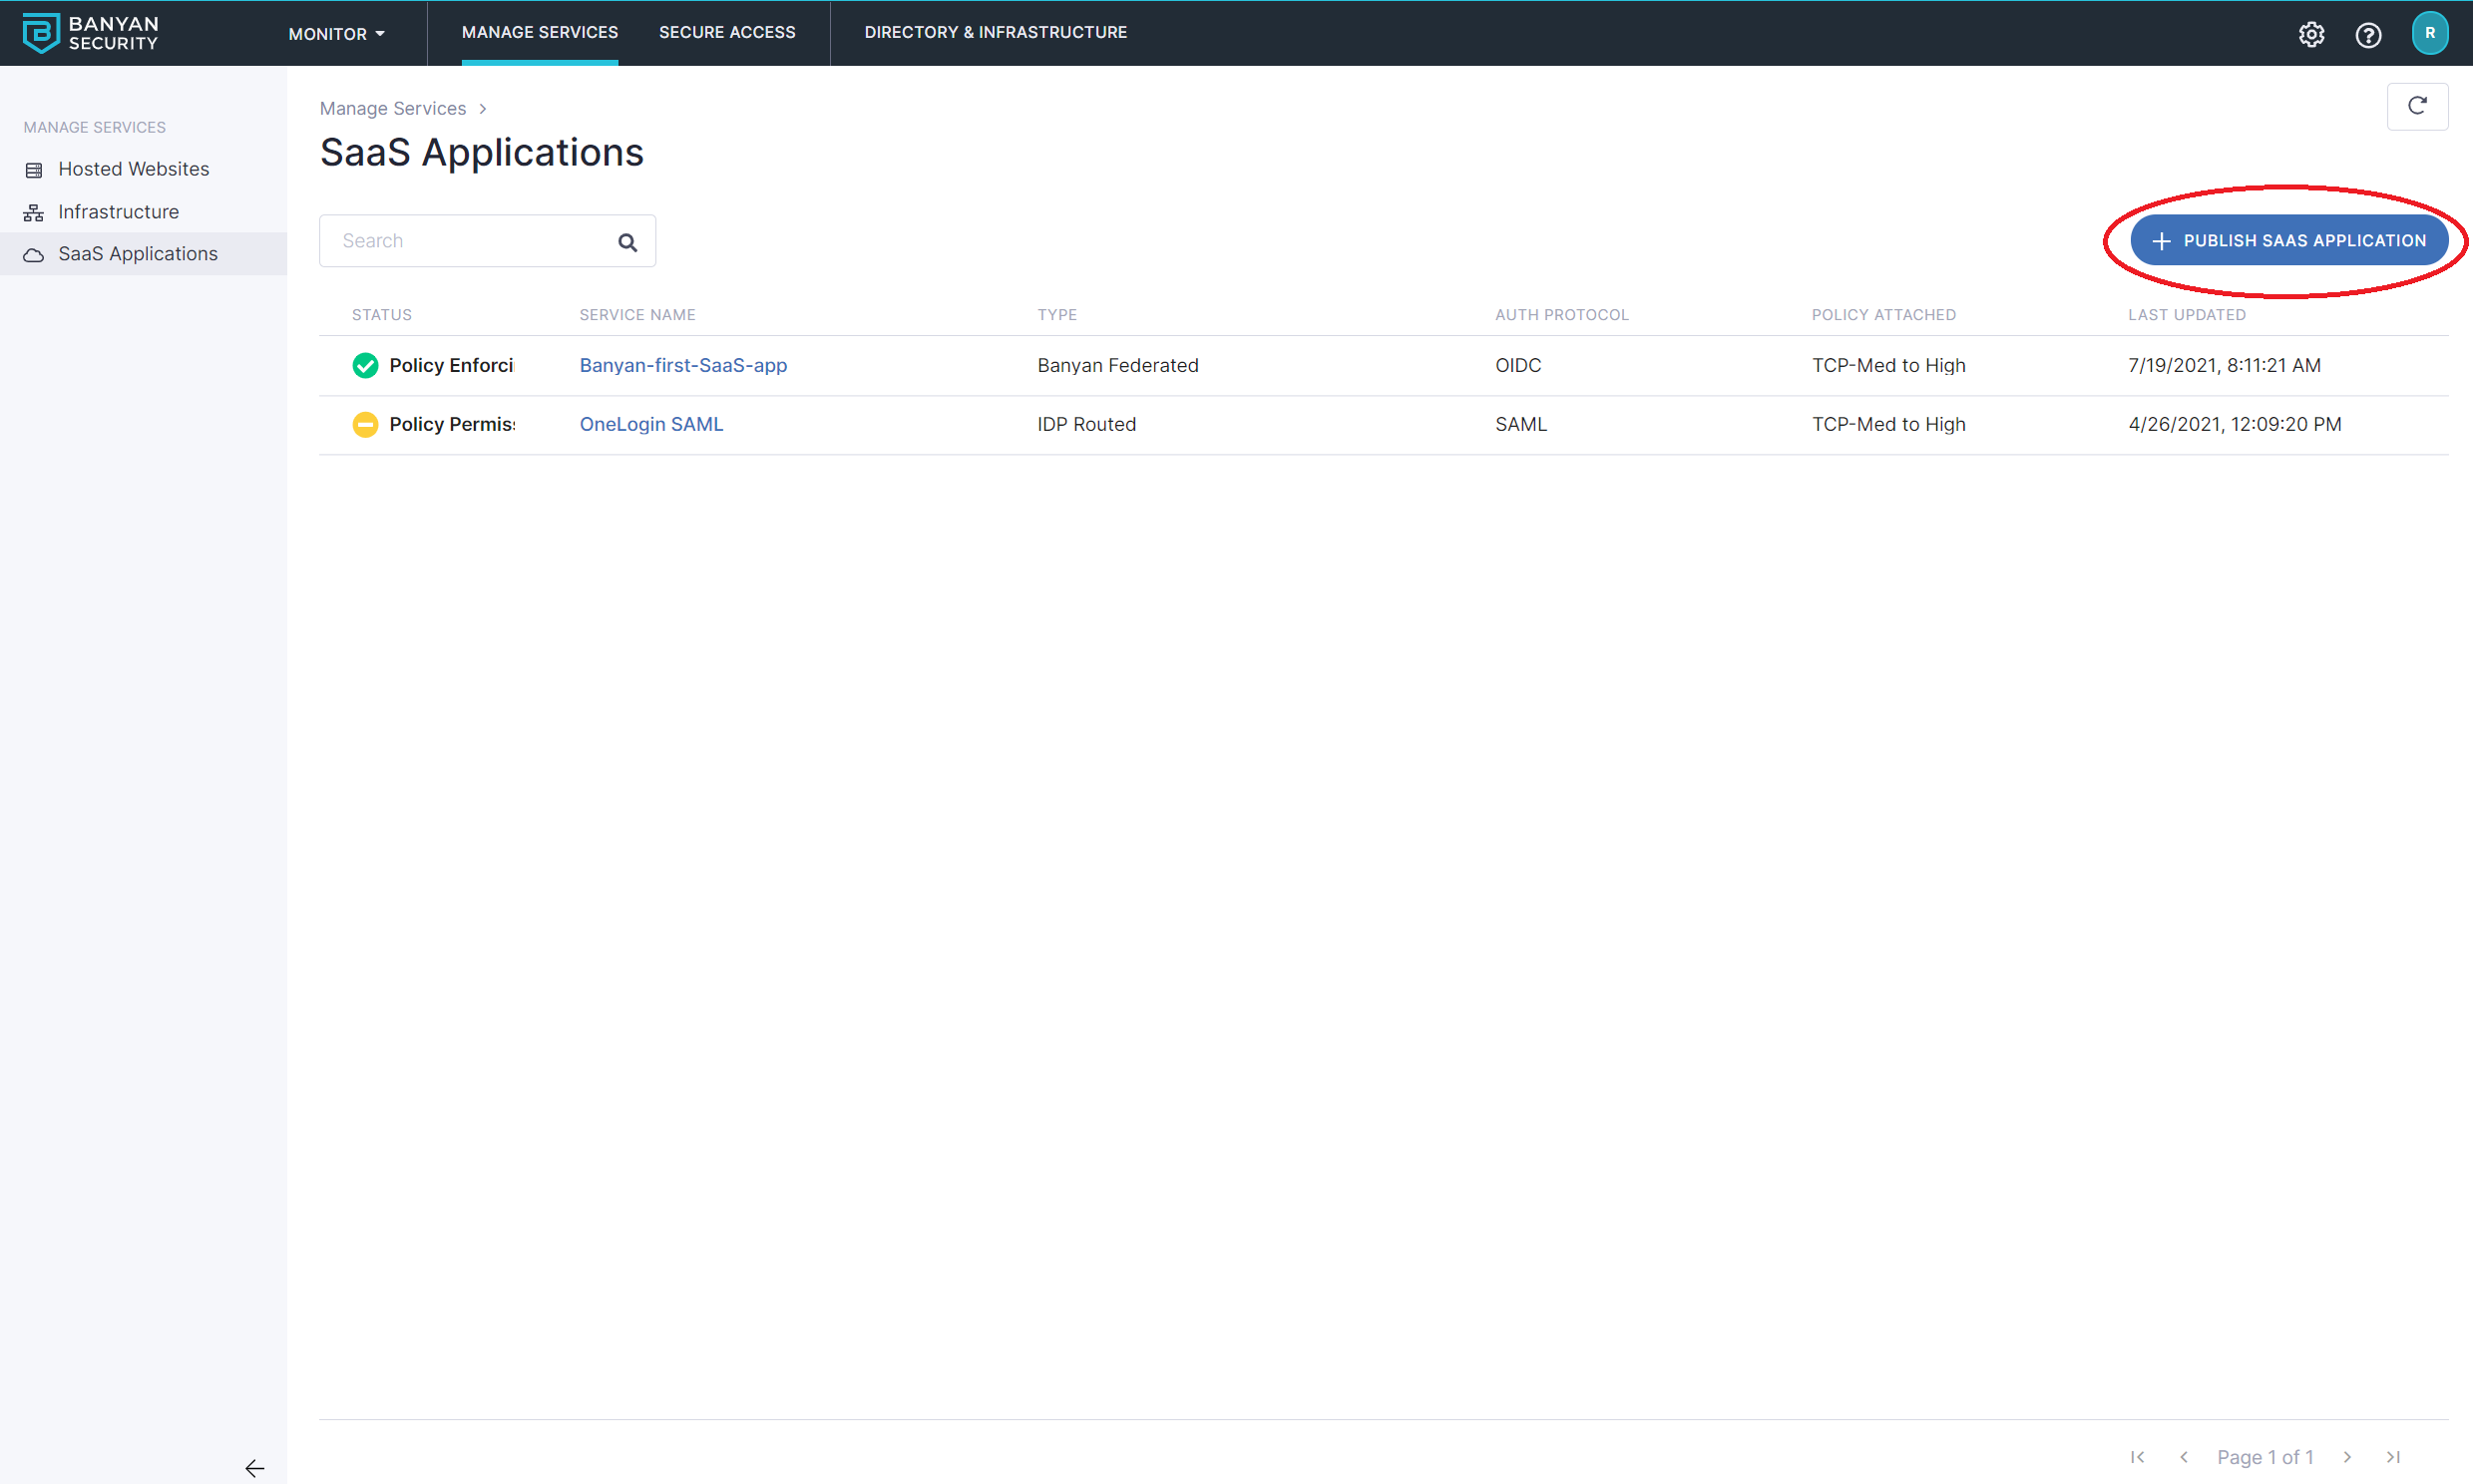
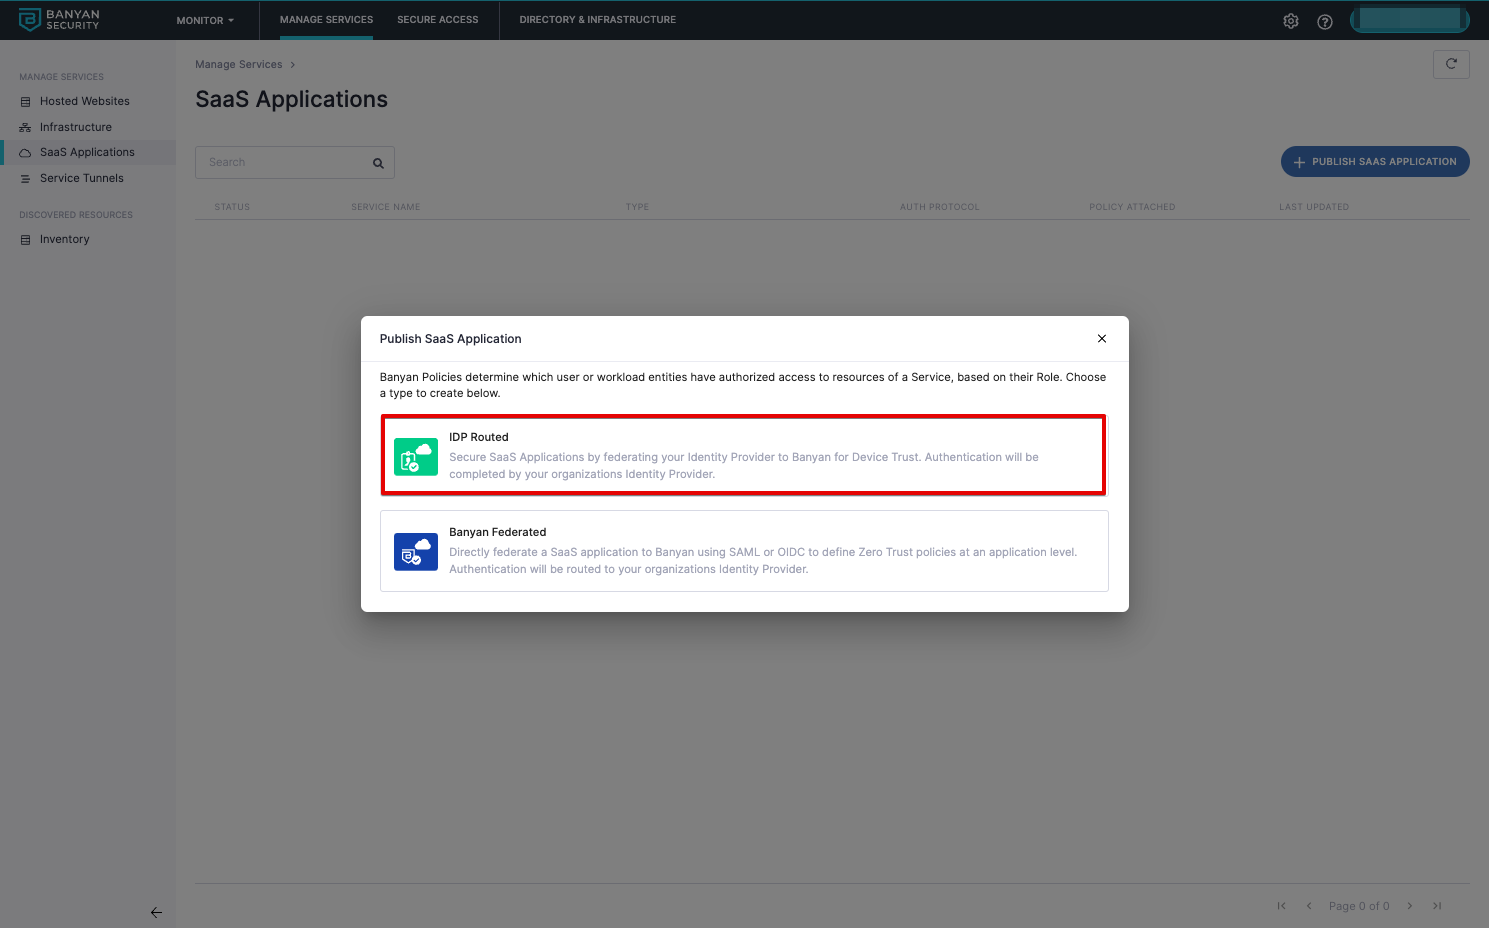
1.2 Navigate to Internet Access > SaaS Apps, select Publish SaaS Application, and then choose the IdP Routed template.
1.3 In the Authentication Federation section, select OIDC as the authentication protocol. This integration adds CSE to Okta as an OpenID Connect Identity Provider (Step 2), so SAML does not apply here.
1.4 Name the SaaS app, and in the Redirect URL field enter your Okta tenant’s callback URL, which has the format https://<your-okta-domain>/oauth2/v1/authorize/callback. Okta displays this Redirect URI after the Identity Provider is created in Step 2; confirm the value there.
1.5 Attach the web policy from Step 1.1 and set its enforcement mode.
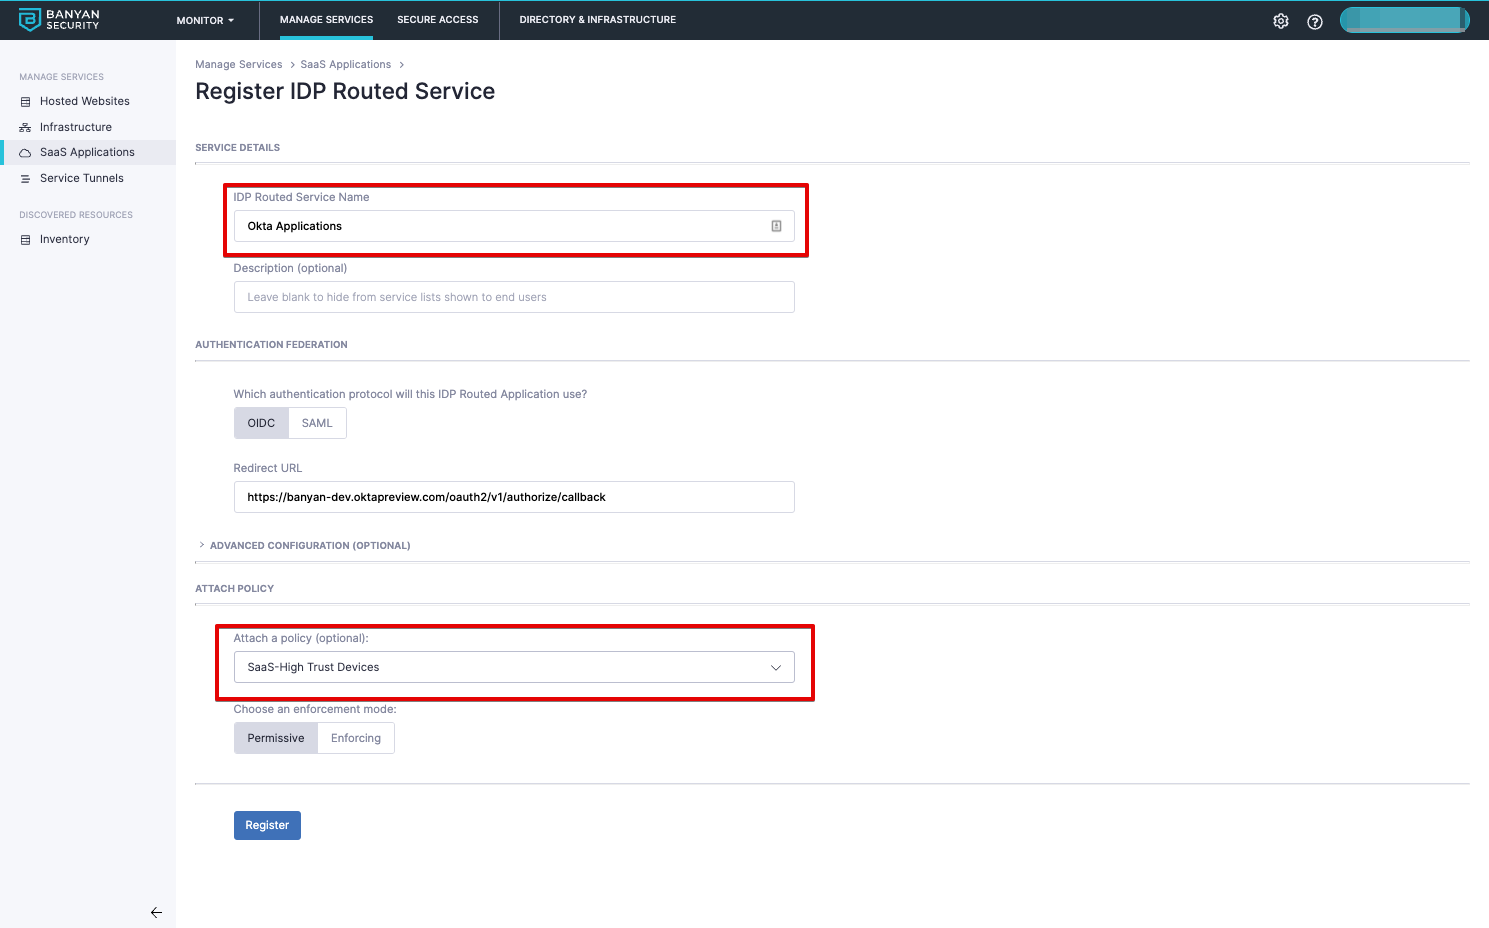
1.6 Register.
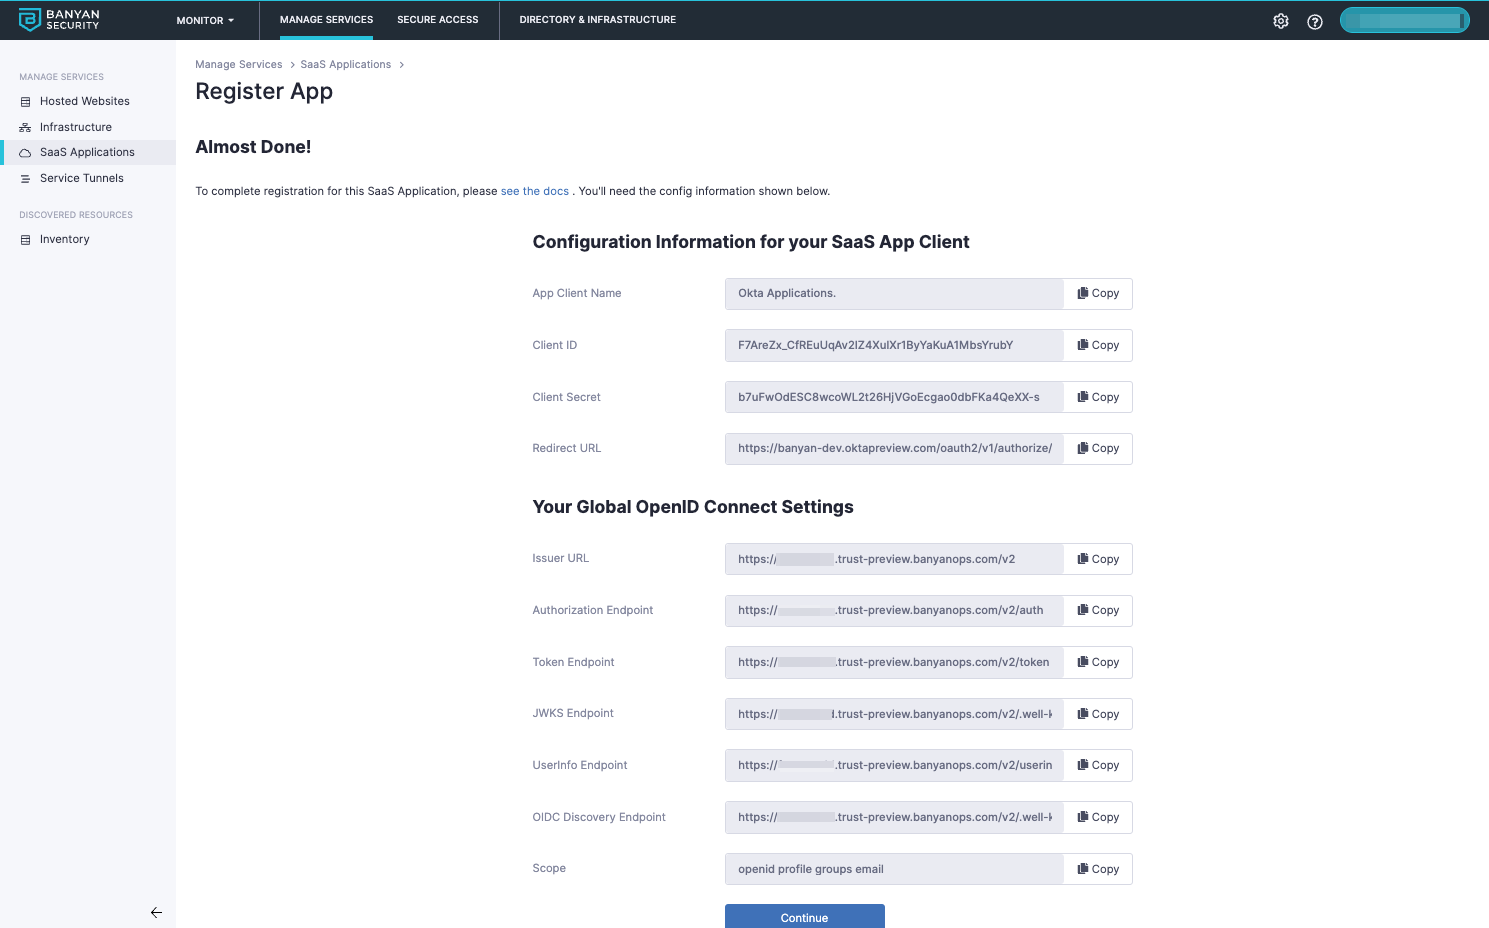
Registering creates the OIDC client in CSE for this SaaS app. The confirmation screen, titled Almost Done!, gives you the details you need to set up Okta to use CSE to enforce your policies: the App Client Name, Client ID, Client Secret, and Redirect URL, plus your global OpenID Connect settings (Issuer URL, Authorization Endpoint, and Token Endpoint). You will copy the client credentials and OpenID Connect settings into Okta in the next step. If you close this screen, the values remain available on the application’s Overview tab under SAAS CLIENT APPLICATION CONFIGURATION.
2. Add CSE as an Identity Provider in Okta
This step establishes the OIDC trust on the Okta side so that Okta recognizes CSE as an external Identity Provider it can route authentication to. The Okta steps below follow Okta’s own console; treat Okta’s documentation as the source of truth for the current Okta UI, which can change without notice.
The values to exchange between CSE and Okta are summarized below. Use the values produced on the CSE Almost Done! screen (Step 1.6) and the Redirect URI that Okta owns.
| Value | Produced by | Entered into |
|---|---|---|
| OpenID Connect config field values (Step 1.6 Almost Done! screen) | CSE | Okta — CSE Policy Engine Identity Provider (Step 2.3) |
Redirect URL (https://<your-okta-domain>/oauth2/v1/authorize/callback) |
Okta | CSE — the SaaS application’s Redirect URL field (Step 1.4) |
2.1 Navigate from Security > Identity Providers, and then select Add Identity Provider.
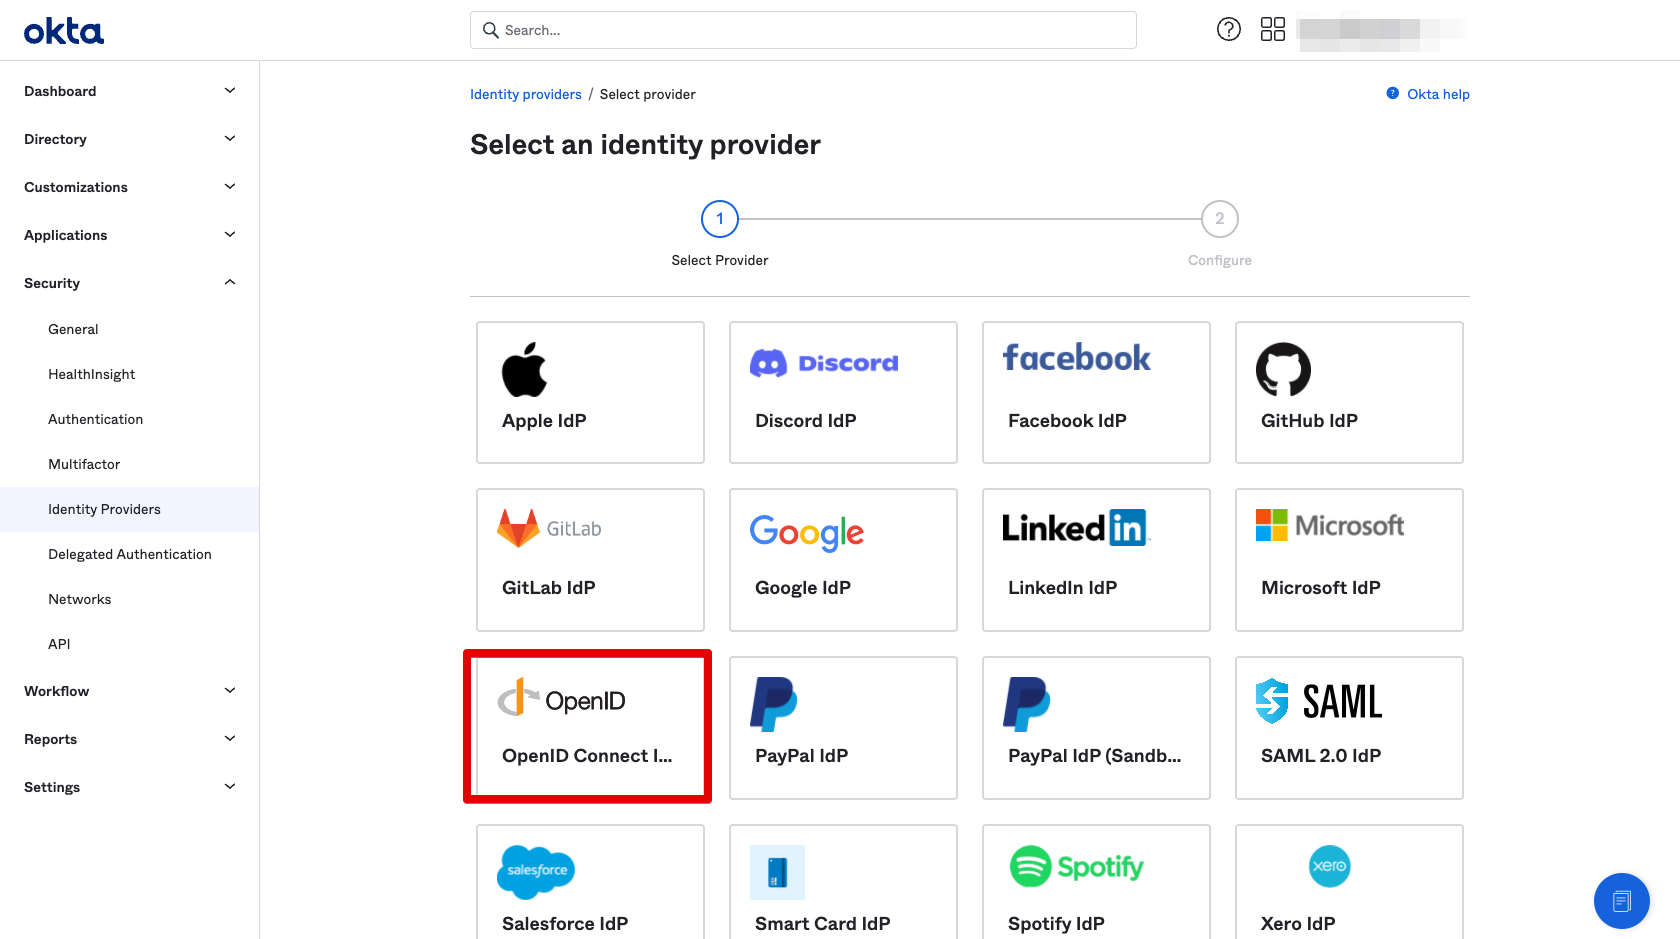
2.2 Select OpenID Connect IdP and select Next.
2.3 Name the Identity Provider CSE Policy Engine and enter the config field values you obtained in Step 1.6 above. Map the CSE values to Okta’s fields as follows:
| Okta field | Value to enter |
|---|---|
| Name | CSE Policy Engine |
| Scopes | Keep the defaults; the email scope is required |
| Client ID | CSE Client ID |
| Client Secret | CSE Client Secret |
| Issuer | CSE Issuer URL (under Your Global OpenID Connect Settings) |
| Authorization endpoint | CSE Authorization Endpoint |
| Token endpoint | CSE Token Endpoint |
| JWKS endpoint | Required by Okta but not shown on the CSE screen. Retrieve the jwks_uri value from the OIDC discovery document at <Issuer URL>/.well-known/openid-configuration |
| Userinfo endpoint | Optional; may be left blank |
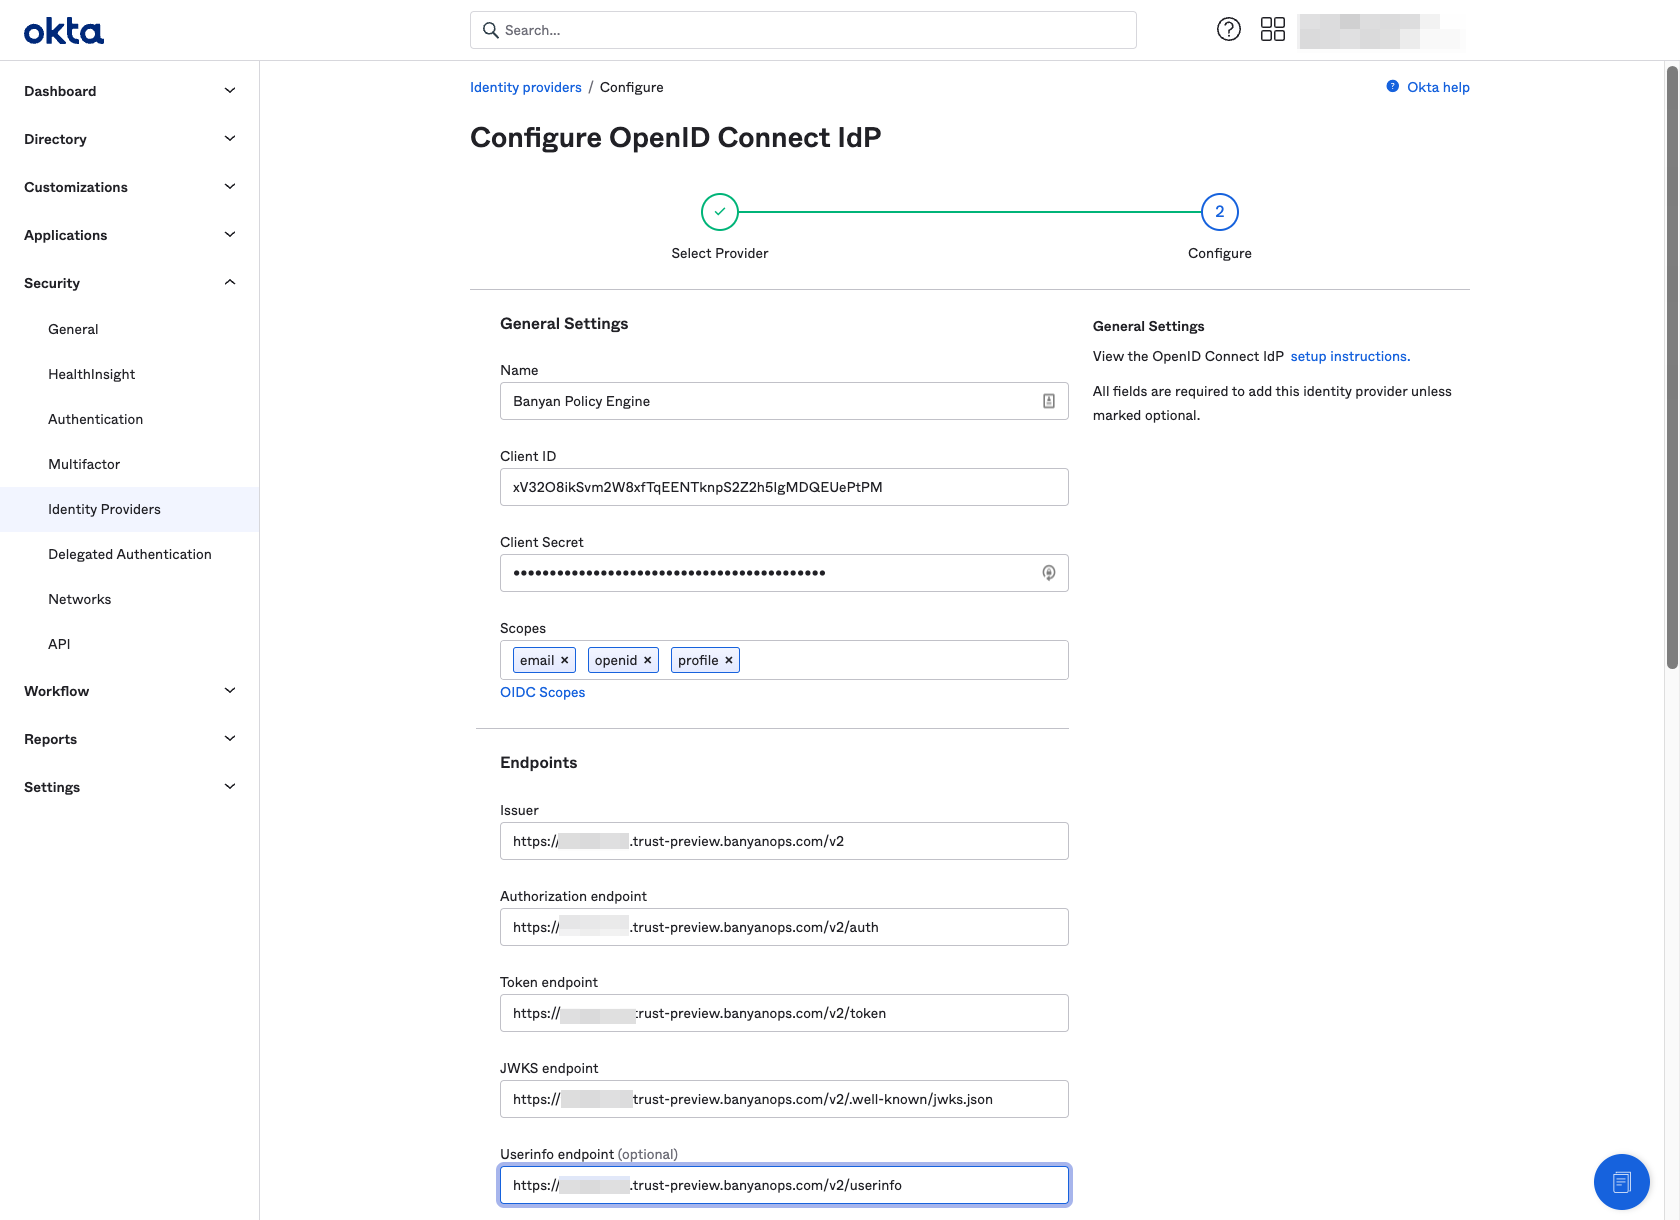
After the Identity Provider is created, Okta displays its Redirect URI (https://<your-okta-domain>/oauth2/v1/authorize/callback). Confirm that this value matches the Redirect URL you entered in the CSE SaaS application in Step 1.4.
3. Add a CSE Fallback Routing Rule
Since all Okta authentication traffic can eventually be federated, you need to ensure that flows involving the CSE Device Registration App Integration bypass federation so that users are not forced into infinite redirect loops.
3.1 Navigate from Security > Identity Providers > Routing Rules.
3.2 Add a Routing Rule called CSE Fallback Routing.
3.3 Select the CSE Device Registration SaaS Application.
3.4 Select Okta as the identity provider.
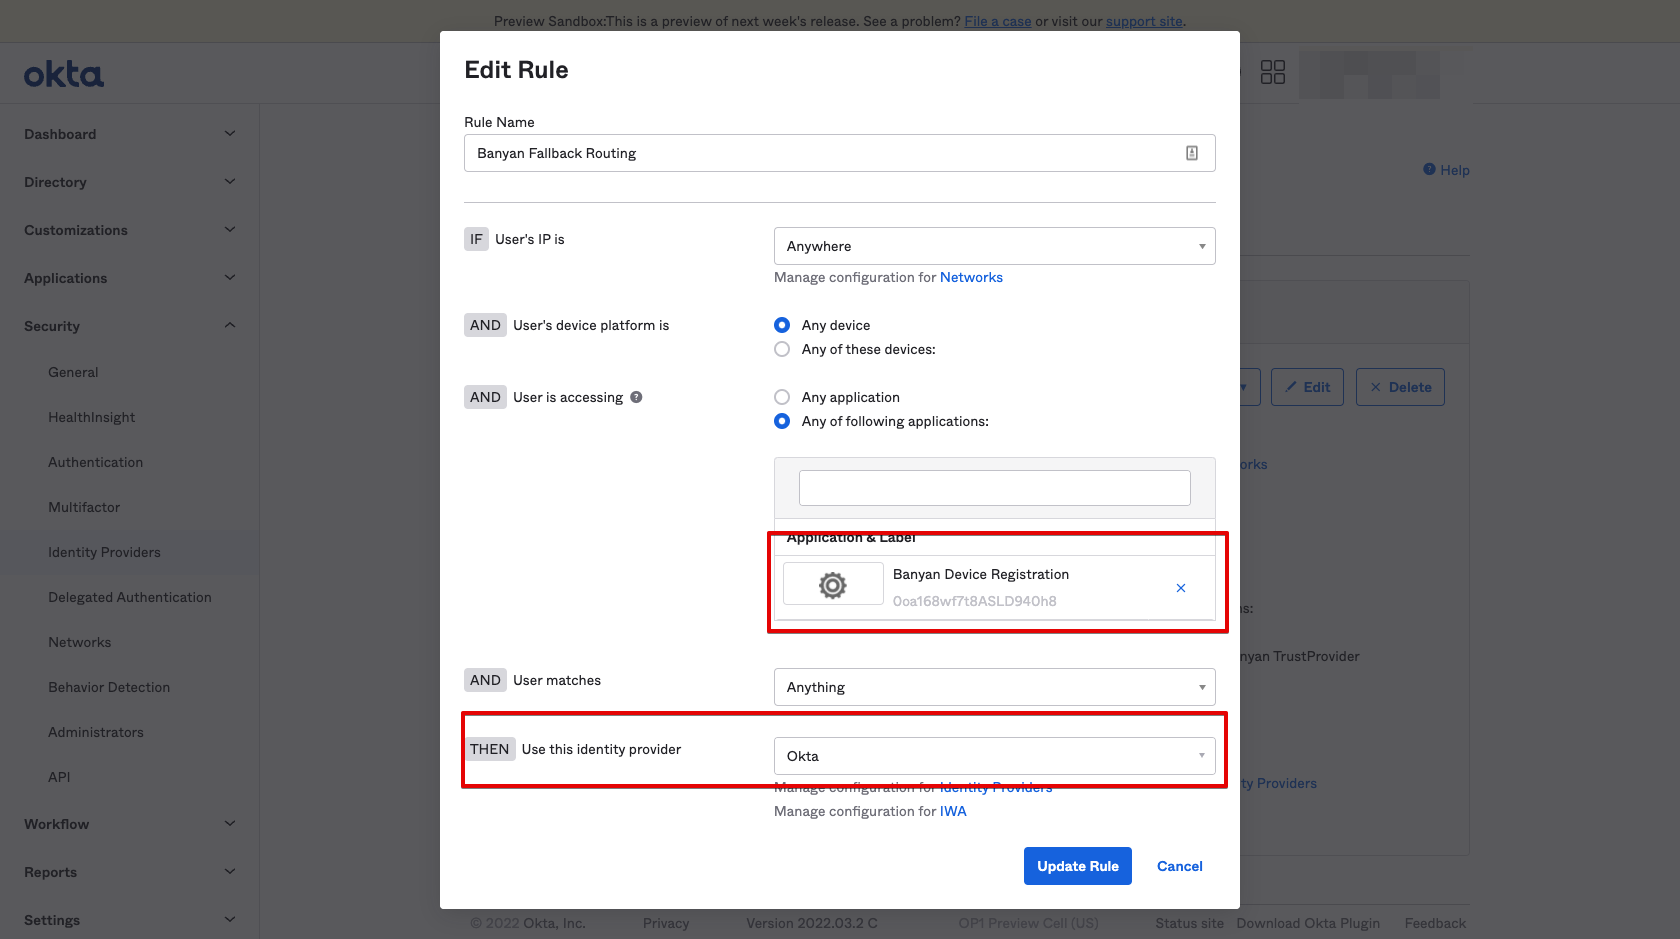
3.5 Ensure the routing rule has been activated.
4. (Optional) Route Specific Okta Applications to CSE
This step will only protect SP-initiated flows for certain selected applications and not flows that start from the Okta dashboard. Routing specific applications is recommended for testing and as part of a broader phased roll out.
4.1 Navigate from Security > Identity Providers > Routing Rules.
4.2 Add a routing rule called CSE Policy Engine Routing, and select the SaaS applications that you wish to secure with CSE Policies. This rule is what directs the selected application’s sign-in traffic to CSE for policy evaluation instead of straight to Okta.
4.3 Select the CSE Policy Engine identity provider you created in Step 2.
4.4 Select the specific applications that you wish to secure with CSE.
Warning Do not select “Any application” when you set up the routing rule here until you are ready to Route All Applications and the Okta Dashboard to CSE
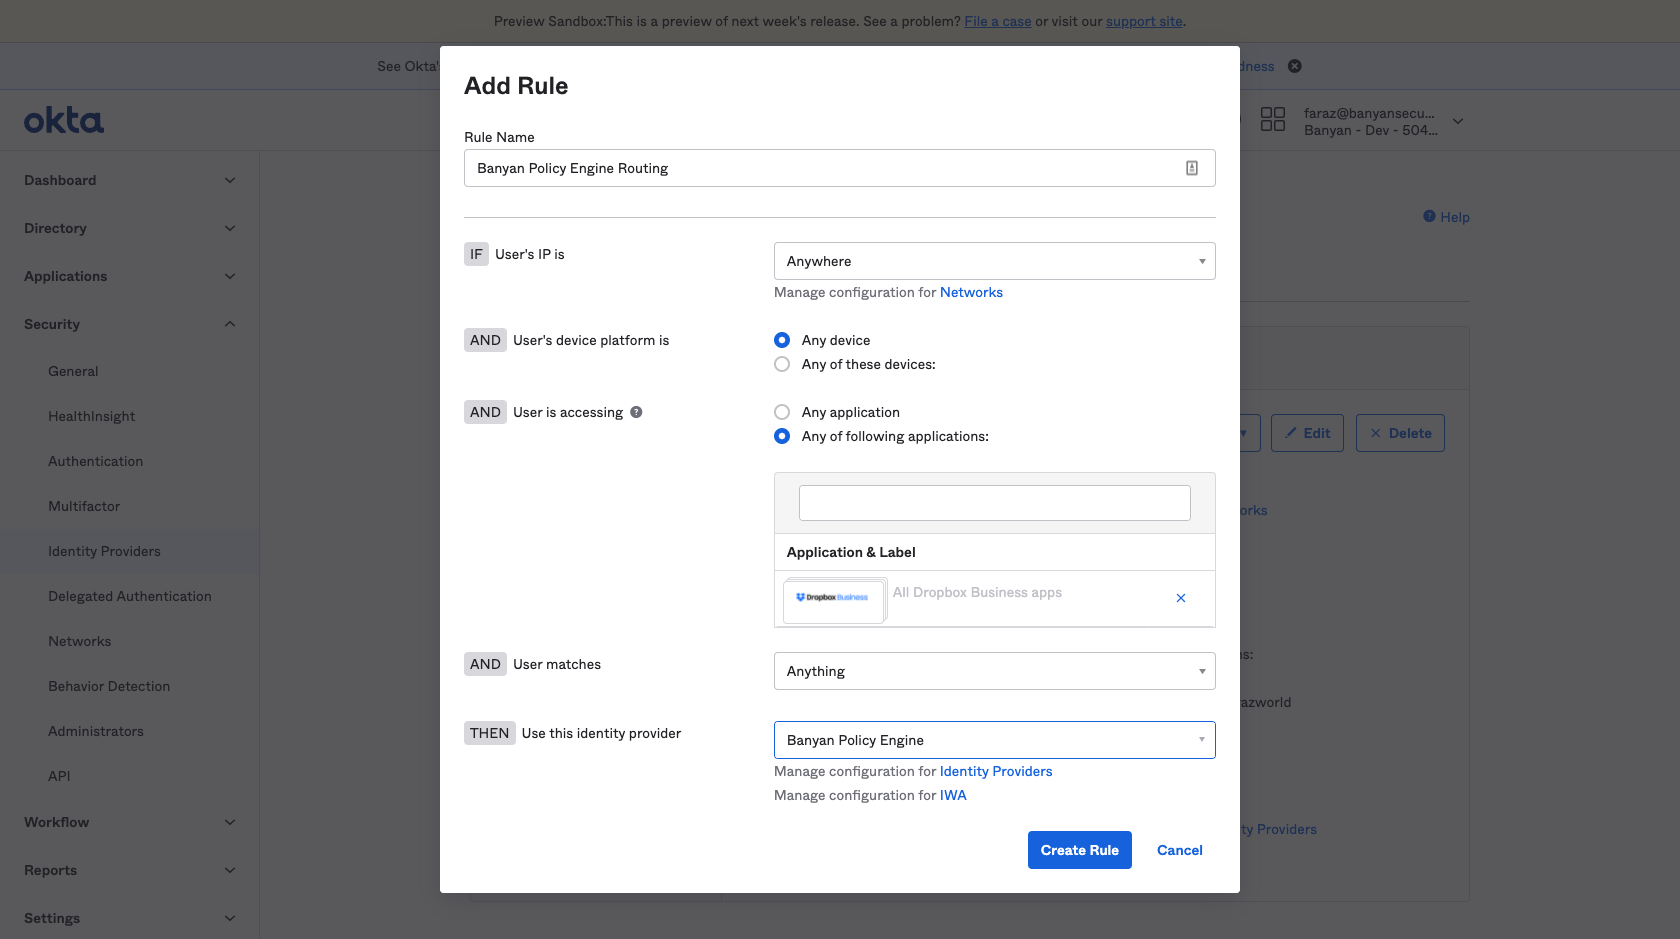
4.5 Ensure that the routing rule has been activated.
Now, specific SaaS application traffic is routed to CSE for policy enforcement. A summary of your Okta Routing Rules is as follows:
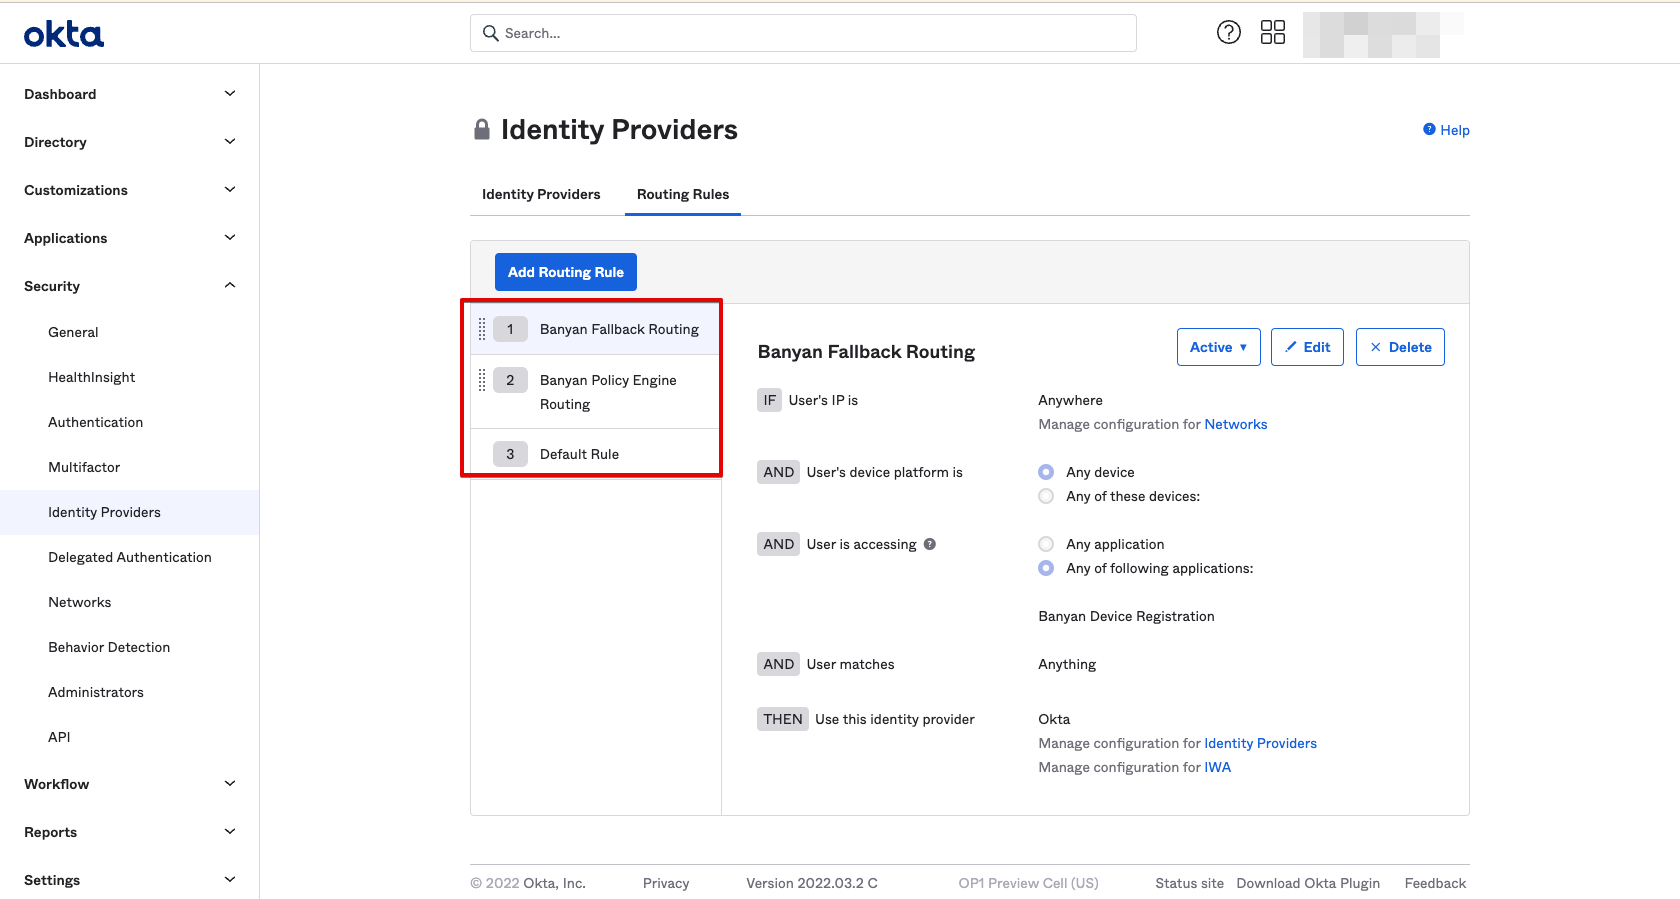
| Routing Rule | Applications to Route | IdP to Route to |
|---|---|---|
| 1. CSE Fallback Routing | CSE Device Registration Provider | Okta |
| 2. CSE Policy Engine Routing | Any Application | CSE Policy Engine |
| 3. Default Rule | Any Application | Okta |
Verify the Sign-In
After the pilot routing rule from Step 4 is activated:
1. In a fresh incognito/private browser window on a registered, trusted device, start an SP-initiated sign-in to one of the routed applications. Confirm that Okta redirects the sign-in to CSE, the device trust check passes, and the sign-in returns to Okta and completes.
2. Repeat from an unregistered device (or one that fails policy). Confirm that the sign-in is blocked at CSE when the web policy is in enforcing mode, or falls back per your design when it is in permissive mode.
3. Confirm the sign-in events in the Okta System Log (routed sign-ins reference the CSE Policy Engine Identity Provider) and the corresponding events in the CSE Command Center.
Sessions persist. Okta evaluates routing rules only at sign-in. Users who are already signed in keep their existing sessions until sign-out or session expiry — an already-signed-in tester sees no redirect (a false negative), and devices that fail CSE policy are not cut off immediately after Step 5. Test in a fresh incognito/private window, and where immediate enforcement is required, terminate users’ existing sessions from the Okta Admin Console (Clear user sessions).
5. Route All Applications and the Okta Dashboard to CSE
5.1 Confirm CSE Web Policy attributes
- A policy in enforcement will not allow any fallback for devices that do not meet trust levels in your policy.
- A policy in permissive will allow for a fallback for users that are not registered.
5.2 Update the CSE Policy Engine Routing Rule to route all application traffic.
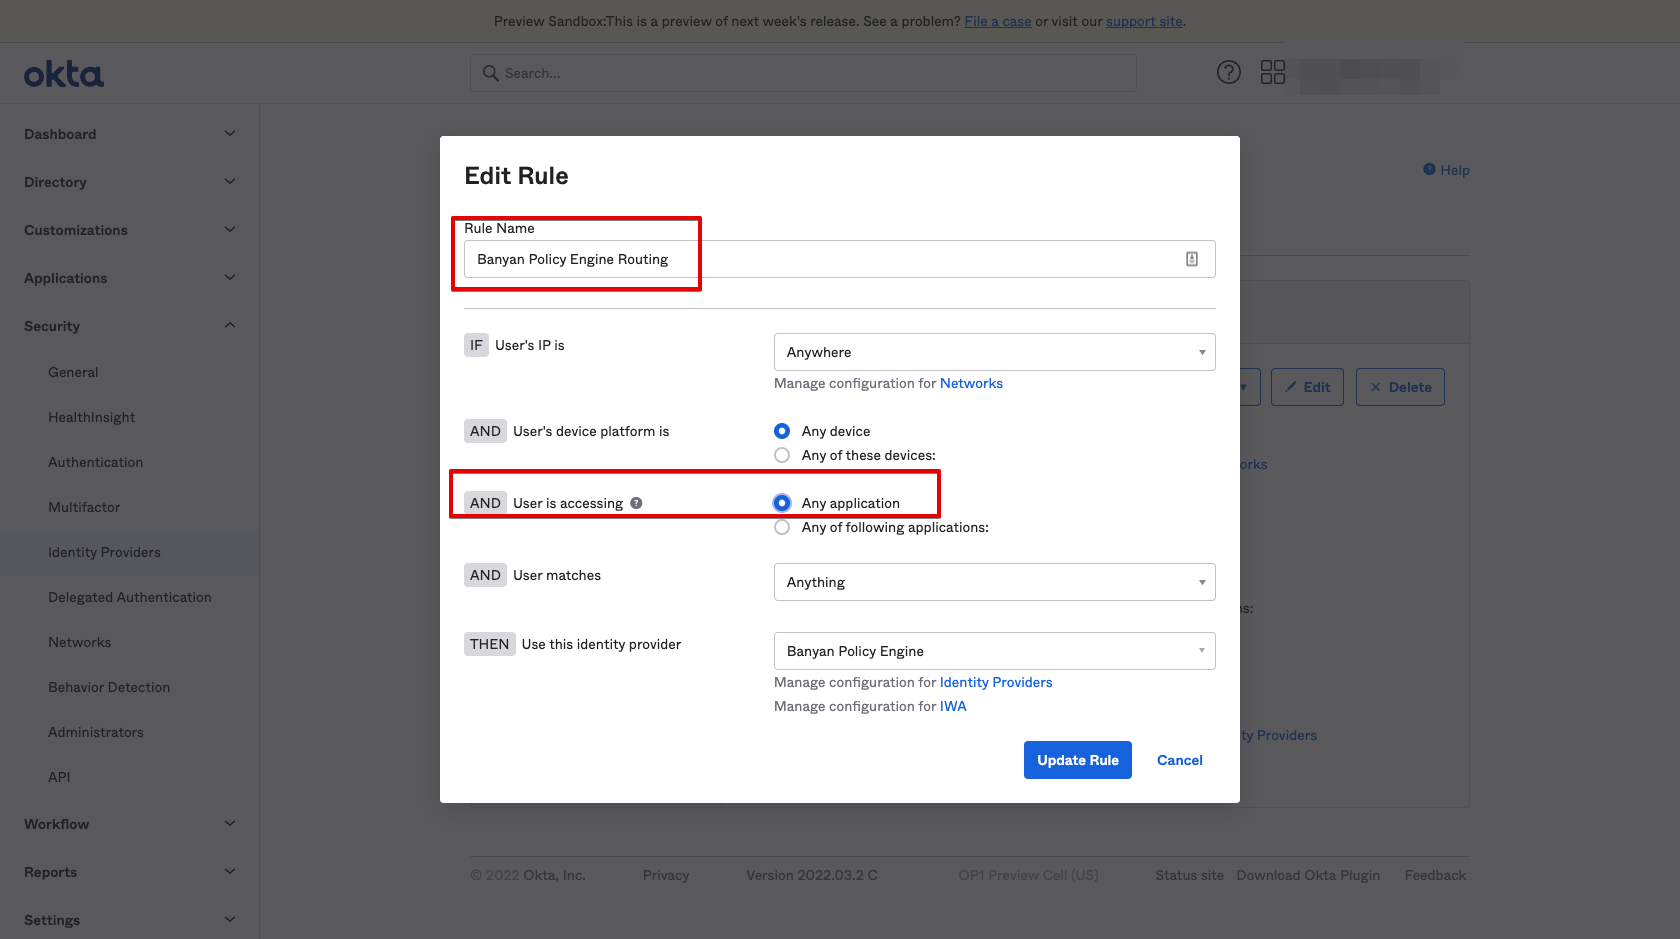
Now, all Okta authentication traffic is routed to CSE for policy enforcement. A summary of your Okta Routing Rules is as follows:
| Routing Rule | Applications to Route | IdP to Route to |
|---|---|---|
| 1. CSE Fallback Routing | CSE Device Registration Provider | Okta |
| 2. CSE Policy Engine Routing | Any Application | CSE Policy Engine |
| 3. Default Rule | Any Application | Okta |
Additional Configurations
Enable Passwordless
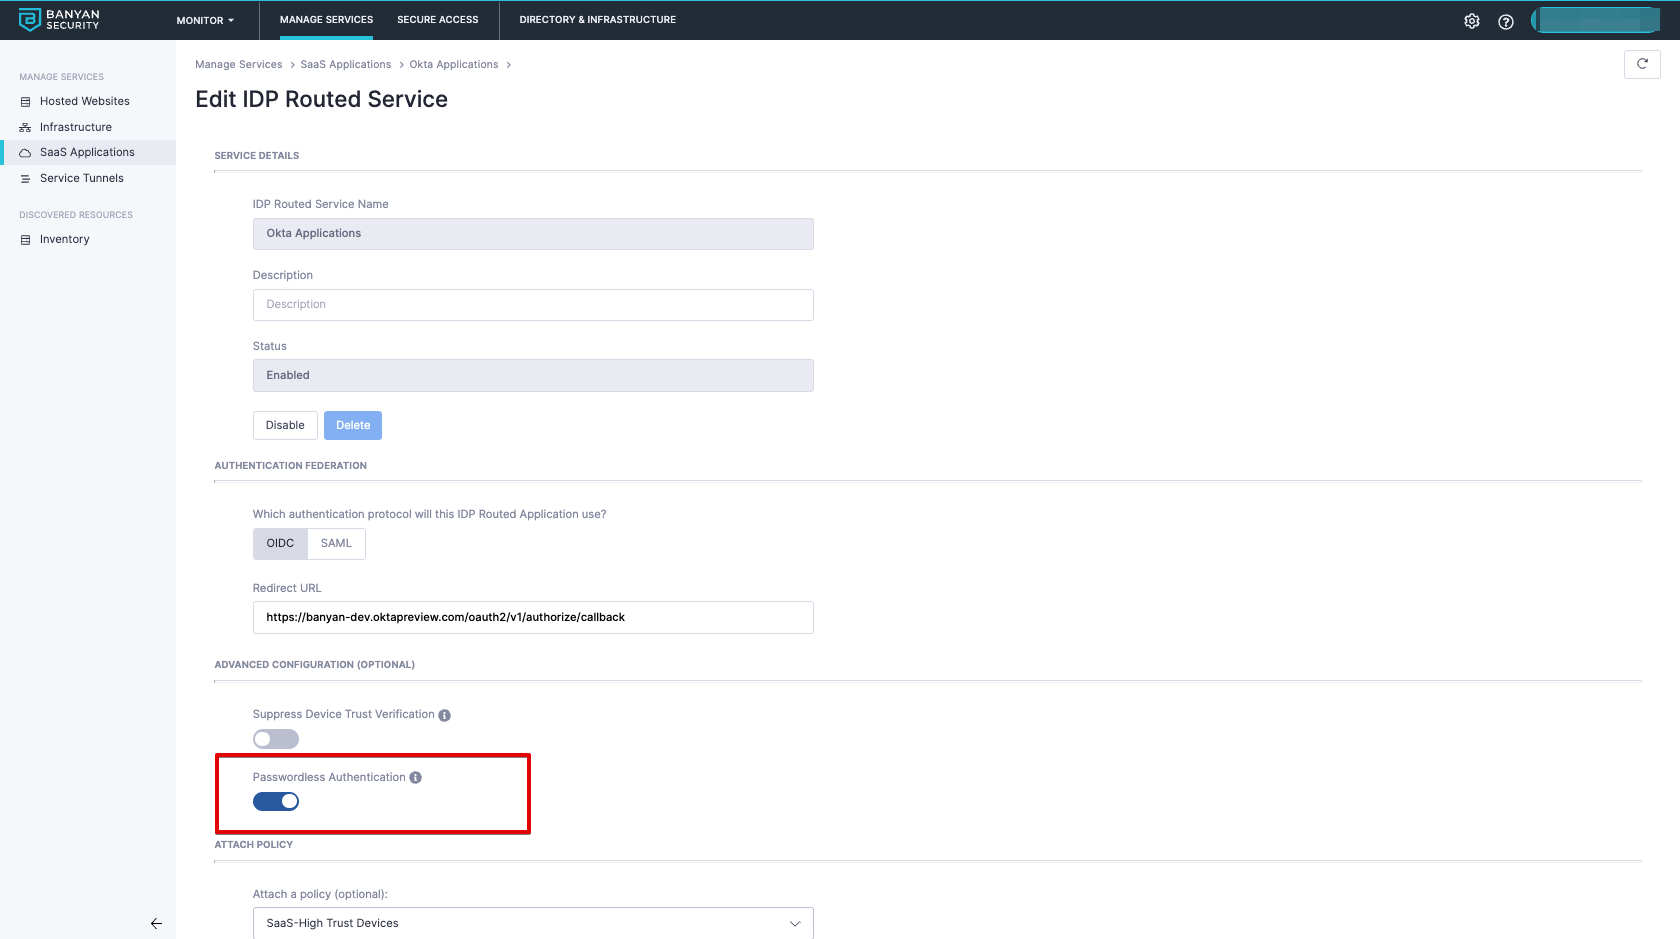
Passwordless is recommended to provide an optimal user experience when accessing applications on CSE registered devices. If Passwordless is not enabled, end users will default to Okta’s authentication methods.
Passwordless authentication with CSE leverages the fact that the trusted Device Certificate includes the user’s email address in the UserPrincipalName SAN extension field.
When Passwordless is enabled, the device certificate that is presented during device trust will be used to extract the user who is attempting to authenticate. The identified user will be issued a TrustToken without requiring username and password. The user will then proceed with Okta’s authentication configurations for the user selected application
1. Edit the existing Okta SaaS app.
2. Enable Passwordless Authentication, located under the application’s Advanced Configurations.
Phased Roll out Solution Guide
Admins typically need to phase the roll-out of CSE device policies for Okta applications. CSE provides 2 capabilities that support a phased roll out - (1) support for unregistered devices and (2) the ability to set up policies in permissive mode.
Review a prescriptive roll-out process in our Solution Guide on enforcing device trust for Okta applications so you can get visibility into how your CSE rollout is progressing without blocking users and devices immediately.
Exempting Specific Users from CSE Policies
In the setup above, all users will get routed to CSE for policy enforcement. You can leverage the same Okta Routing Rules to exempt specific types of users from CSE policies. We recommend using a user’s login attributes (not network zones via Source IP address matching or device platform via browser sniffing) to exempt users.
1. Add a routing rule called CSE Exempt Users Routing, and set the match rules based on the attributes of the users to exempt. Select Okta as the identity provider.
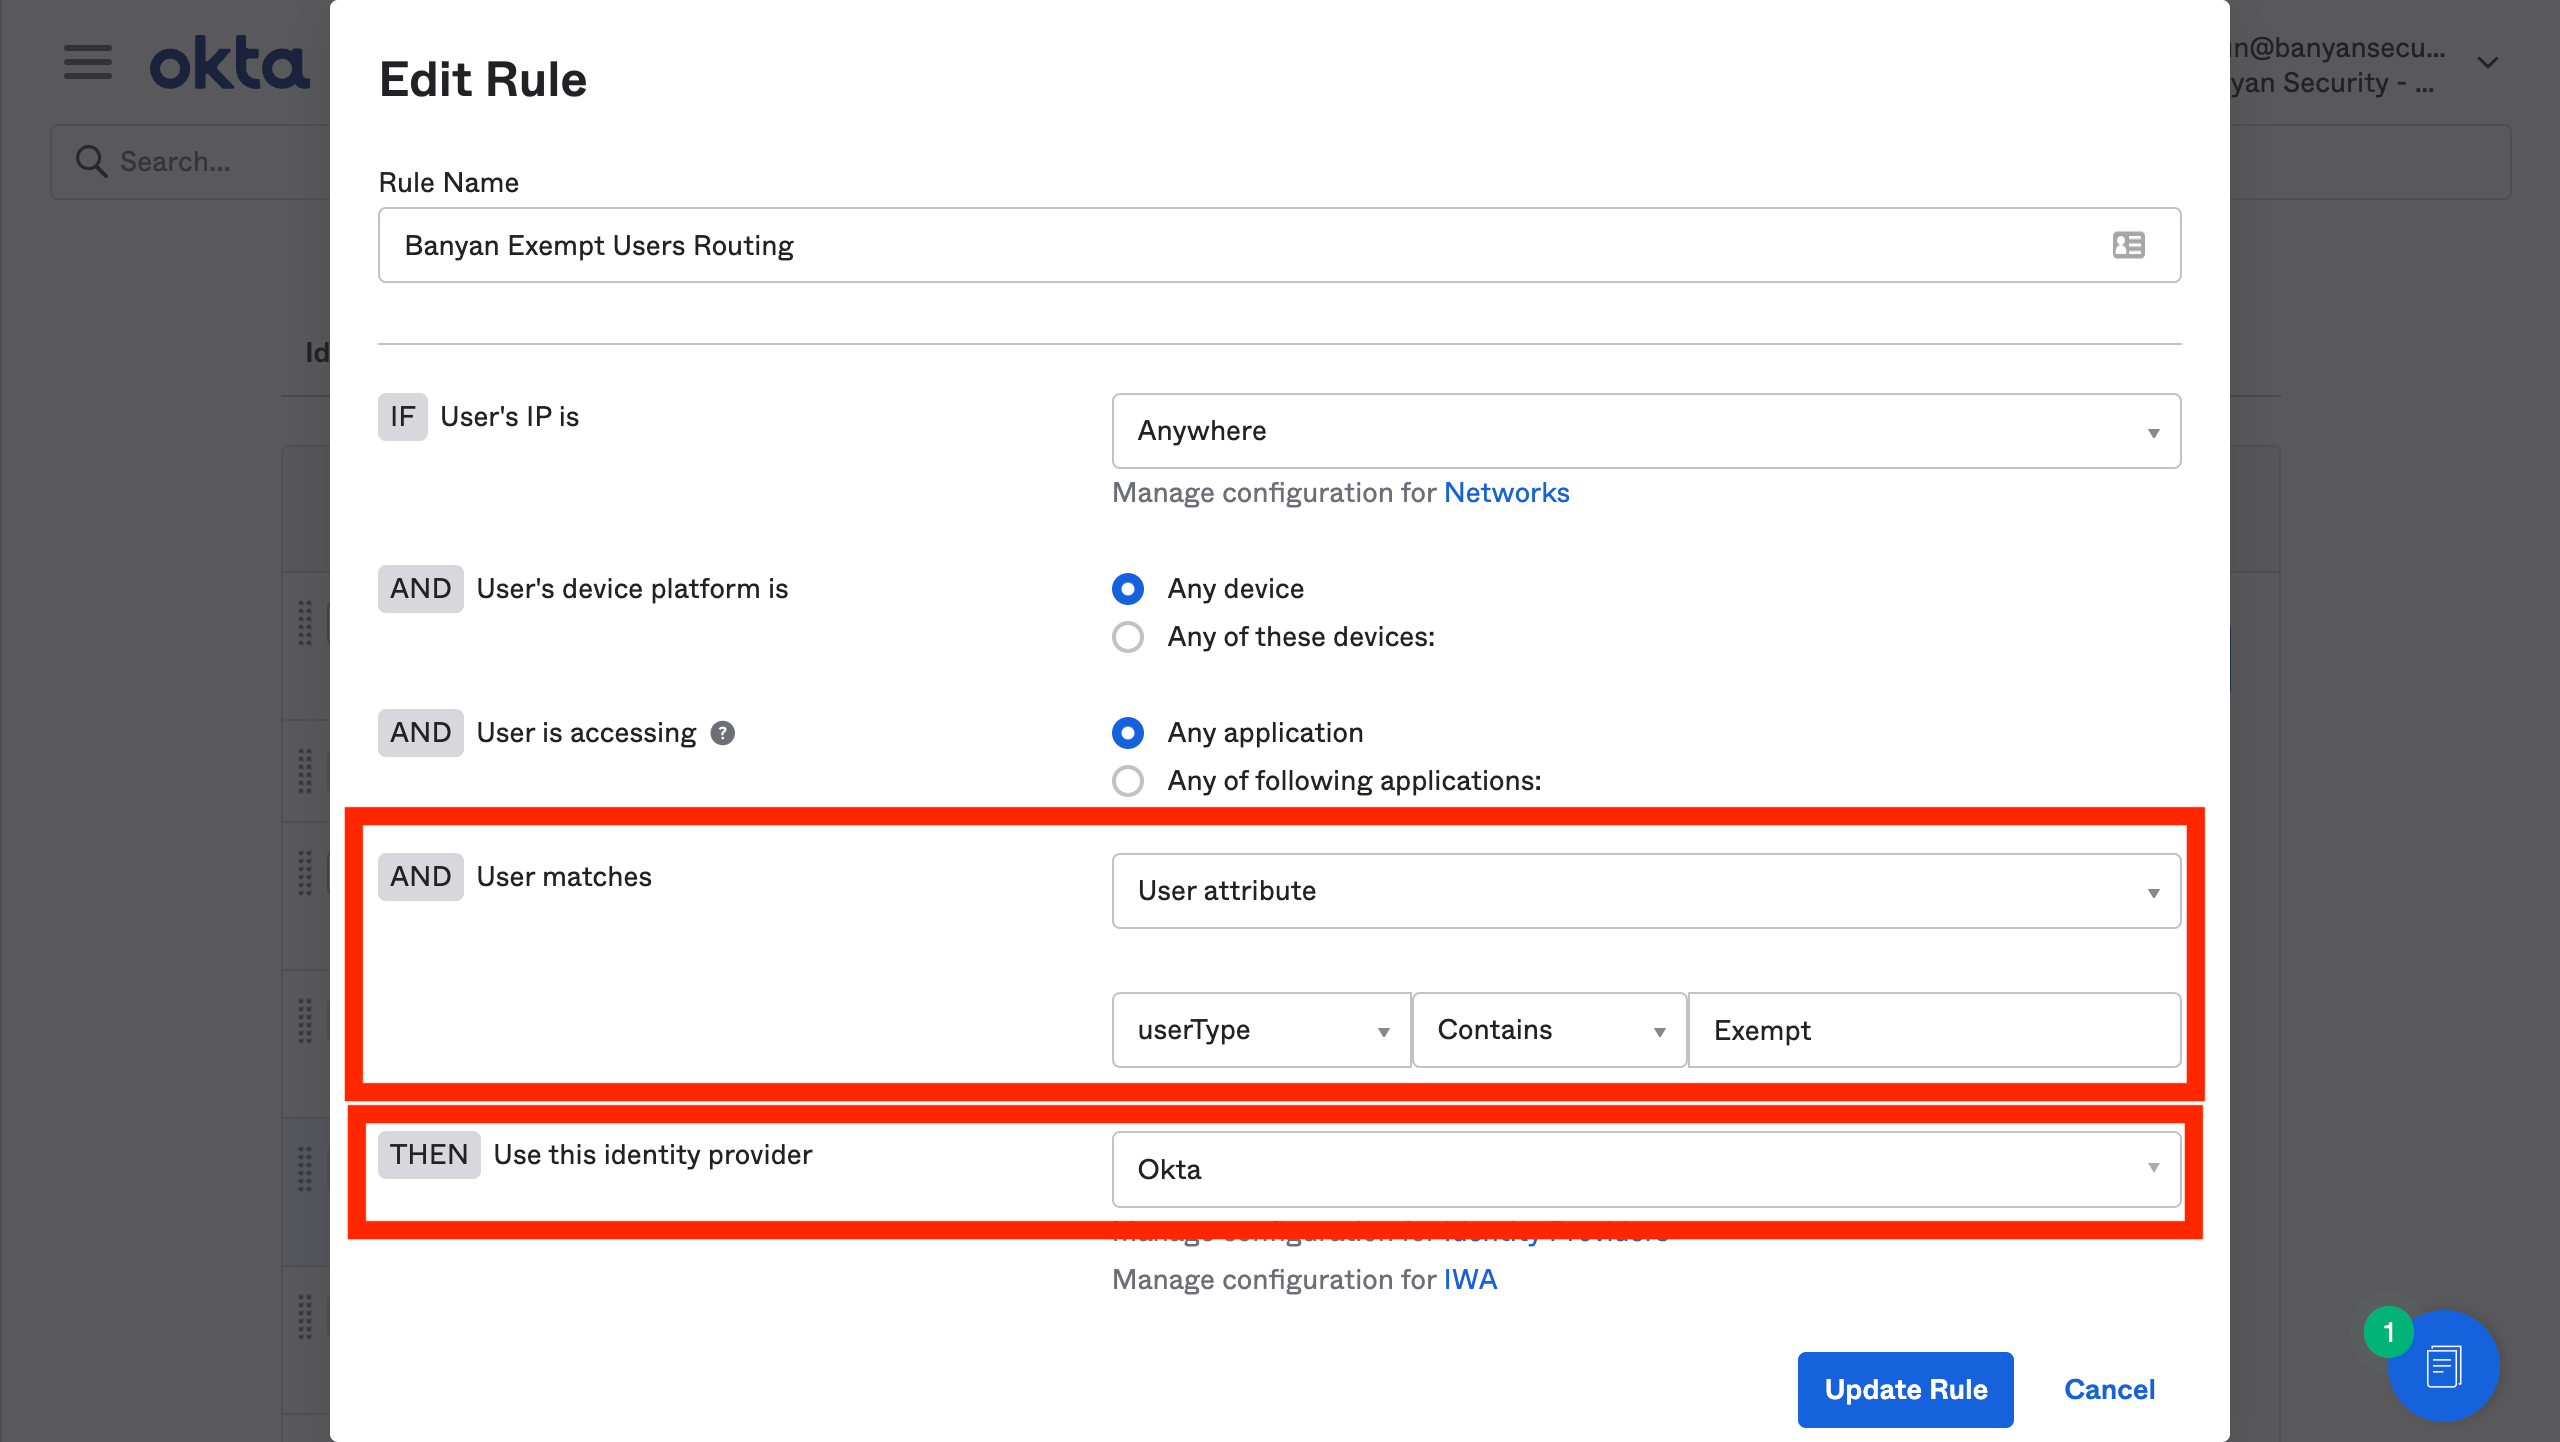
2. Place this routing rule above the CSE Policy Engine Routing rule
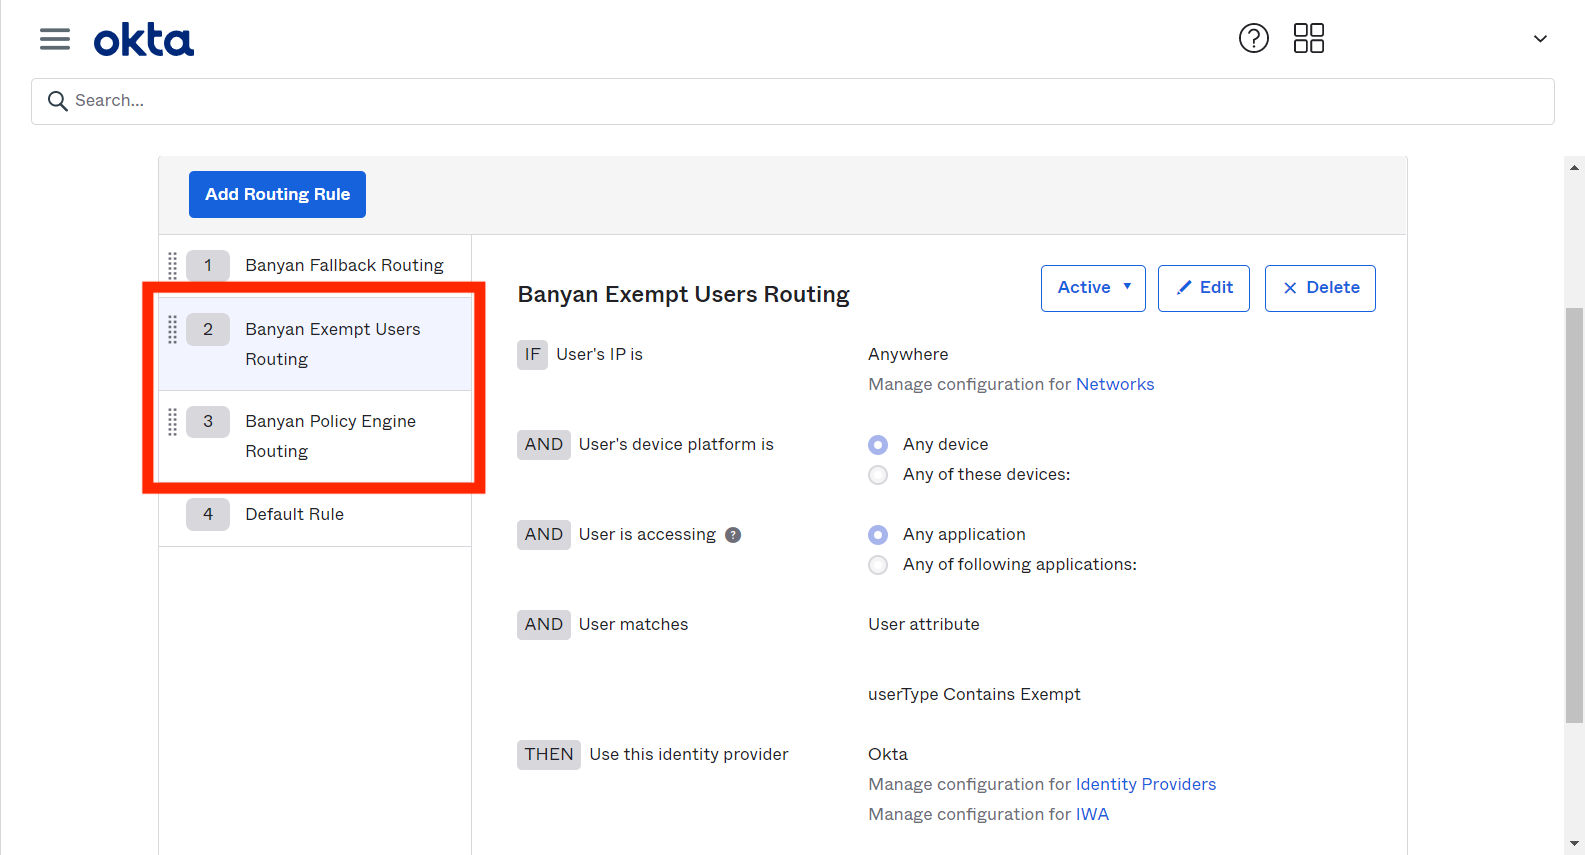
The summary of your Okta Routing Rules is then as follows:
| Routing Rule | Applications to Route | IdP to Route to |
|---|---|---|
| 1. CSE Fallback Routing | CSE Device Registration Provider | Okta |
| 2. CSE Exempt Users Routing | Any Application | Okta |
| 3. CSE Policy Engine Routing | Any Application | CSE Policy Engine |
| 4. Default Rule | Any Application | Okta |
Exempting Non-SaaS Applications from Passwordless
By default, enabling passwordless for Okta will apply to all CSE service access flows. To exempt Hosted Websites and CSE app authentication for Infrastructure Services and Service Tunnels from leveraging passwordless, complete the following steps:
1. Edit the CSE Fallback Routing rule in Okta
2. Add the CSE TrustProvider application to the rule and Save.
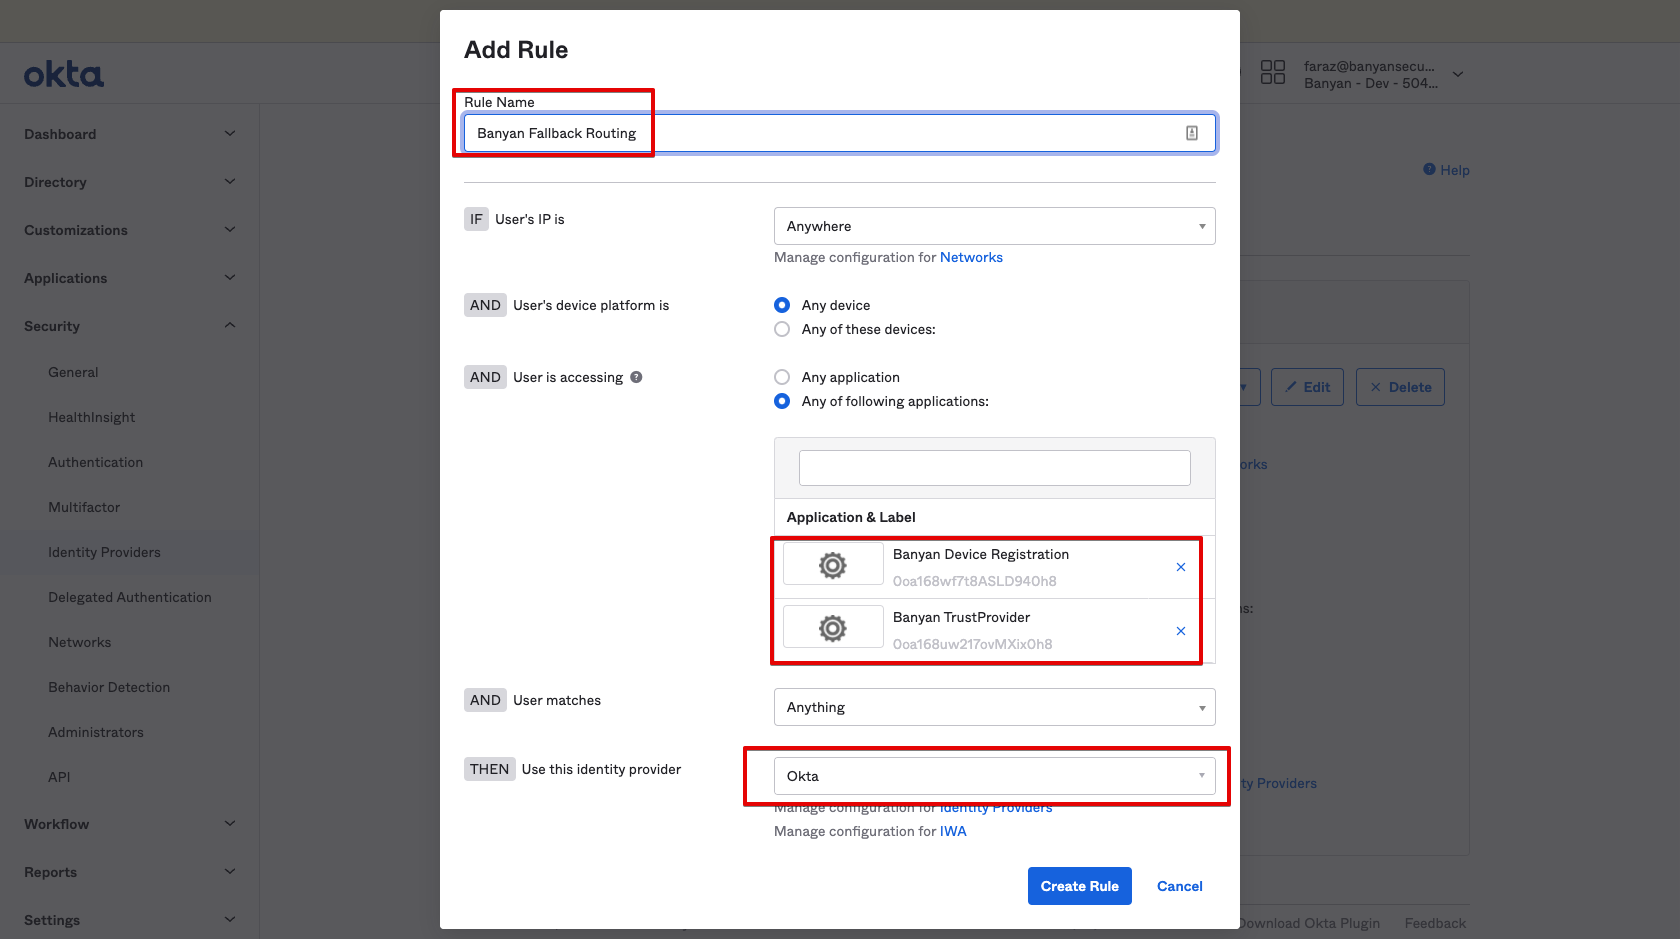
Now, all Hosted Websites and CSE app authentication for Infrastructure Services and Service Tunnels will not go through CSE Passwordless and leverage Okta for authentication. A summary of your Okta Routing Rules is as follows:
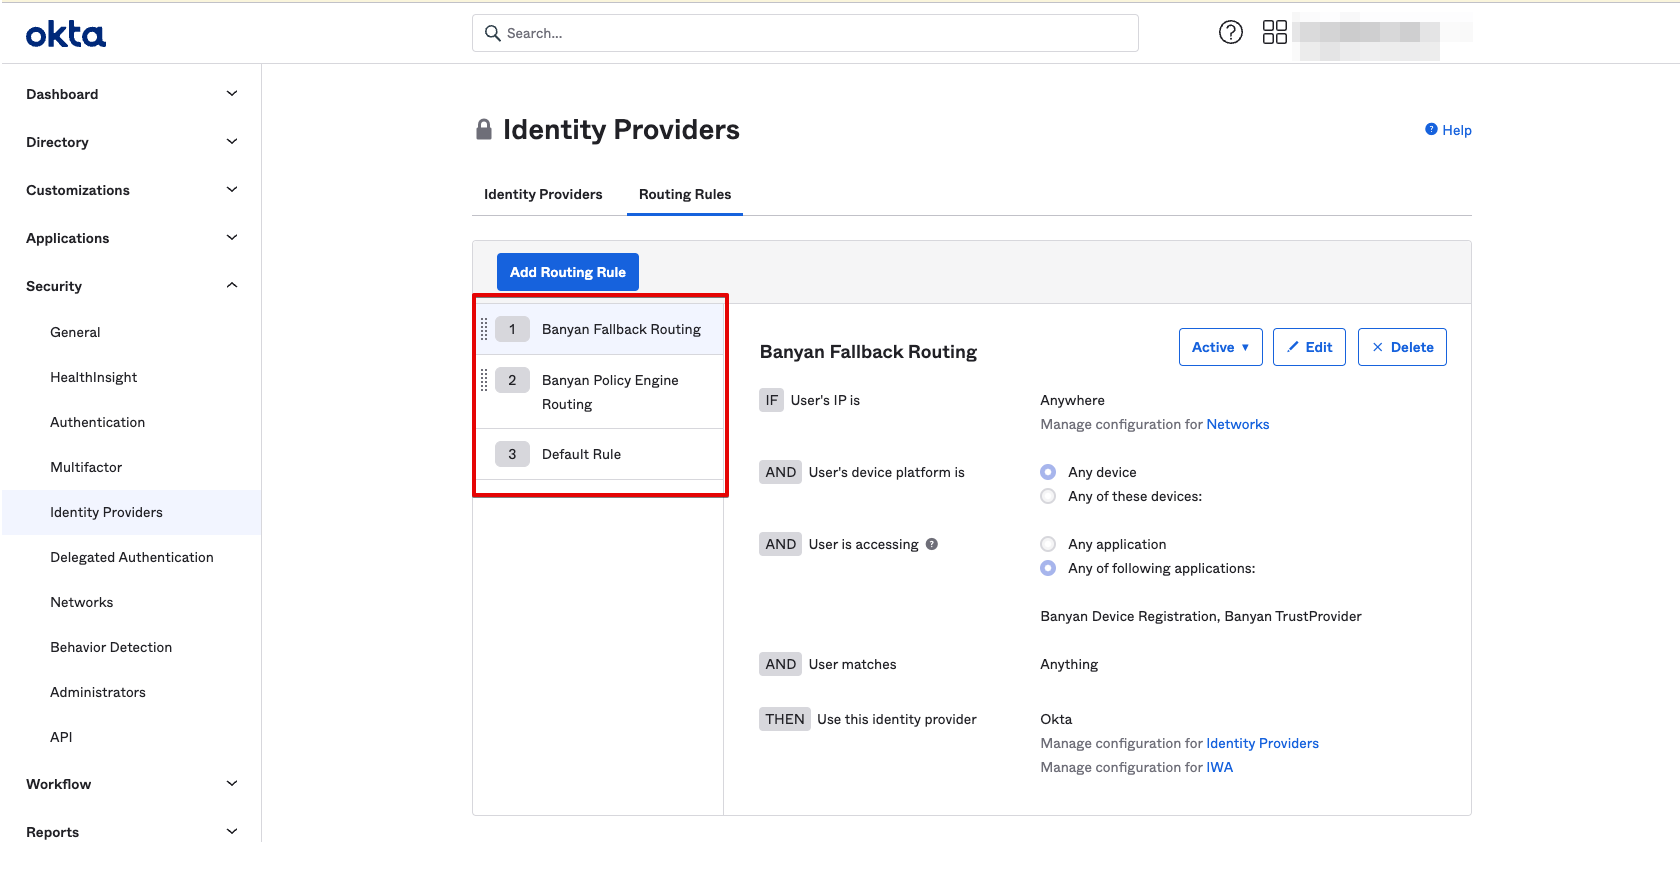
| Routing Rule | Applications to Route | IdP to Route to |
|---|---|---|
| 1. CSE Fallback Routing | CSE Device Registration Provider, CSE TrustProvider | Okta |
| 2. CSE Policy Engine Routing | Any Application | CSE Policy Engine |
| 3. Default Rule | Any Application | Okta |
IDP-based Sign On Policy
When using global session policy rules (specifically MFA) in Okta, and when using third-party IdP and routing rules for SaaS applications, Okta creates an MFA challenge for each IdP in the authentication chain. This results in end users being prompted twice for MFA challenges.
To avoid this undesired end user experience, Okta has a feature (available in early access) that allows the Okta admin to specify which IdP the global session policy rule(s) will apply to, such as “Okta”.
To configure this early access feature:
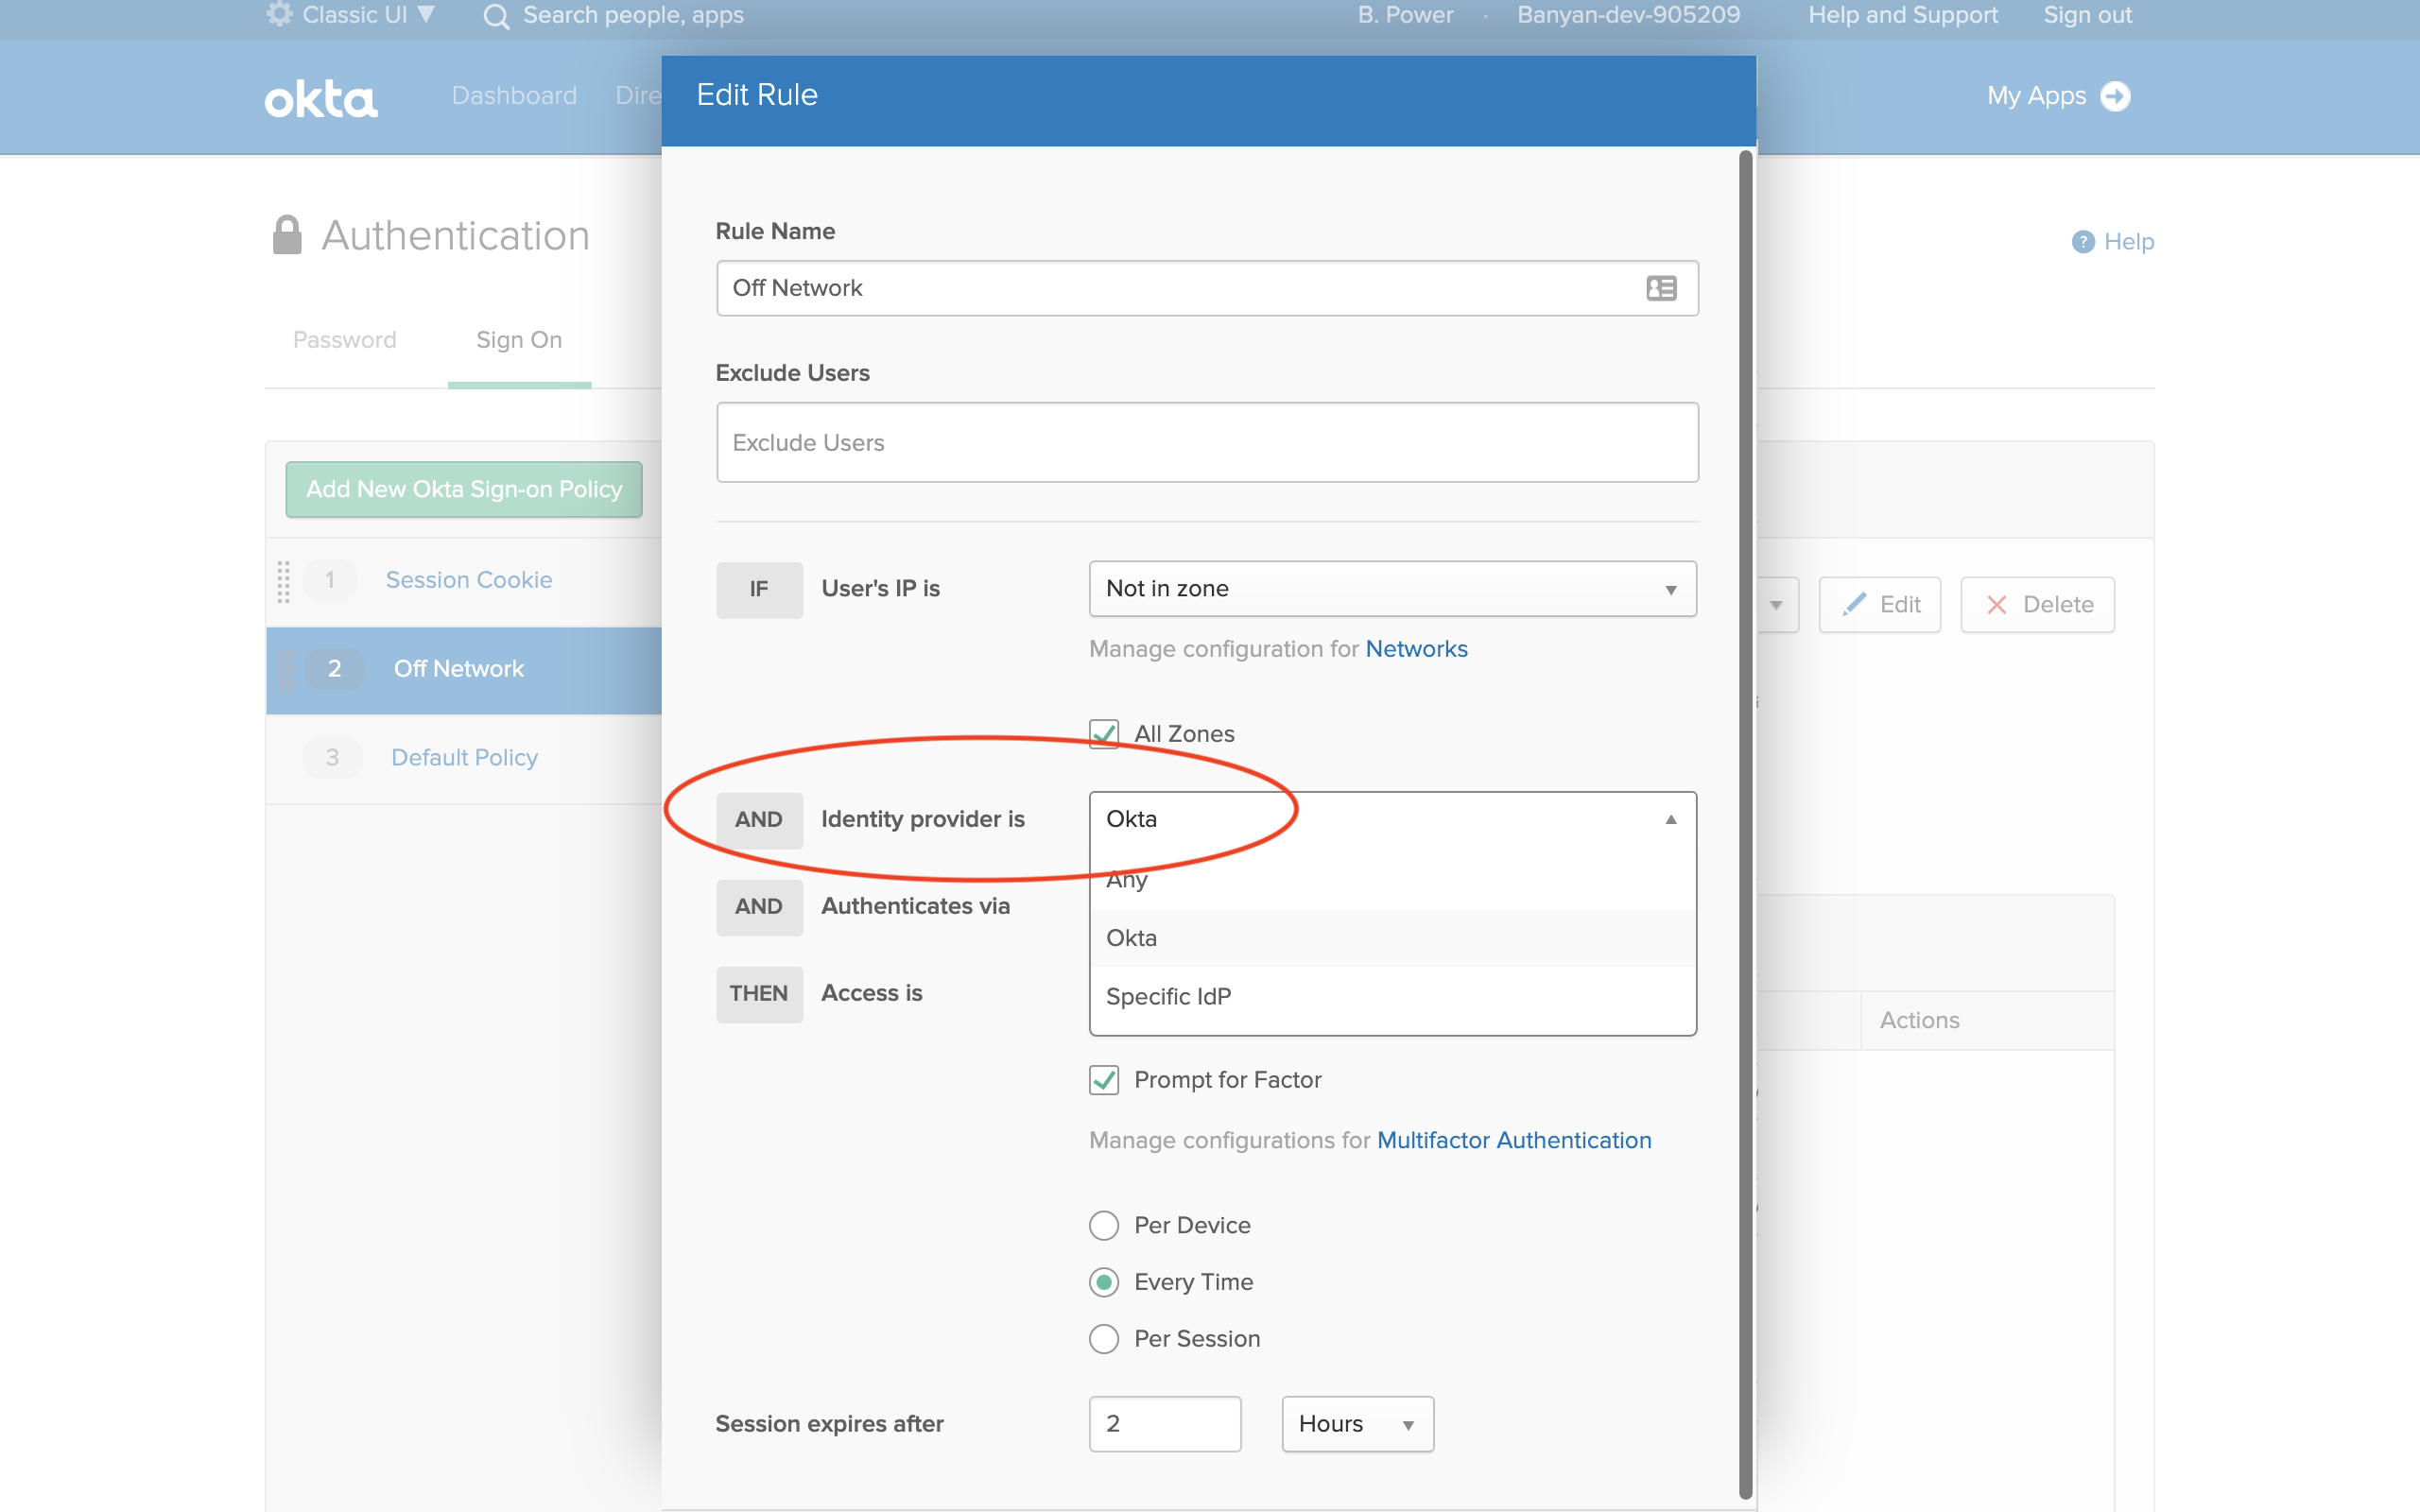
1. Navigate from Security > Global Session Policy. (In organizations still on Okta Classic Engine, the legacy path is Security > Authentication > Sign On.)
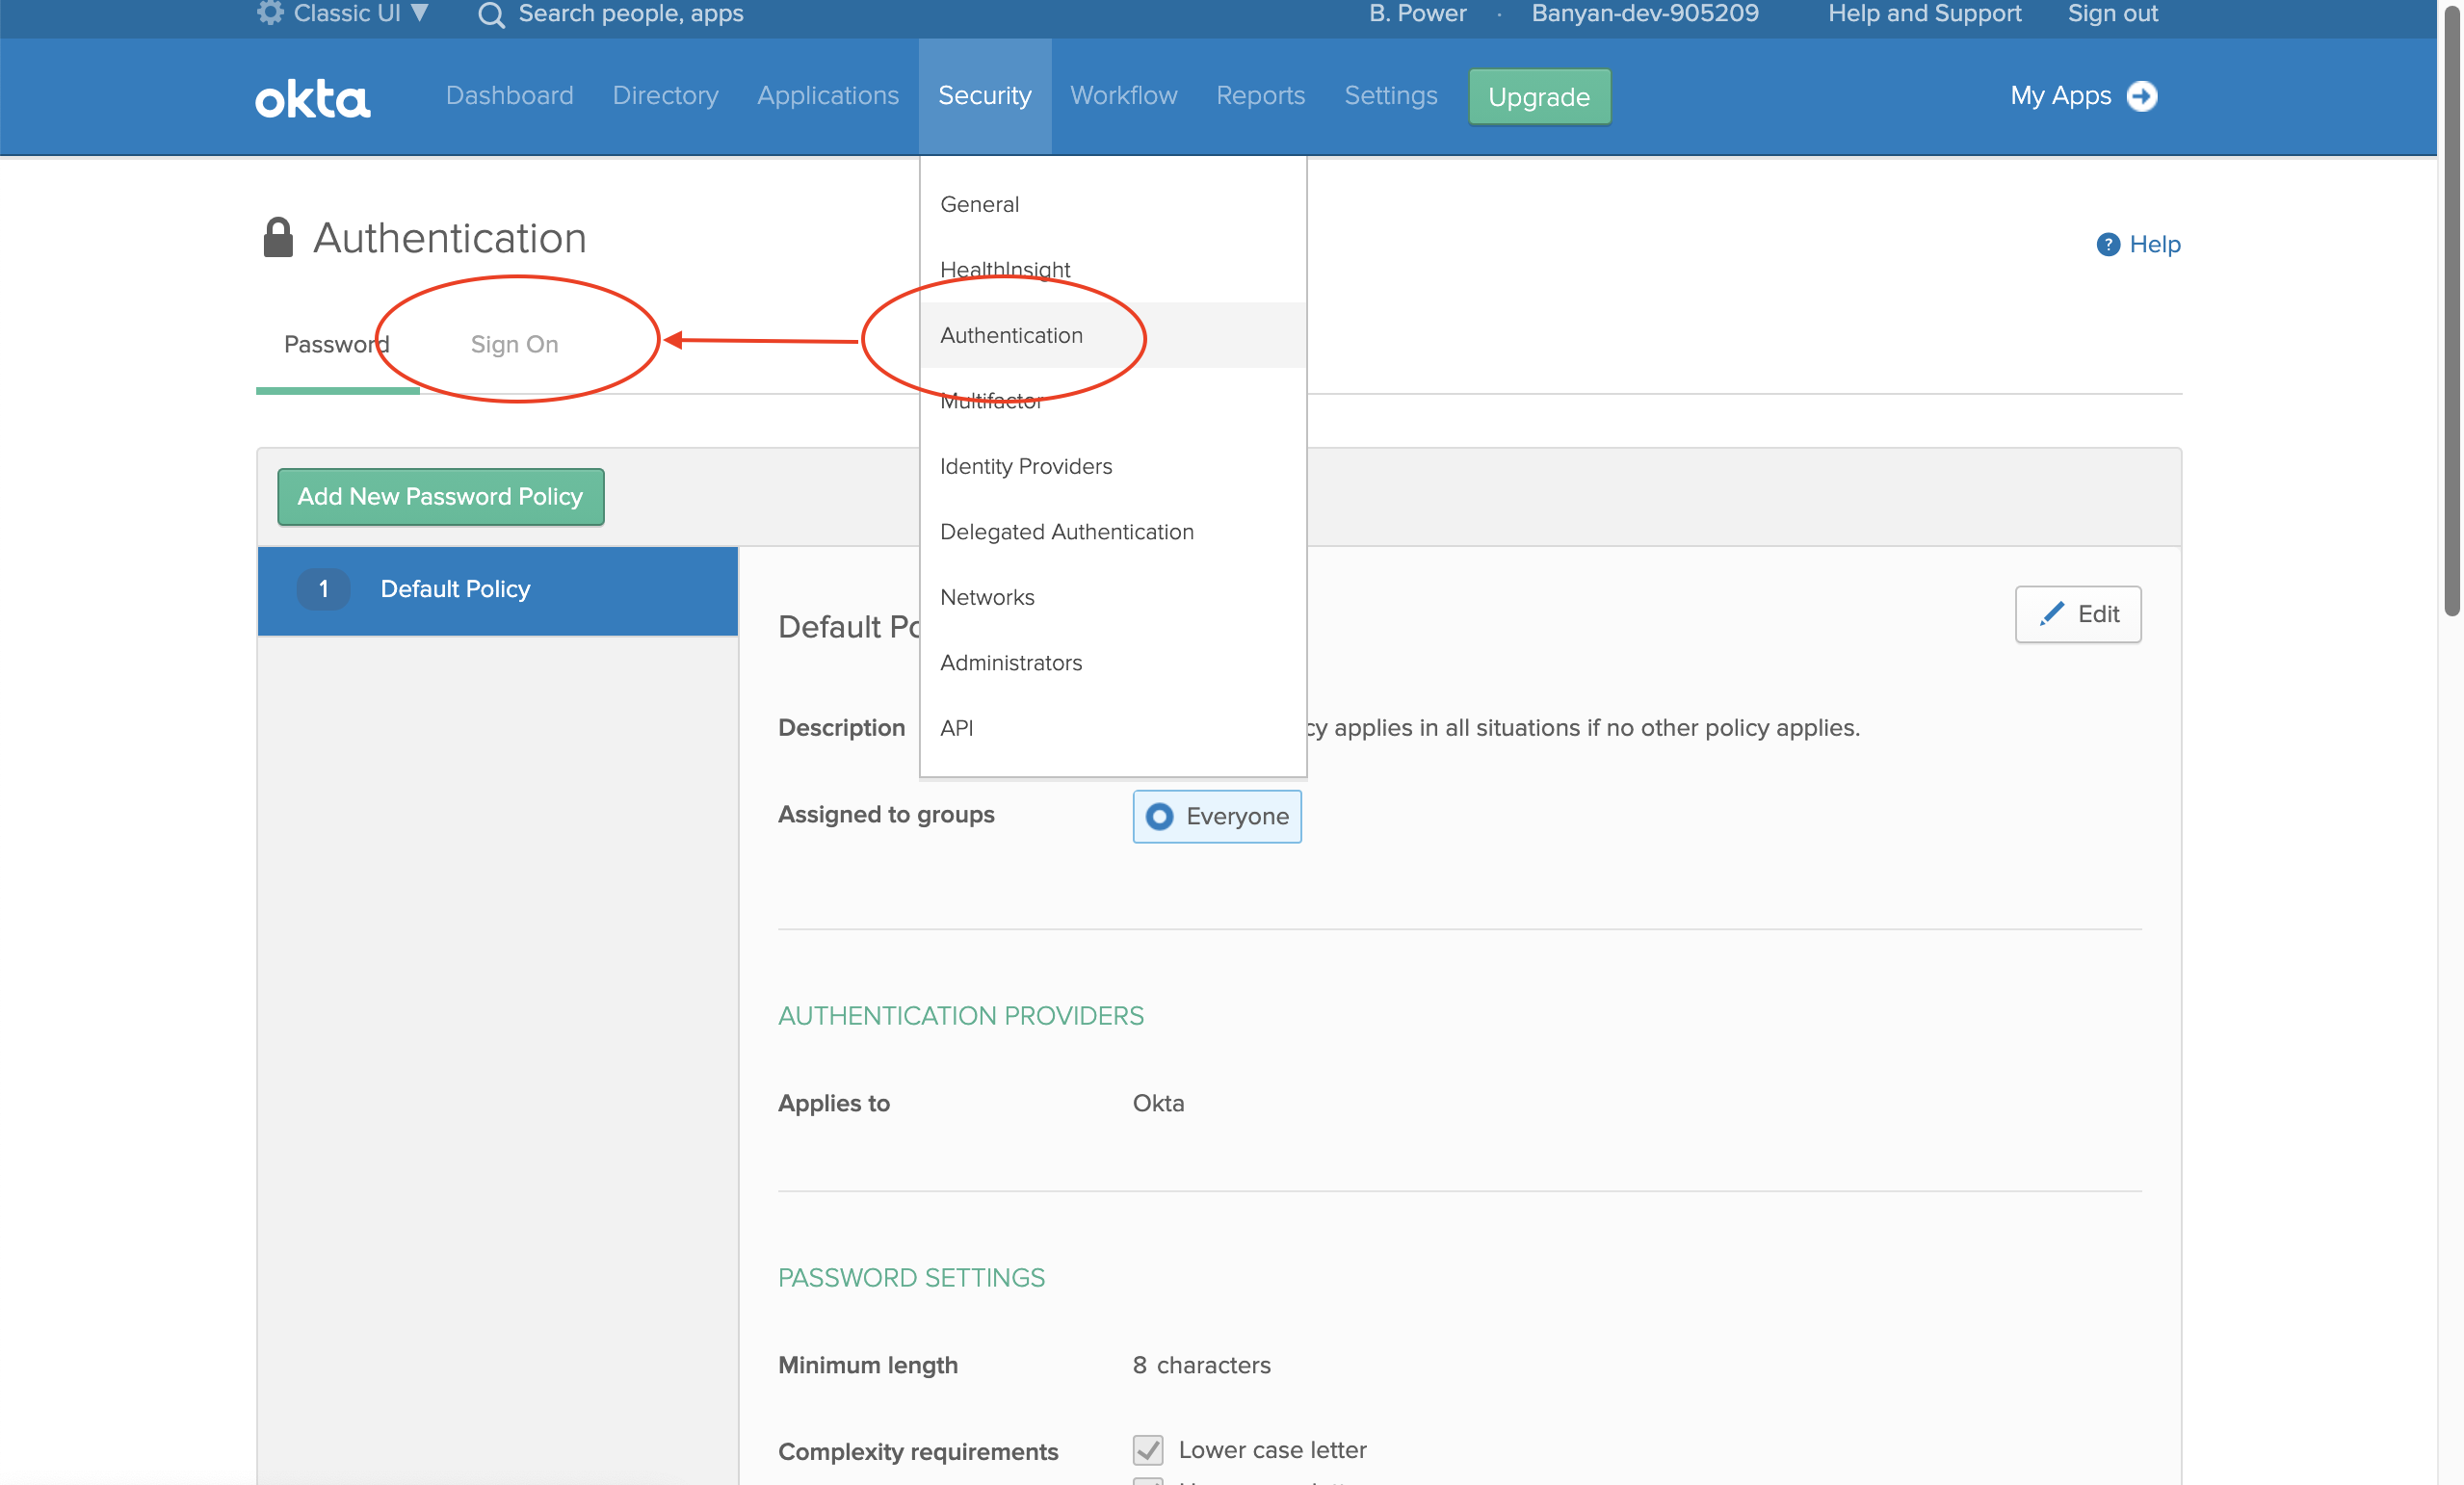
2. Edit an existing global session policy, and then add a new rule.
3. Locate the field AND Identity Provider, and then select Okta.
If you do not see the AND Identity Provider option, you will need to file a ticket to Okta Support to “Enable feature - IdP-based sign on policy”. Okta Support will typically enable this feature for you within a few hours.