Kubernetes OIDC Authentication
Leverage SonicWall Cloud Secure Edge OIDC token capabilities to manage end user access to Kubernetes API Servers, including configuring RBAC policies for K8S
- Last validated: Jul 15, 2026
Overview
As described in the zero-trust access to the Kubernetes API article, Cloud Secure Edge’s (CSE) default approach is to treat K8S like any other TCP service and be agnostic to the underlying K8S authentication method. You can retain your current K8S authentication mechanism - be it password, client cert, JWT tokens, etc. CSE then creates zero-trust connectivity at the TCP layer using Mutually Authenticated TLS (MTLS), so end users can conveniently yet securely connect to your K8S cluster without needing to rely on a VPN.
In many Zero Trust scenarios, security and/or operational requirements may need you to change how K8S authentication and authorization is set up.
Some example scenarios include:
- In Managed K8S offerings, the cloud provider uses their own Identity and Access Management systems for authentication and authorization. However, this requires setting up an entirely separate IdP for K8S access, and configuring RBAC rules for individual users or service accounts manually.
- In Hosted K8S distributions, it is possible to configure the cluster to integrate with an organization’s existing IdP but it is cumbersome to setup and KubeConfig files for authentication typically need to be distributed manually to developers.
In both example scenarios, K8S Authorization via Kubernetes RBAC is difficult to scale with an organization’s Zero Trust security policies that require policies based on IdP Groups and Device Trust.
In such cases, you can leverage K8S’ built-in OIDC authentication capability.

Since the CSE platform includes a standards-compliant OIDC Provider, it natively provides the ability to authenticate and authorize users against K8S clusters. This gives end users the ability to connect to K8S clusters without a VPN, authenticate against the cluster directly through the desktop app, and authorize users with RBAC using CSE Roles and Policies.
Best of all, the CSE OIDC mechanism works seamlessly with the Mutually Authenticated TLS (MTLS) mechanism, letting you choose one or both capabilities based on your needs.
How It Works
The diagram below details the VPN-free Access with K8S OIDC authentication flow works in CSE.
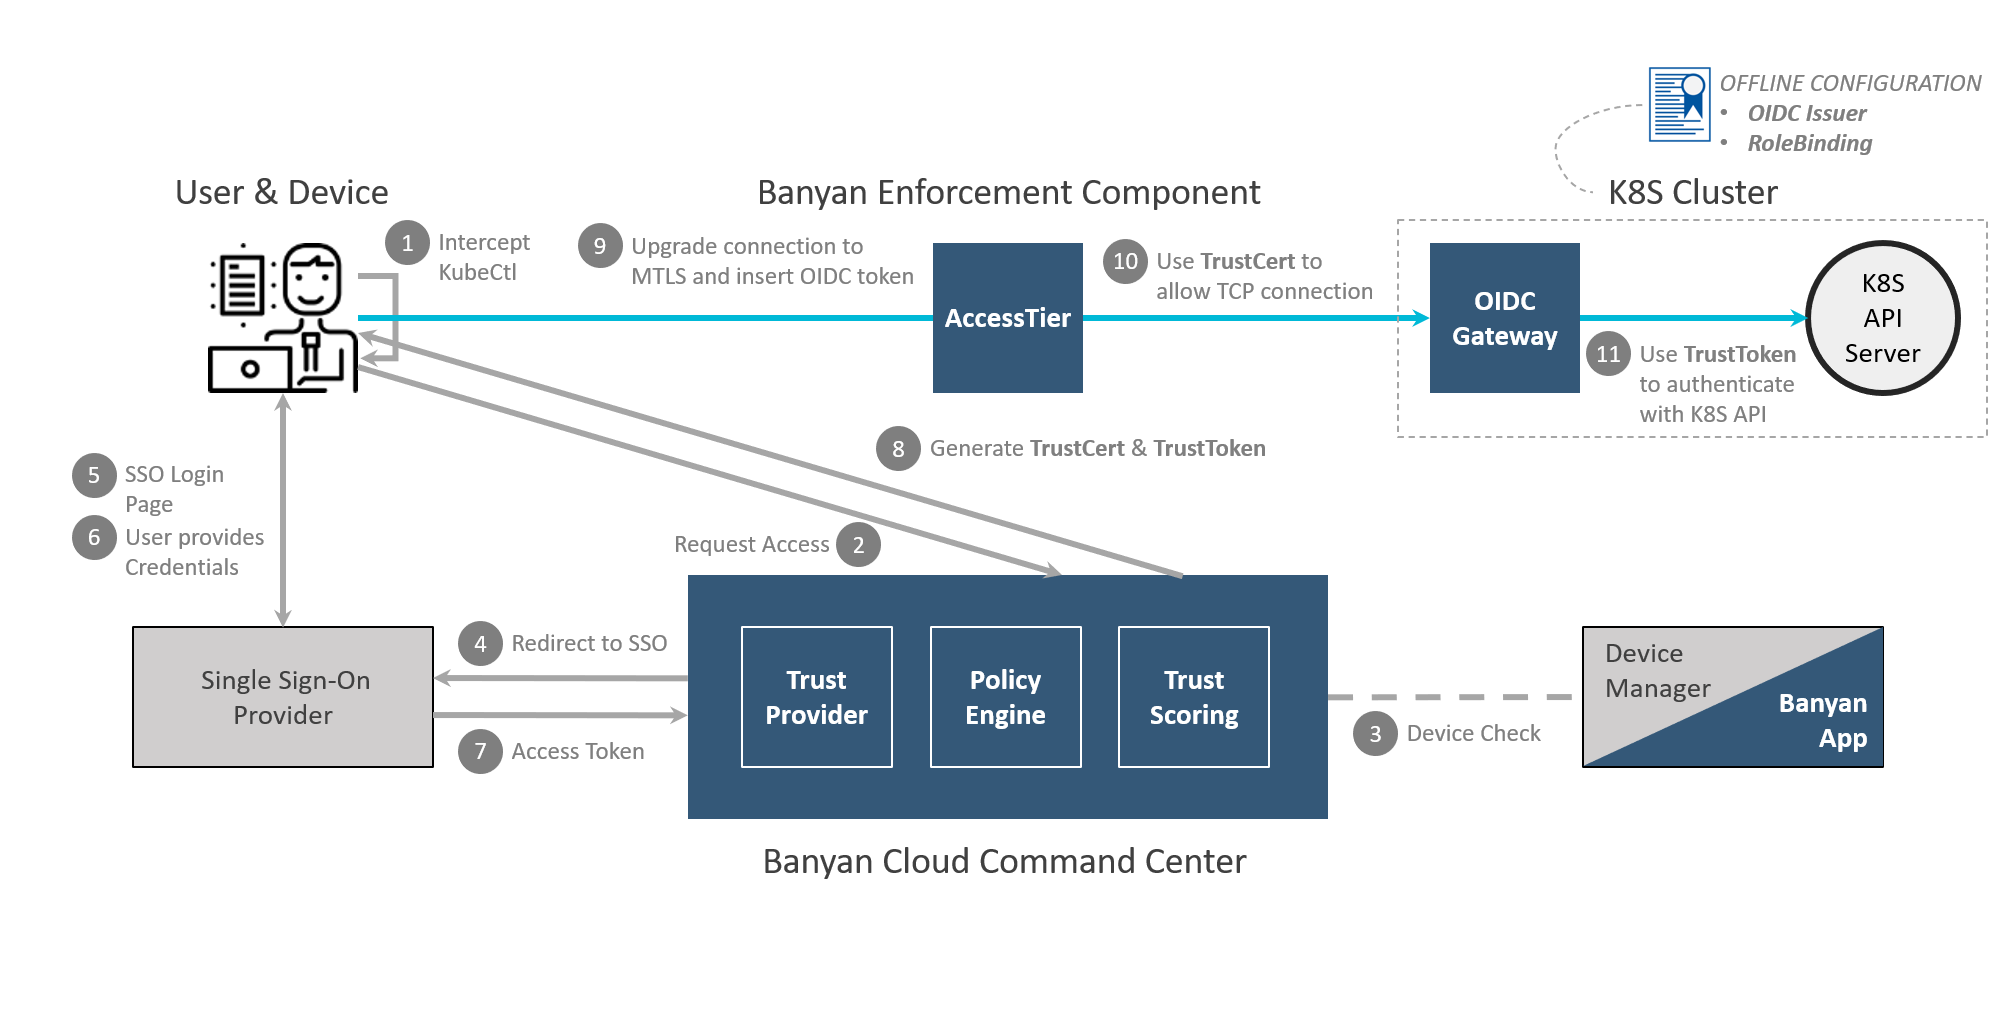
With CSE, you deploy a Kube OIDC Proxy in your cluster, which seamlessly extends the authentication and authorization capabilities of any K8S cluster without making any changes to existing K8S API access.
The request authorization flow using the Kube OIDC Proxy leverages K8S’s User Impersonation authentication strategy, where once the request reaches the K8S cluster it is modified by the Kube OIDC Proxy before reaching the actual Kube API server. This technique allows CSE to secure access to any flavour of K8S, without needing to make any changes to existing IAM.
Prerequisites
This guide assumes you have:
- Deployed an Access Tier with access to your Kubernetes cluster.
- Installed desktop app v.1.12.2+ on your desktop device and registered with a valid CSE organization.
- Verified the Identity Provider Redirect URL uses the TrustProvider v2 endpoints. (In the Command Center, navigate to Settings > TrustProvider > Identity Provider and ensure the Redirect URL is formatted as
https://<ORG NAME>.trust.banyanops.com/v2/callback) - Completed the steps to create a Role and create a Policy as described in the Zero Trust Access to the Kubernetes API article.
- Installed Helm v3+ following Helm installation instructions.
- Installed kubectl v1.19+ on your desktop machine (see note below).
(This feature uses the proxy-url capability available in kubectl v1.19+. If you’re using an older version of kubectl you will need to add https_proxy env var in front of your kubectl commands where noted in this guide).
Steps
With the prerequisites in place, enable K8S OIDC Authentication:
Step 1. In the Command Center, gather the OIDC Provider details & Refresh Token.
Step 2. In your K8S Cluster, deploy the Kube OIDC Proxy.
Step 3. In the Command Center, define a Kubernetes Service.
Step 4. In your K8S Cluster, set up K8S RBAC authorization policies.
Step 5. On the end user device, click “Connect” in the desktop app.
Step 1. Gather OIDC Provider Details & Refresh Token
We will use CSE’s OIDC Provider capability - via a standard OIDC App called “App Client for External Services” - to issue an OIDC JWT token that can be used in conjunction with authentication and authorization capabilities of any K8S cluster.
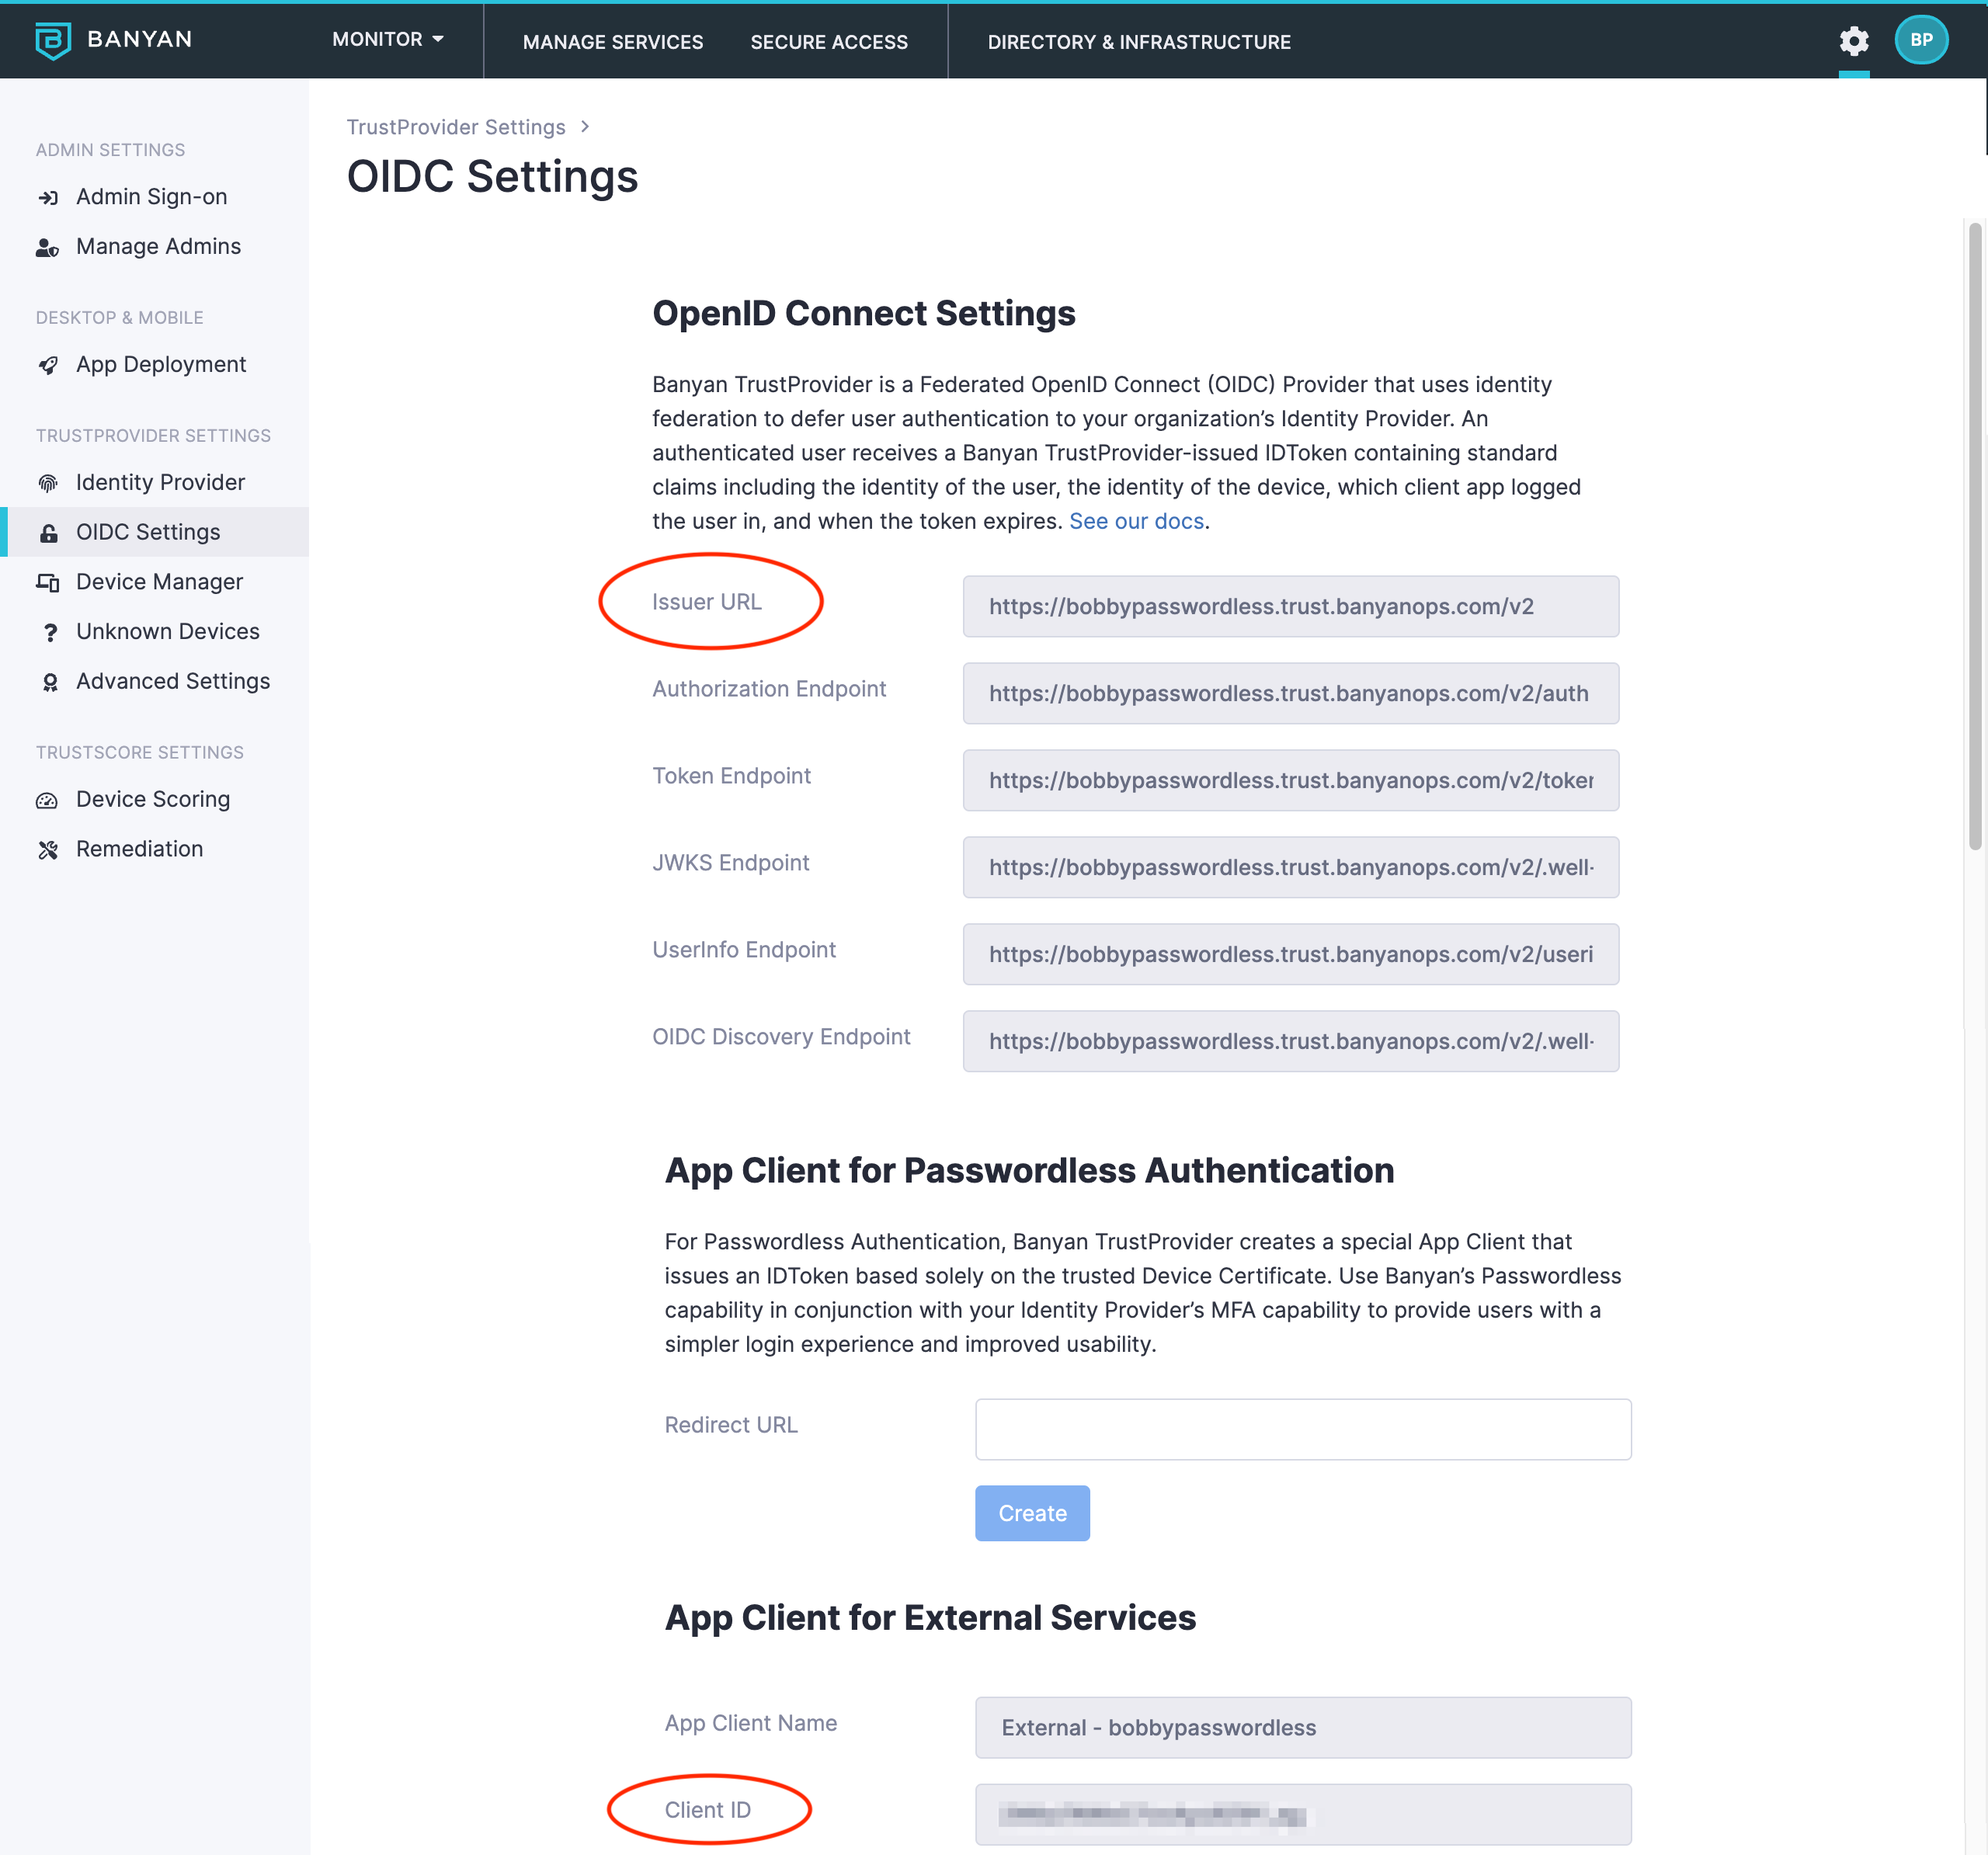
1.1 In the Command Center, navigate to Settings > TrustProvider Settings > OIDC Settings and note the OIDC values. These will be used in the upcoming steps.
- Issuer URL (from OpenID Connect Settings)
- Client ID (from External Service Settings)
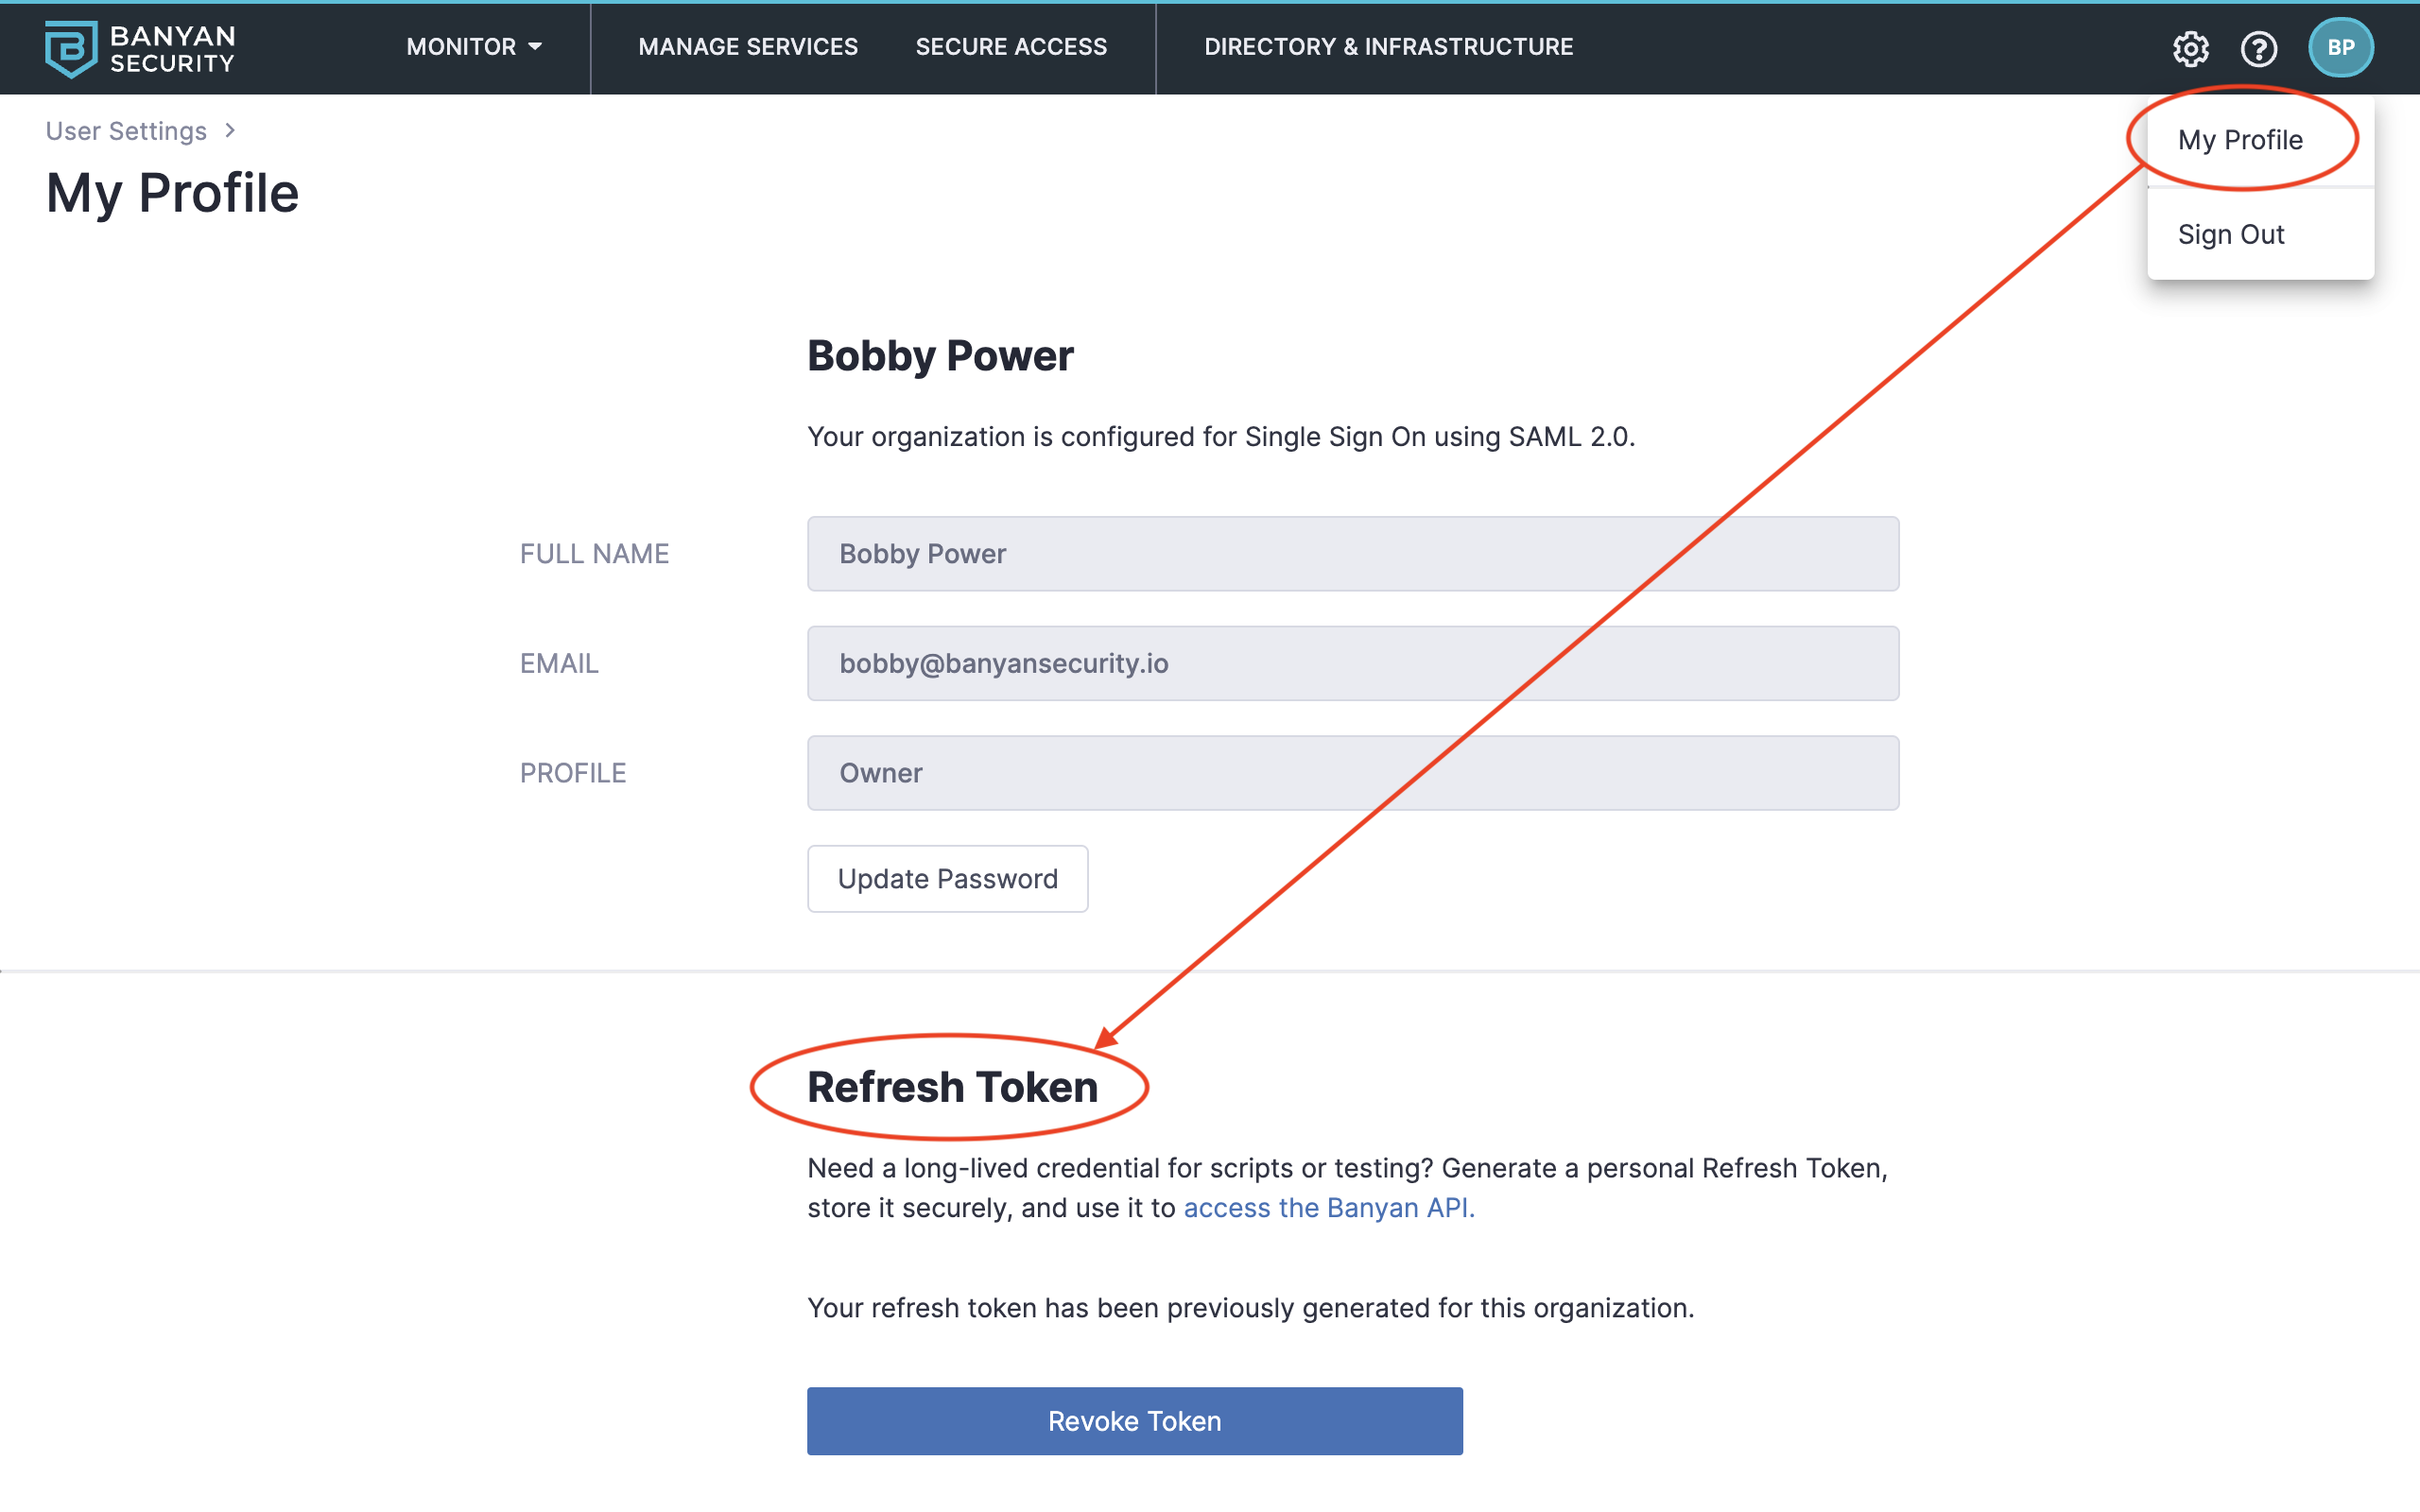
1.2 Click your user initials in the top-right corner and then navigate to My Profile and then take note of (or generate) your CSE Refresh Token. This will be used in the upcoming steps.
SAML Admins log in via Single Sign-On and cannot generate a Refresh Token. You must be logged into the Command Center as a Local CSE (formerly Banyan) Admin in order to generate a Refresh Token. If you are a SAML Admin, please have your account Owner create a Local Admin account using a unique email address, and use that Local Admin account before proceeding to the steps below.
Step 2. Deploy the Kube-OIDC-Proxy
Kube-OIDC-Proxy is an Open Source effort, led by Jetstack. You may use any other OIDC gateway with similar capabilities.
We will use a Kube-OIDC-Proxy to define a new K8S API endpoint that will allow end users to authenticate using the CSE OIDC JWT token.
2.1 Launch your preferred Terminal or Command Line tool.
2.2 Run the command below to access the Helm chart.
$ helm version
version.BuildInfo{Version:"v3.2.4", GitCommit:"0ad800ef43d3b826f31a5ad8dfbb4fe05d143688", GitTreeState:"dirty", GoVersion:"go1.14.3"}
2.3 Run the command to clone the Kube-OIDC-Proxy repo project locally.
$ git clone https://github.com/banyansecurity/kube-oidc-proxy
2.4 Run the command to navigate to the kube-oidc-proxy directory.
$ cd kube-oidc-proxy
2.5 Run the command to switch to the banyan branch.
$ git checkout banyan
2.6 Navigate to the cert Helm chart location.
$ cd deploy/charts/kube-oidc-proxy-cert
2.7 Run the command to create the Kube namespace.
$> kubectl create namespace kube-oidc-proxy-ns
2.8 Edit the values.yamlto enter the service domain name as the hostName.
tls:
  hostName: < SERVICE_DOMAIN_NAME, to be used in Step 3 >
2.9 Run the command to install the Helm chart.
If you have already installed the Helm chart and need to upgrade it, then replace install with upgrade in the command below.
$> helm install -n kube-oidc-proxy-ns selfsigned .
2.10 Navigate to the kube-oidc-proxy directory.
cd ../kube-oidc-proxy
or
cd deploy/charts/kube-oidc-proxy
2.11 Modify the following attributes in values.yaml file for the Helm chart.
Exposing the Kubernetes API to the public internet is a serious security risk, so we disable the Ingress option and enable an internal-only LoadBalancer service. The Kube-OIDC-Proxy is not internet facing, and all traffic from the public internet should be routed through the Access Tier.
CSE currently only supports service.type LoadBalancer. However, you can use service.type ClusterIP in some cases (such as bare metal installation) as well.
- Add the exact service name as configured in the Command Center as your
serviceName. - Add your refresh token from Step 1.
- Unhash the appropriate service
annotationto create a load balancer for Kube OIDC proxy. - Add your
clientIdandissuerUrlfrom Step 1.
CSE does not recommend copy-and-pasting your Refresh Token from the Command Center. Please use a more secure way to manage your secrets.
# Default values for kube-oidc-proxy.
# This is a YAML-formatted file.
# Declare variables to be passed into your templates.
replicaCount: 1
auditProxy:
  # required
  serviceName: < your service name - must match the service configured in the CSE Command Center > # required
  refreshToken: < your refresh token, from Step 1 > # required
  restapiUrl: "https://net.banyanops.com"
imagePullSecrets: []
nameOverride: ""
fullnameOverride: ""
service:
  type: LoadBalancer
  port: 443
  annotations:
    # You can use this field to add annotations to the Service.
    # Define it in a key-value pairs. E.g.
    # service.beta.kubernetes.io/aws-load-balancer-internal: "true" ## AWS
    # service.beta.kubernetes.io/azure-load-balancer-internal: "true" ## Azure
    # cloud.google.com/load-balancer-type: "Internal" ## GCP
  loadBalancerIP: ""
  loadBalancerSourceRanges: []
tls:
  # `secretName` must be a name of Secret of TLS type. If not provided a
  # self-signed certificate will get generated.
  secretName: selfsigned-kube-oidc-proxy-cert-tls
  # `hostName` is the domain name that will be optionally added to the self-signed certificate.
# These values needs to be set in overrides in order to get kube-oidc-proxy
# working.
oidc:
  # A minimal configuration requires setting clientId, issuerUrl and usernameClaim
  # values.
  clientId: < CLIENT_ID, from External Service Settings in Step 1 >
  issuerUrl: < ISSUER_URL, from OpenID Connect Settings in Step 1 >
  usernameClaim: email
  # PEM encoded value of CA cert that will verify TLS connection to
  # OIDC issuer URL. If not provided, default hosts root CA's will be used.
  caPEM:
  usernamePrefix: "banyan:"
  groupsClaim: roles
  groupsPrefix: "banyan:"
  signingAlgs:
    - RS256
  requiredClaims: {}
# To enable token passthrough feature
# https://github.com/jetstack/kube-oidc-proxy/blob/master/docs/tasks/token-passthrough.md
tokenPassthrough:
  enabled: false
  audiences: []
# To add extra impersonation headers
# https://github.com/jetstack/kube-oidc-proxy/blob/master/docs/tasks/extra-impersonation-headers.md
extraImpersonationHeaders:
  clientIP: false
  #headers: key1=foo,key2=bar,key1=bar
extraArgs:
  audit-webhook-config-file: /audit/webhook.yaml
  audit-policy-file: /audit/audit.yaml
  audit-webhook-batch-max-wait: 300s #5 mins
  audit-webhook-initial-backoff: 30s
  audit-webhook-batch-max-size: 400
  audit-webhook-batch-throttle-burst: 4
  audit-webhook-batch-throttle-qps: 4
  audit-webhook-batch-buffer-size: 10000
  audit-webhook-truncate-enabled: true
extraVolumeMounts:
  - name: audit
    mountPath: /audit
    readOnly: true
extraVolumes:
  - configMap:
      defaultMode: 420
      name: kube-oidc-proxy-audit-policy
    name: audit
ingress:
  enabled: false
  annotations: {}
    # kubernetes.io/ingress.class: nginx
    # kubernetes.io/tls-acme: "true"
  hosts:
    - host: chart-example.local
      paths: []
  tls: []
  #  - secretName: chart-example-tls
  #    hosts:
  #      - chart-example.local
# Enable Pod Disruption Budget
podDisruptionBudget:
  enabled: false
  minAvailable: 1
resources: {}
  # We usually recommend not to specify default resources and to leave this as a conscious
  # choice for the user. This also increases chances charts run on environments with little
  # resources, such as Minikube. If you do want to specify resources, uncomment the following
  # lines, adjust them as necessary, and remove the curly braces after 'resources:'.
  # limits:
  #   cpu: 100m
  #   memory: 128Mi
  # requests:
  #   cpu: 100m
  #   memory: 128Mi
  #
initContainers: []
nodeSelector: {}
tolerations: []
affinity: {}
2.12 Run the command to install the kube-oidc-proxy Helm chart.
$> helm install -n kube-oidc-proxy-ns banyan-chart .
The necessary annotations to create an internal-only service may be different depending on your cluster - you may need to change the service.annotations or use NodePort in service.type. For a full list of configurable options (such as nodeSelectors and resources), please review the complete values file.
2.13 To push Kube audit events to CSE events you must apply the provided configmap.yaml to the Kube cluster using following kubectl command:
$ kubectl apply -f configmap.yaml
2.14 Once these Helm charts have been installed successfully, take note of two parameters for use in subsequent steps:
- 2.15.i. You will need the internal load balancer IP or URL to provide to the Access Tier to route traffic to the Kube-OIDC-Proxy. Run the command below to display the Kubernetes OIDC proxy service details:
kubectl get svc banyan-chart-kube-oidc-proxy -n kube-oidc-proxy-ns -o json
Then, search for the load balancer hostname.

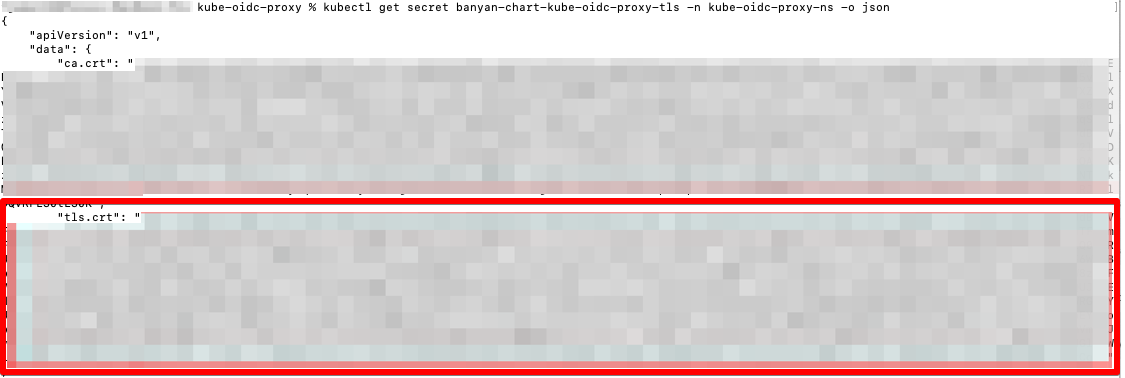
- 2.15.ii. You will also need the Kube-OIDC-Proxy self-signed Certificate Authority Public Key:
kubectl get secret selfsigned-kube-oidc-proxy-cert-tls -n kube-oidc-proxy-ns -o json
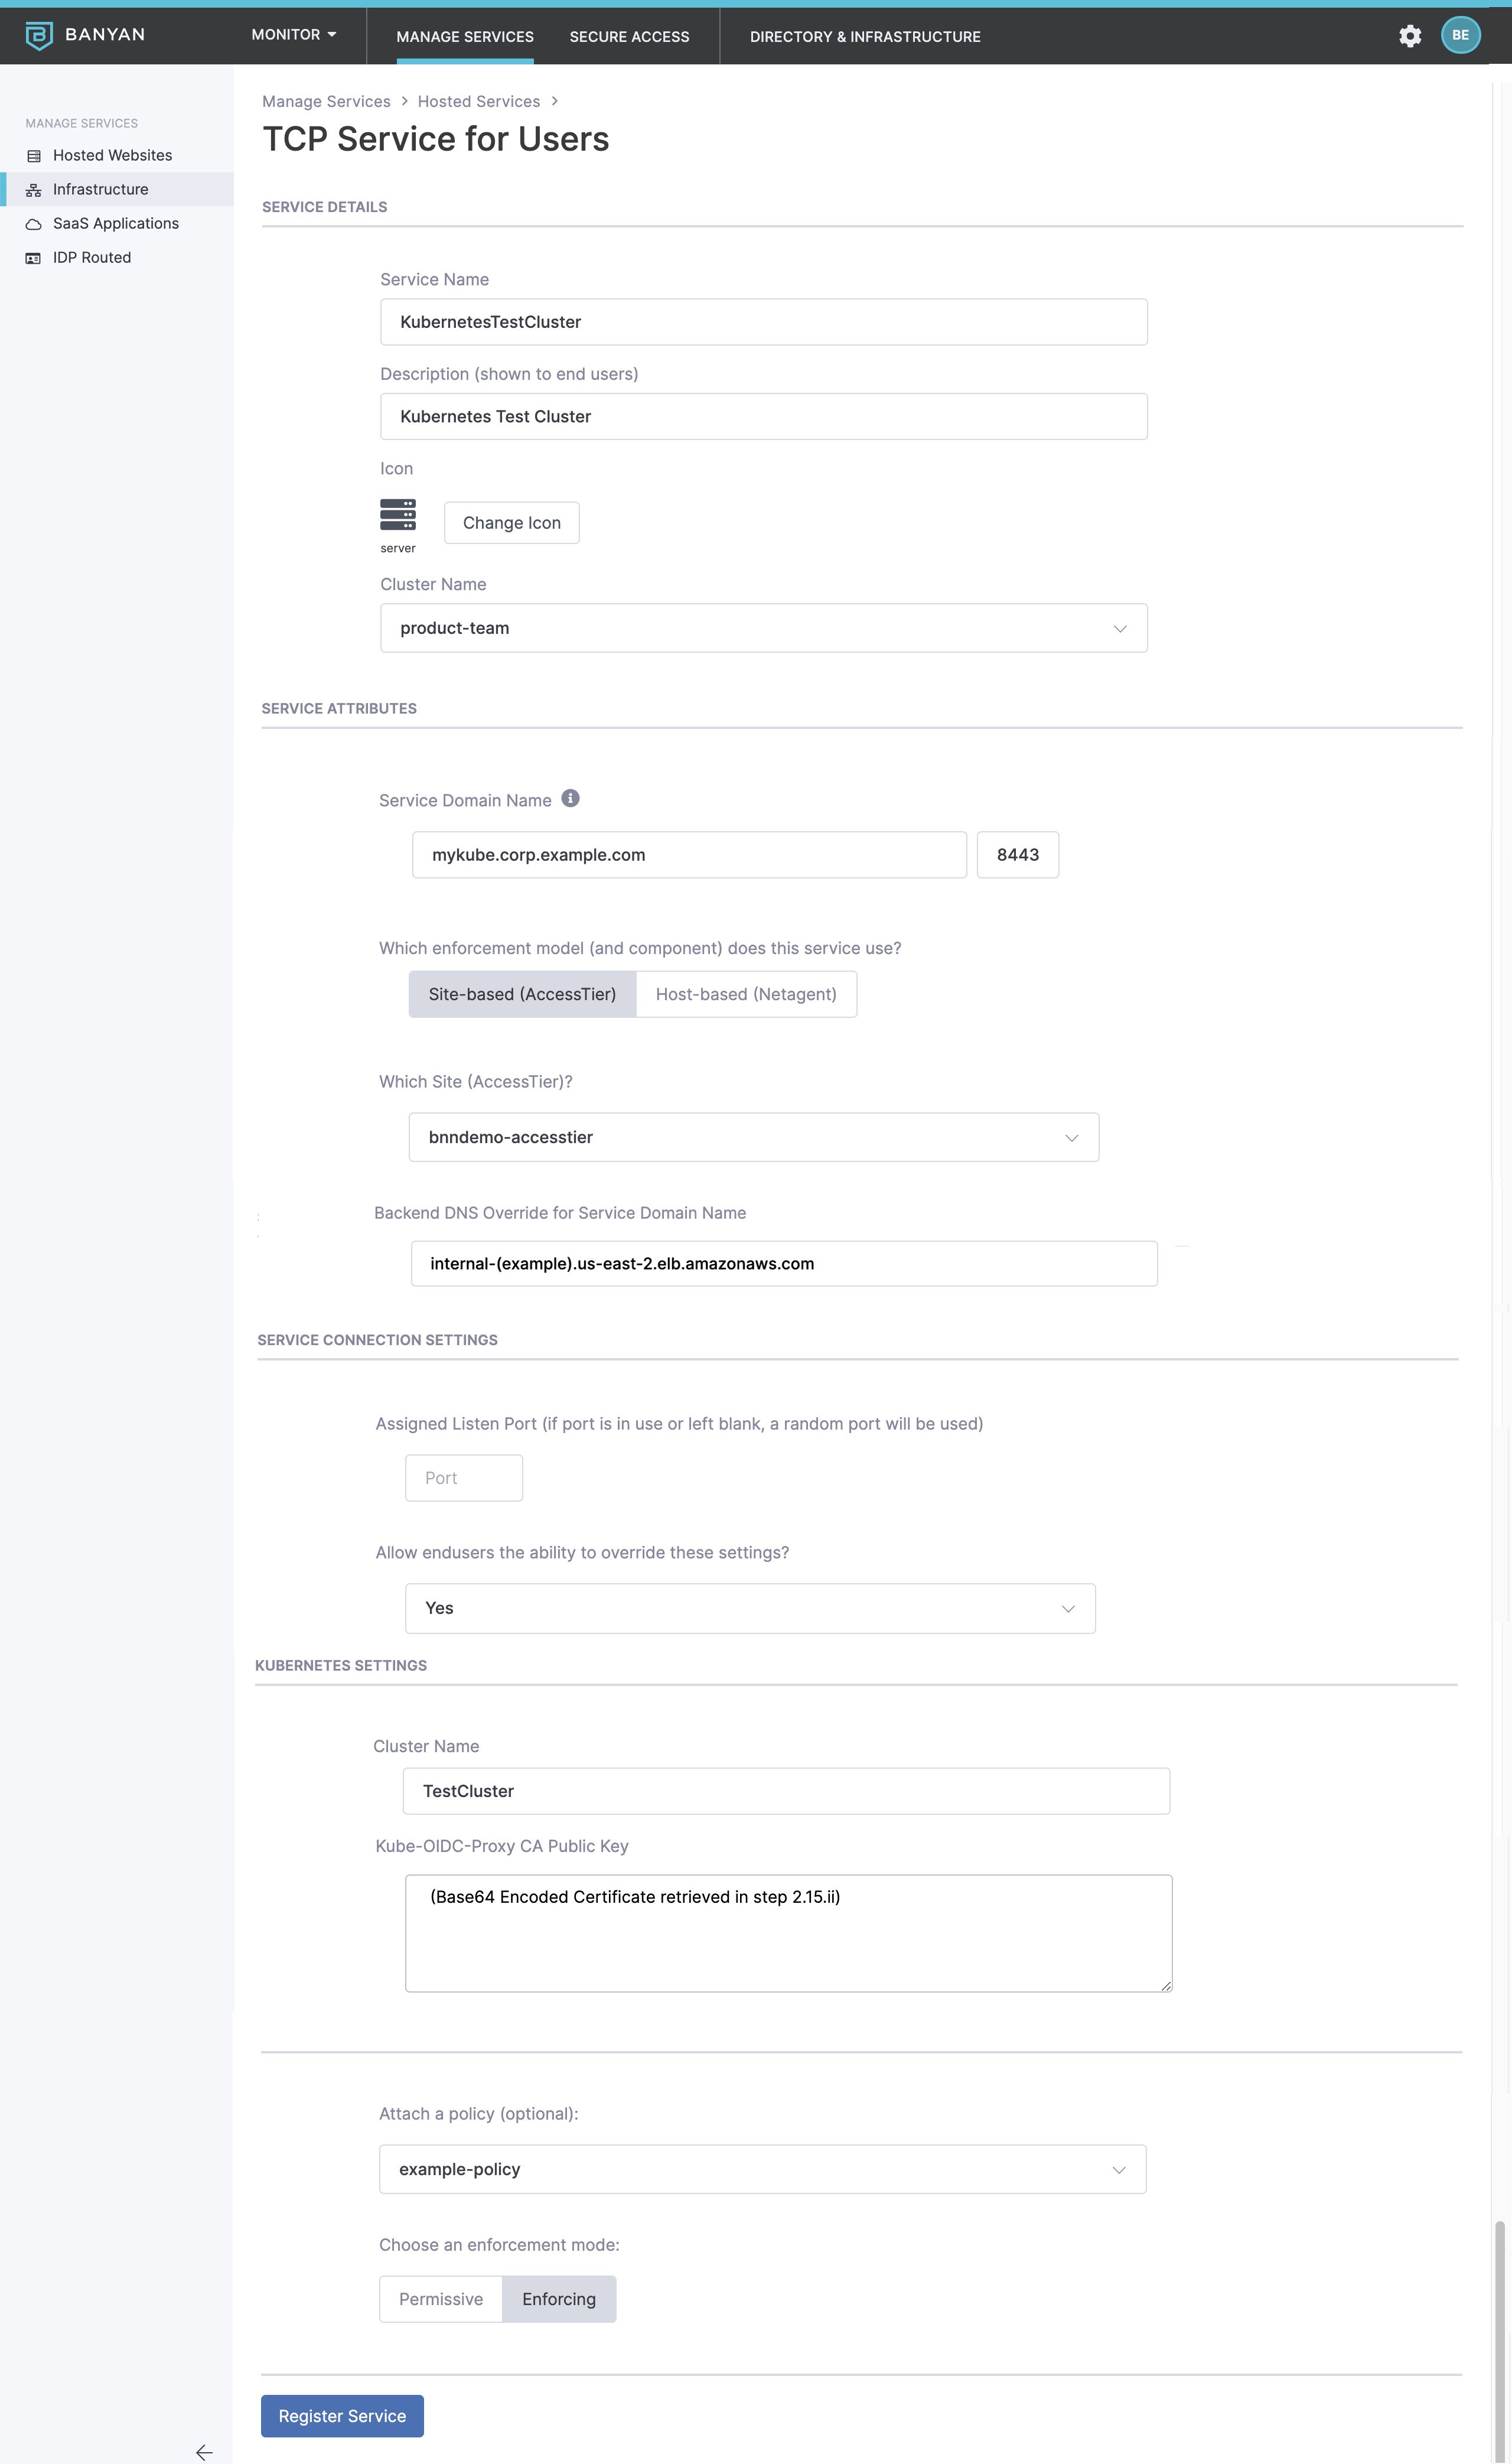
Step 3. Define a Kubernetes Service
3.1 Navigate to Private Access > Infrastructure and then click + Register Service. Select the option Kubernetes Service.
3.2 Configure the service as shown below, making sure to match the Service Domain Name with the tls.hostname configured Step 2.12. Leave the port as 8443.
In this example, we have created a Service Domain Name called mykube.corp.example.com. This is your new Kube API endpoint. The banyanproxy on your end user’s devices will automatically tunnel Kubernetes traffic to this domain.
3.3 In the Backend DNS Override for Service Domain Name field, enter the internal IP or DNS name of the load balancer Step 2.15.i.
3.4 In the Service Connection Settings set the banyanproxy to listen on a specific Listen Port. This enables banyanproxy to tunnel Kubernetes traffic over port 8443.
3.5 In the Kubernetes Settings, enter a Cluster Name and enter the Kube-OIDC-Proxy CA Public Key retrieved in Step 2.15.ii. In this example, our cluster is named “TestCluster”.
3.6 Attach the policy we had previously created and set enforcement mode to Enforcing.
Step 4. Set up your RBAC authorization policies for K8S
Kubernetes provides fine-grain role-based access control (RBAC) for all API actions. In this section we will create an example Kubernetes Role (named pod-reader-default), which we will then bind to the any-employee-personal-device CSE Role.
We will also bind users with the all-admins-corporate-device CSE Role to the pre-configured cluster-admin ClusterRole that are pre-configured with most Kubernetes distributions.
Kubernetes has two role types, Roles and ClusterRoles. Basic Roles are bound to a single namespace with a Rolebinding. ClusterRoles are bound at the cluster level with ClusterRoleBinding and allow access to certain resources in any namespace.
It is also possible to create other custom K8S Role or ClusterRole definitions. For more information on how to do this, see the K8S RBAC docs.
As configured in the oidc.groupsPrefix and oidc.groupsClaim in Step 2, authenticated users will be given an OIDC JWT token where their CSE Roles embedded as claims with the name banyan:<role name>. In this guide we will configure RBAC access using CSE Roles (and K8S Roles).
4.1 Create a pod-reader-default.yaml file which contains a K8S Role that only allow access to reading pod information in the default namespace:
apiVersion: rbac.authorization.k8s.io/v1
kind: Role
metadata:
  name: pod-reader-default
  namespace: default
rules:
- apiGroups: [""]
  resources: ["pods", "pods/log"]
  verbs: ["get", "list", "watch"]
Create with kubectl apply -f pod-reader-default.yaml.
4.2 Create a pod-reader-default-binding.yaml file which contains a role binding that binds the banyan:any-employee-personal-device CSE Role to the pod-reader-default Kubernetes Role:
apiVersion: rbac.authorization.k8s.io/v1
kind: RoleBinding
metadata:
  name: pod-reader-default-binding
  namespace: default
subjects:
- apiGroup: rbac.authorization.k8s.io
  kind: Group
  name: banyan:any-employee-personal-device ## CSE Roles are prefixed with "banyan:"
roleRef:
  kind: Role
  name: pod-reader-default
  apiGroup: rbac.authorization.k8s.io
4.3 Create with kubectl apply -f pod-reader-default-binding.yaml.
Now any user with the any-employee-personal-device Role will have pod-reader-default K8S Role and associated permissions on the Kubernetes Cluster.
4.4 Create a cluster-admin-binding.yaml file which contains a cluster-role binding that binds the banyan:all-admins-corporate-device Role to the cluster-admin Kubernetes ClusterRole:
apiVersion: rbac.authorization.k8s.io/v1
kind: ClusterRoleBinding ## This binding is for a ClusterRole
metadata:
  name: cluster-admin-binding
subjects:
- apiGroup: rbac.authorization.k8s.io
  kind: Group
  name: banyan:all-admins-corporate-device ## CSE Roles are prefixed with "banyan:"
roleRef:
  kind: ClusterRole ## This binding is for a ClusterRole
  name: cluster-admin
  apiGroup: rbac.authorization.k8s.io
4.5 Create with kubectl apply -f cluster-admin-binding.yaml.
Now any user with the all-admins-corporate-device Role will have cluster-admin K8S ClusterRole and associated permissions on the Kubernetes Cluster.
If you do not create a RoleBinding, or if a user who does not have the correct role tries to use the API, the cluster will return an unauthorized response.
Step 5. Connect via the desktop app
When an end user connects to a Kubernetes service, the desktop app will create a kube config file ~/.kube/banyan.
This feature uses the proxy-url capability available in kubectl v1.19+. If you’re using an older version of kubectl you will need to add https_proxy env var in front of your kubectl commands.
Ensure your end users install the latest desktop app and register their device.
Once the Service is defined, your end users will see it in their desktop app.
When the user clicks Connect, the Desktop App will launch the banyanproxy in HTTP_CONNECT_DAISY_CHAIN Mode, on the specified port.
The user can now use kubectl to access the Kubernetes API by setting the kuebconfig and context correctly:
kubectl --kubeconfig=~/.kube/banyan --context TestCluster get pods
To make the CSE Kubernetes Service the default method to access your cluster, your end users can set the KUBECONFIG env variable and the use the config use-context commands as detailed in the kubectl docs. If you set the env variable using export KUBECONFIG=$HOME/.kube/banyan:$HOME/.kube/config (macOS), you do not have to preface all kubectl commands with the banyan config file.
The Kube-OIDC-Proxy will validate the CSE-issued OIDC token and utilize user impersonation to forward the request to the origin K8S API, where roles and RBAC policies will be enforced.
If a user with the any-employee-personal-device Role (and thus the pod-reader-default K8S Role) tries to access a resource they are not authorized to, they will receive an authorization error.
kubectl --kubeconfig=~/.kube/banyan --context TestCluster get services
Error from server (Forbidden): services is forbidden: User "banyan:myuser@example.com" cannot list resource "services" in API group "" in the namespace "default"
Notes
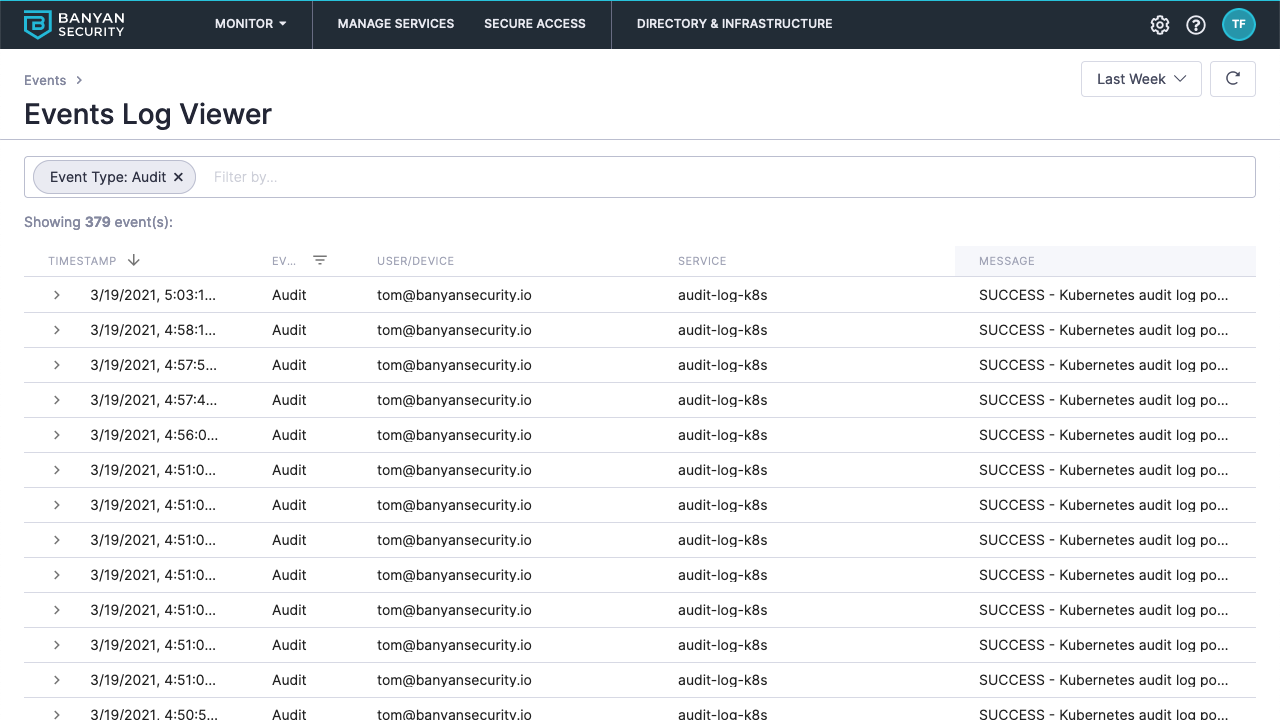
Audit Logs
By default, CSE batches Kube events once every 5 minutes and displays the single event in the Events Log Viewer. Expand the audit event to view all of the commands captured in the batched event.
Common Issues
TLS handshake errors in the kube-oidc-proxy logs
Sometimes, the kube-oidc-proxy logs are filled with log lines like:
2020-10-30 03:34:56.788668 I | http: TLS handshake error from 172.31.85.109:14312: EOF
This is typically because the internal LoadBalancer in front of kube-oidc-proxy uses a TCP-based (and not a TLS-based) health check. The kube-oidc-proxy logs all non-TLS connections as TLS handshake errors. You can remove these log lines by switching the LoadBalancer health-check to use TLS.
Kubectl client gets an error message saying credentials not provided
Sometimes, your end users may see an authentication error of the sort from kubectl:
error: You must be logged in to the server (the server has asked for the client to provide credentials)
This typically happens because the OIDC id_token placed in the ~/.kube/banyan file is invalid. It is likely associated with an incorrect IdP issuer. Parse the id_token, check validity and compare against the OIDC settings you provided the kube-oidc-proxy. You might have to update a configuration parameter such as clientId or issuerUrl.
Kubectl client does not set context correctly
Sometimes, your end users may see an configuration error of the sort from kubectl:
Error in configuration: context was not found for specified context: my-banyan-cluster
This typically happens because the ClusterName has not been created correctly, and doesn’t pass Kubernetes object name validation. The ClusterName should contain no more than 63 characters and contain only lowercase alphanumeric characters or -. Spaces are not allowed.