Configure Microsoft's Active Directory to manage your directory of users
Connect your Windows server to CSE using LDAP
- Updated on
- Pre-requisites
- Steps to set up Active Directory (AD) authentication in CSE
Active Directory is Microsoft’s on-premise directory service, which allows employees to sign in and access resources. Cloud Secure Edge (CSE) integrates with your organization’s Active Directory Windows server via the LDAP protocol to authenticate end users that need access to CSE networks and services.
Pre-requisites
- a reporting Global Edge Connector in CSE
- a bind user account (to authenticate to an LDAP directory, like Active Directory).
Steps to set up Active Directory (AD) authentication in CSE
Step 1: Configure User Identity Provider details
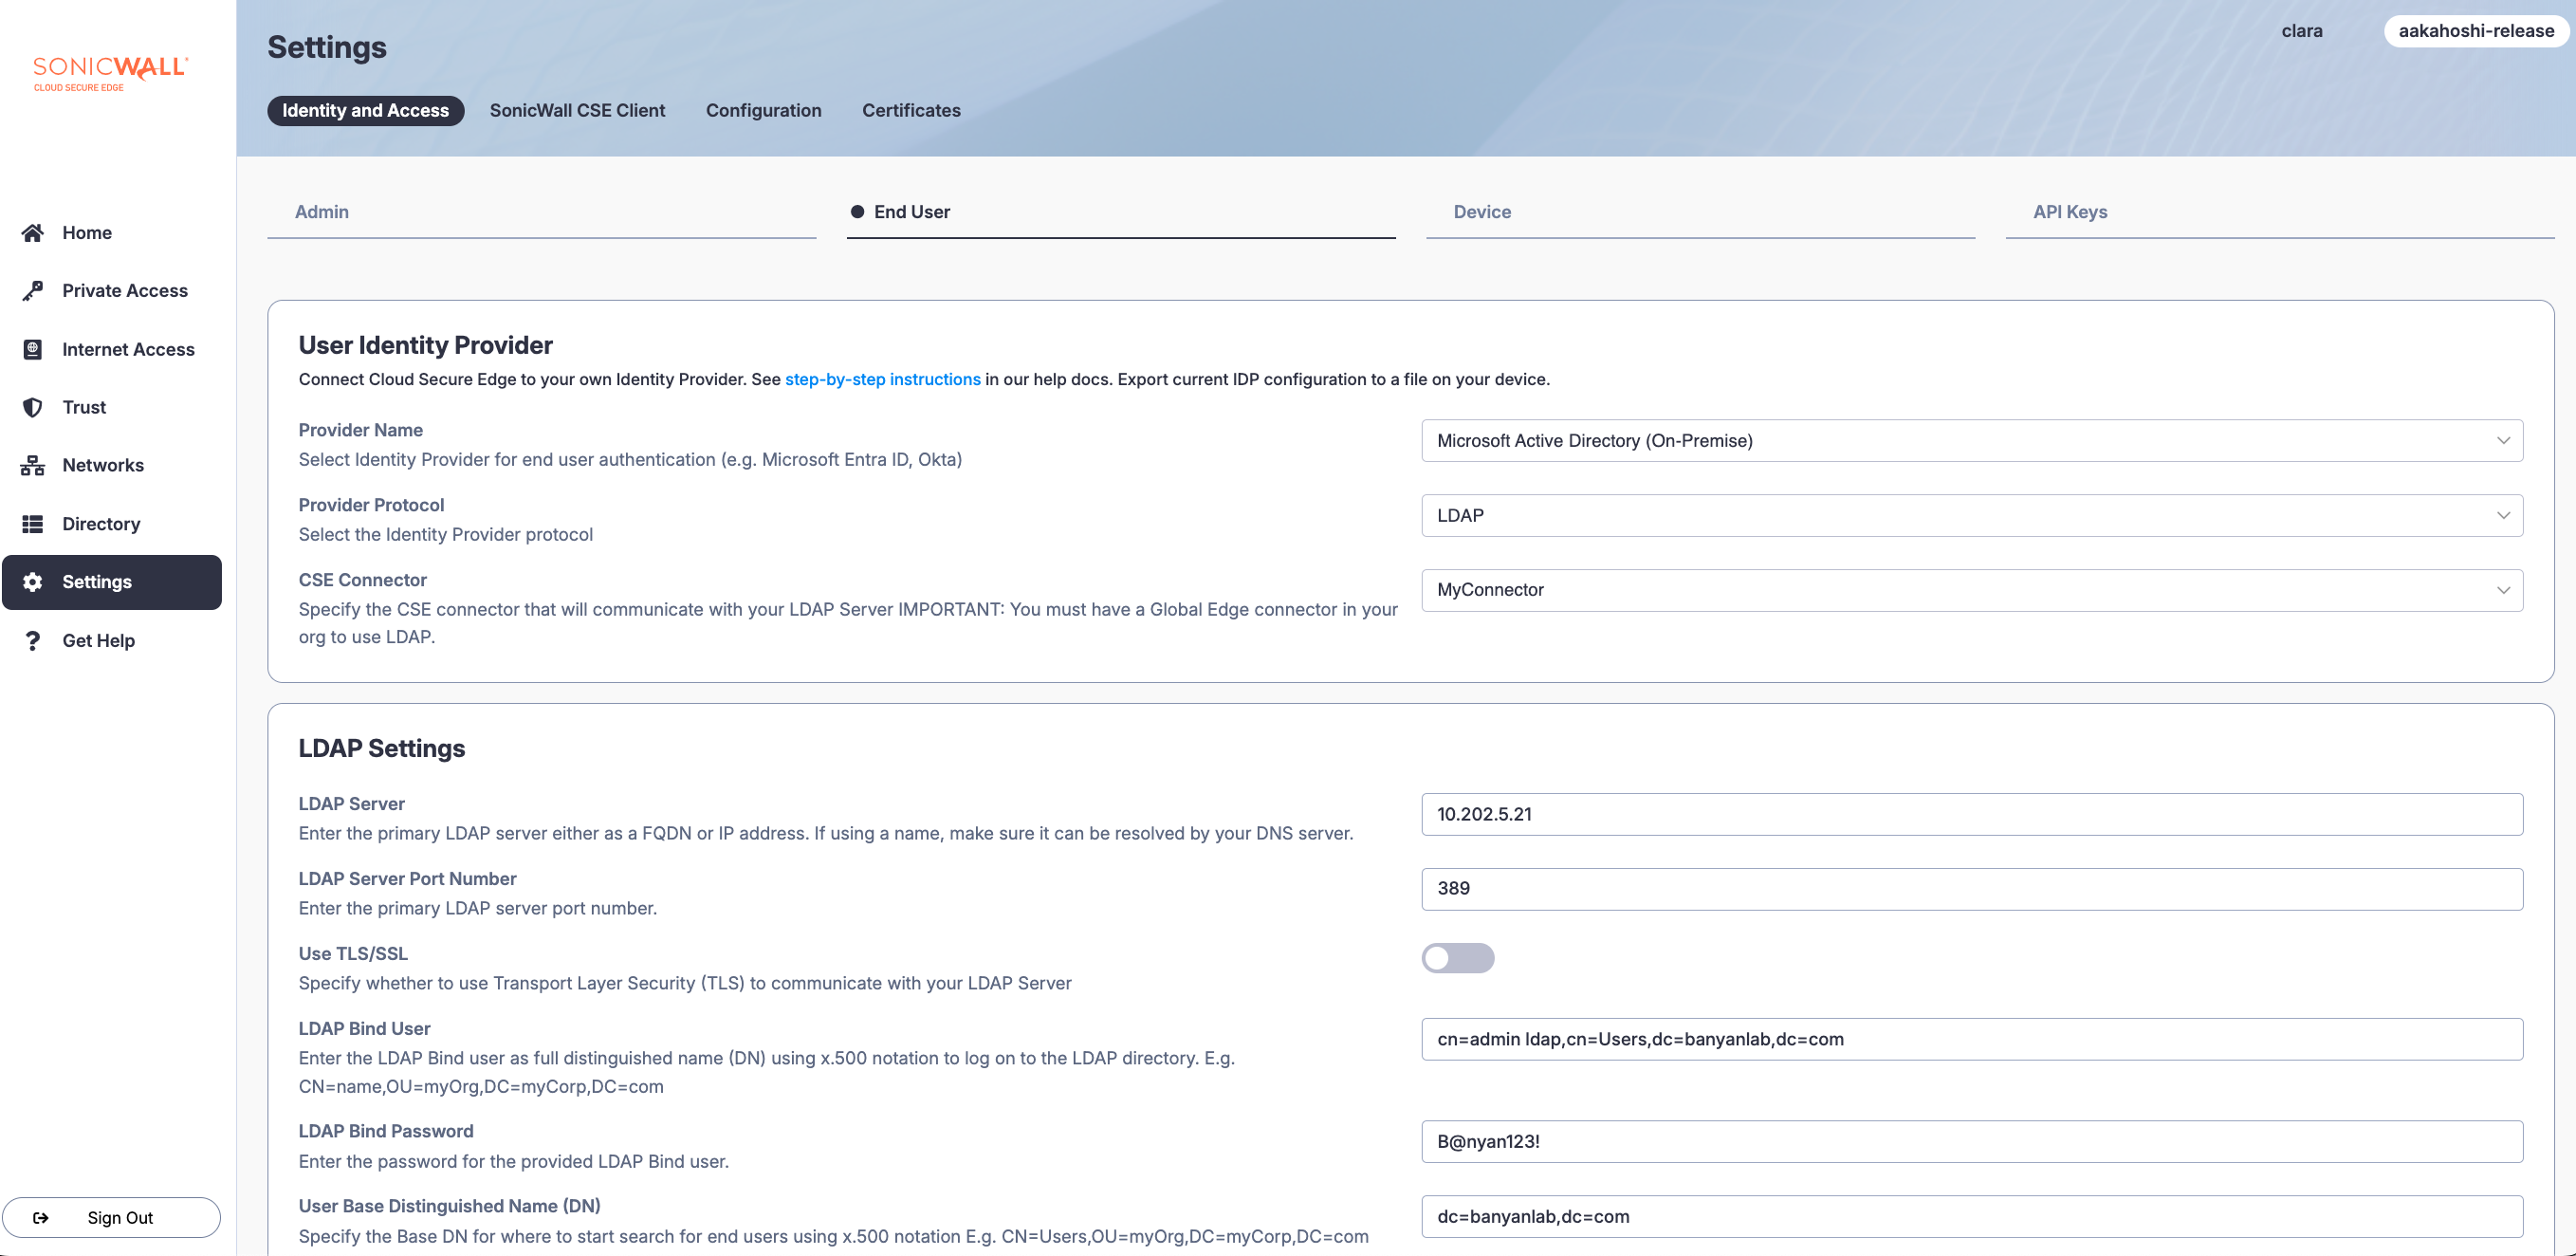
1.1 In the Cloud Secure Edge Command Center, navigate from Settings > Identity and Access > End User, and select Microsoft Active Directory (On Premise) as the Provider Name.
1.2 Under Provider Protocol, ensure that LDAP is selected by default.
1.3 Under CSE Connector, select a Connector. Ensure that the selected Connector is a reporting Global Edge Connector.
Step 2: Configure LDAP Settings
2.1 Enter the IP address or fully-qualified domain name (FQDN) associated with the LDAP Server used for Active Directory. If using a domain name (e.g., ad1.microsoft.com), ensure that the name can be resolved by your DNS server.
2.2 Enter the LDAP Server Port Number. Note that if using Port 636 that Use TLS/SSL will automatically be toggled on and the server will be accessed via HTTPS; if using Port 389, Use TLS/SSL will automatically be toggled off and the server will be accessed via HTTP.
2.3 If using an alternative port, toggle Use TLS/SSL on or off.
2.4 Enter the LDAP Bind User, adhering to Microsoft’s X.500 notation (e.g.,CN=name,OU=myOrg,DC=myCorp,DC=com).
2.5 Enter the associated LDAP Bind Password.
2.6 Enter the User Base Distinguised Name to specify where to start a search for an end user, using X.500 notation with key-value pairs (e.g., OU=myUnit,DC=myCorp,DC=com).
2.7 Optional: Specify a Username Filter (e.g., objectClass=user).
Suggestion: To filter based on user’s group membership, we suggest the following template, to be completed with your own org details: (memberOf=[DN of a Group]). For example, an implementation of this template could be: (memberOf=CN=BigOrg,OU=Engineering,DC=internal,DC=bigorg,DC=com). This will make end users’ ability to log in conditional on group membership outlined above.
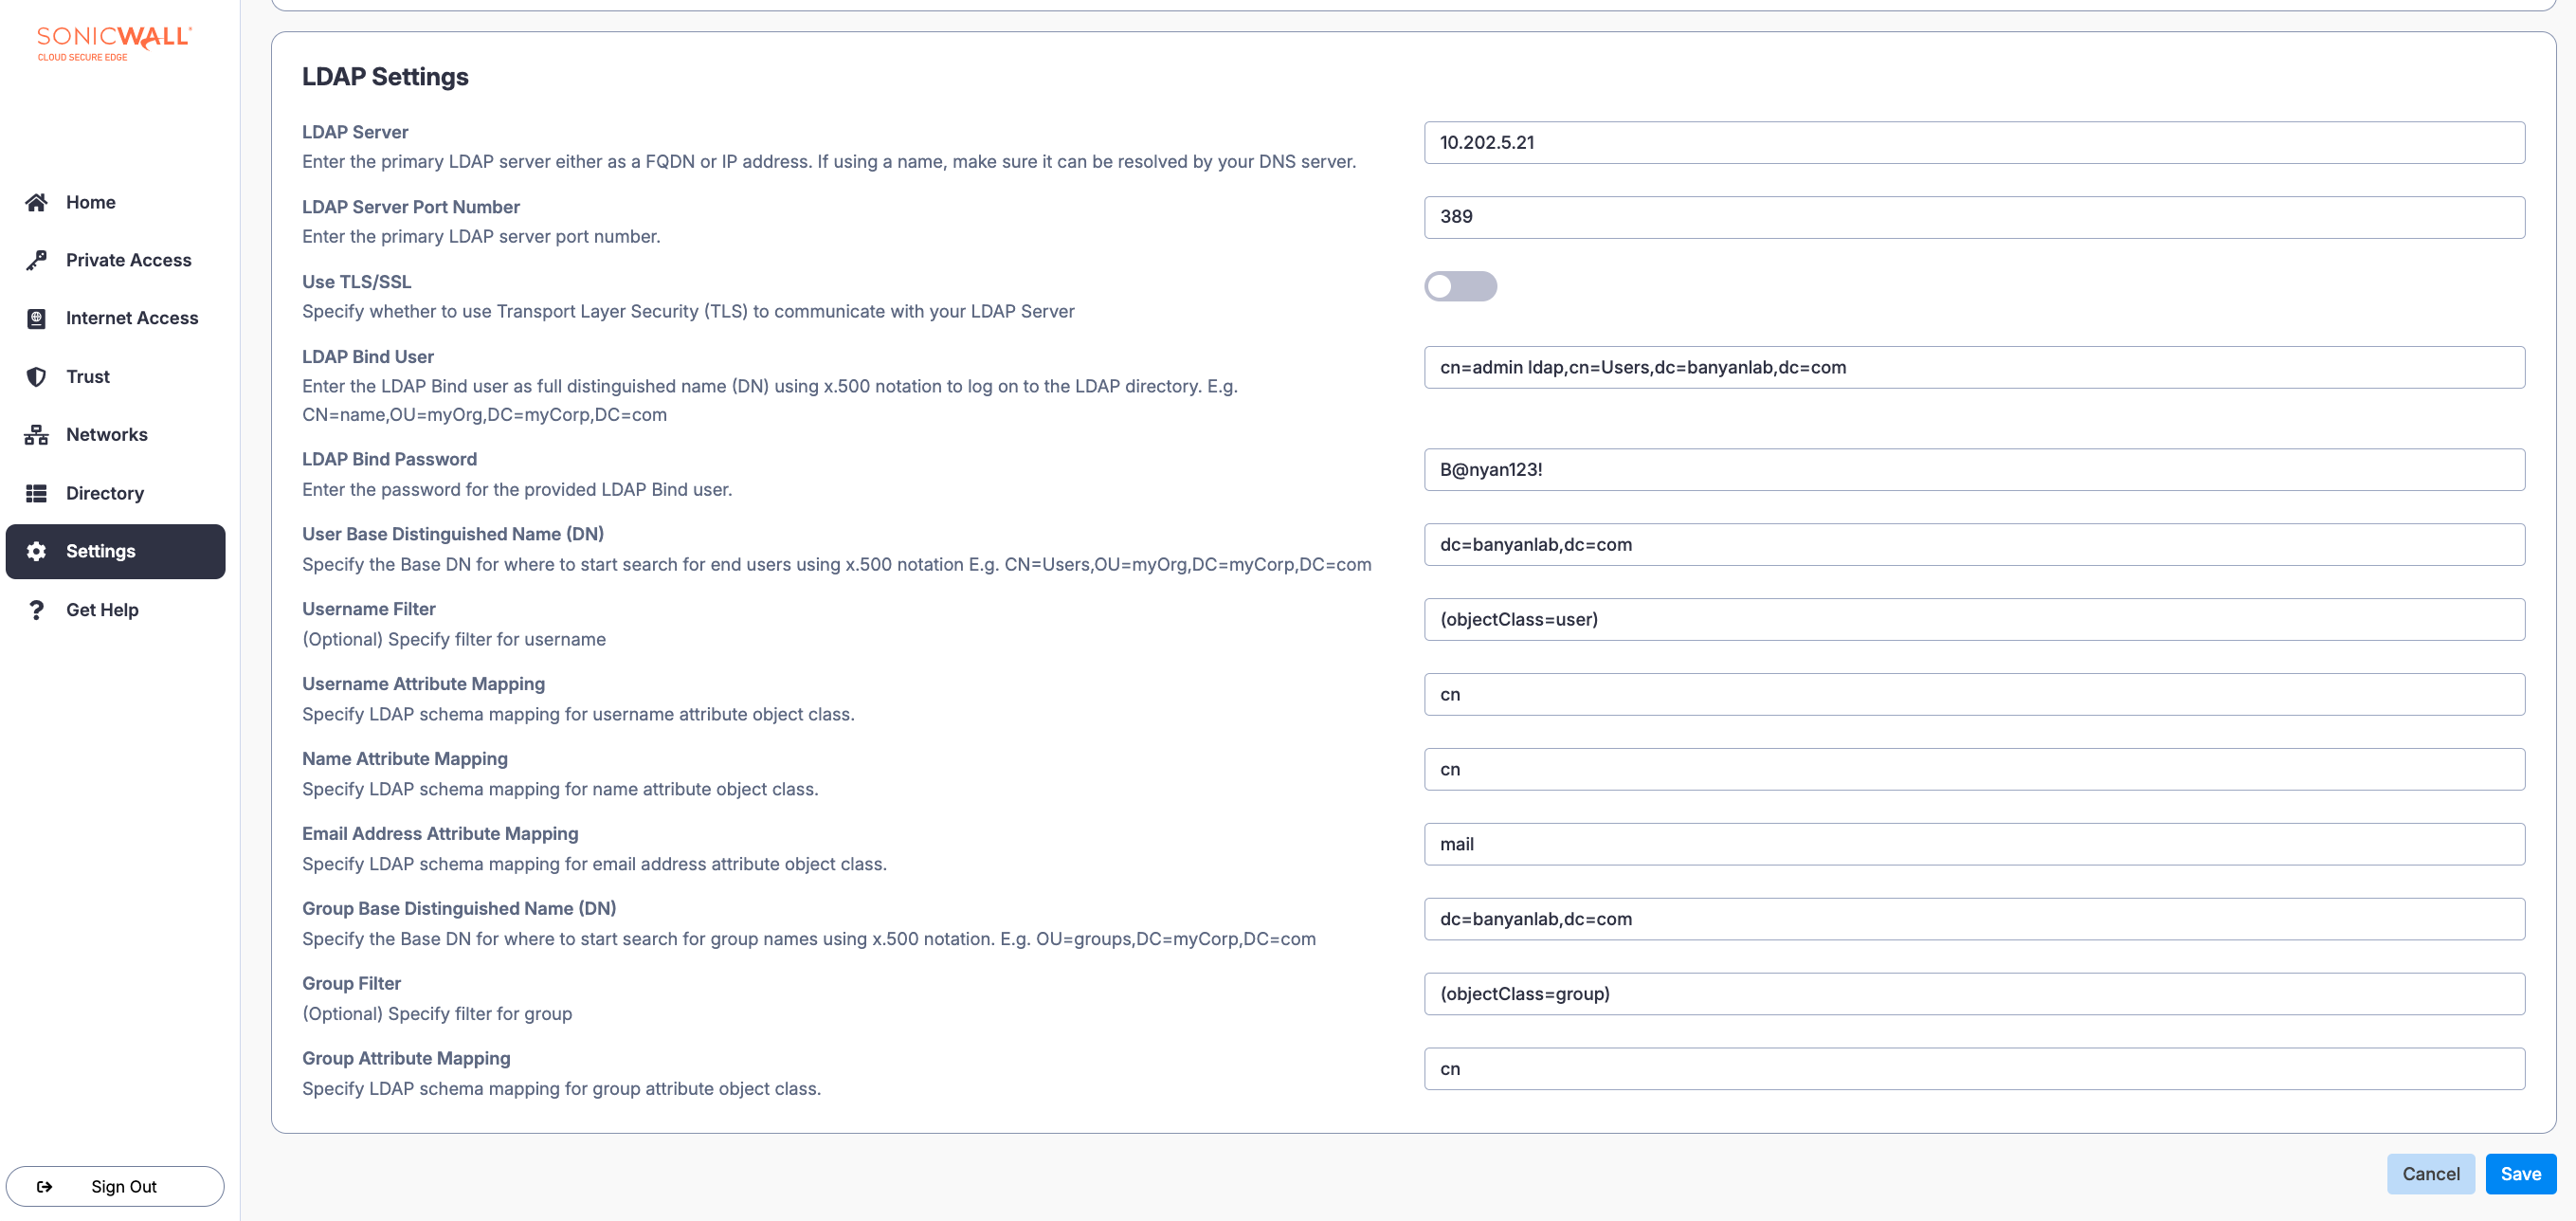
2.8 Enter the Username Attribute Mapping: Specify the LDAP schema mapping for username attribute object class (e.g., userPrincipalName).
2.9 Enter the Name Attribute Mapping: Specify the LDAP schema mapping for name attribute object class (e.g., cn).
2.10 Enter the Email Address Attribute Mapping: Specify the LDAP schema mapping for email address attribute object class (e.g., email).
2.11 Enter the Group Base Distinguished Name (DN): Specify the Base DN for where to start search for group names using x.500 notation (e.g., OU=groups,DC=myCorp,DC=com).
2.12 Optional: Specify a Group Filter (e.g., (objectClass=group)).
2.13 Enter the Group Attribute Mapping: Specify LDAP schema mapping for group attribute object class (e.g., member).
2.14 Save your configuration.
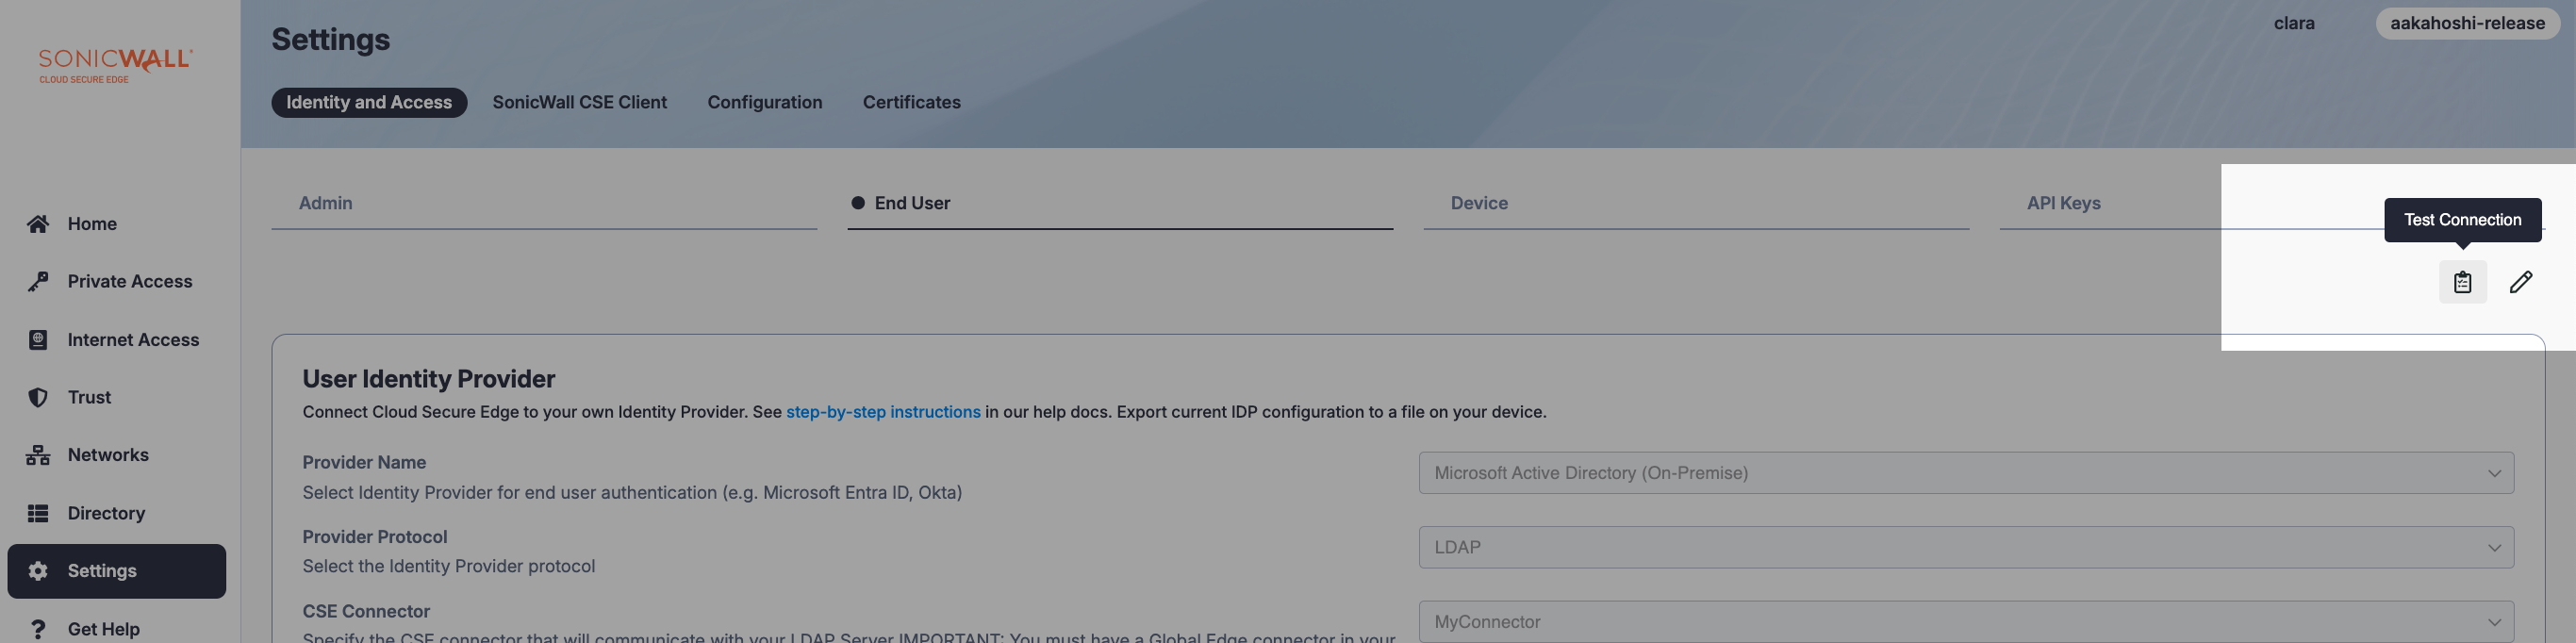
Test the Configuration
Once the configuration is saved, certificate provisioning can take up to 10 minutes; after 10 minutes, a Test Configuration button will become available.
Enter your credentials (i.e., email and password, which should match inputs in Active Directory); if successful, a modal will pop up displaying the service, the LDAP server, and credentials. Review these to ensure that everything is configured correctly.
Troubleshooting
If specifying member as the group attribute object class isn’t sufficient for accessing nested groups, append the object identifier (OID) (i.e., a number string) to resolve the issue. We recommend entering the following value for member:
1.2.840.113556.1.4.1941
FAQ
Section 1: Server Connection
-
Q: What do I enter in the “LDAP Server” field?
- Enter the address of your Active Directory Domain Controller. You must enter a single IP address (e.g.,
192.168.1.10) or a Fully Qualified Domain Name (FQDN) (e.g.,dc01.mycorp.com).
- Enter the address of your Active Directory Domain Controller. You must enter a single IP address (e.g.,
Note: CSE only supports a single server entry.
-
Q: What is the “LDAP Server Port Number”?
-
This is the TCP port CSE uses to contact your server.
-
Port 389: The default port for unencrypted LDAP.
-
Port 636: The required port for LDAP over TLS (LDAPS).
-
Note: We strongly recommend using Port 636.
-
Q: What is the “Use TLS/SSL” toggle for?
-
This toggle enables LDAP over TLS (LDAPS).
-
Enabled: CSE will connect securely using LDAPS on port 636.
-
Disabled: CSE will connect unencrypted on port 389. This is insecure, since passwords are sent in plain text.
-
Note: We strongly recommend that you enable Use TLS/SSL.
-
Q: How do I enable LDAP over TLS (LDAPS) on my server?
-
If LDAPS is not already enabled on your domain controller, you must enable it. The pre-requirement is that you install a valid SSL/TLS certificate on each domain controller. Once a domain controller finds a valid certificate in its “Personal” certificate store for the “Local Computer,” it automatically enables LDAPS and begins listening for secure connections on TCP port 636.
-
You can obtain a valid certificate in a few ways:
-
Active Directory Certificate Services (AD CS): This is the most common, recommended method. By installing the AD CS role on a server in your domain, your domain controllers can automatically enrol for and receive a “Domain Controller” certificate that meets all of the LDAPS requirements.
-
Third-Party Public CA: You can purchase a certificate from a public vendor and manually install it on your domain controller.
-
Self-Signed Certificate: You can generate a self-signed certificate on the server. As the next question notes, CSE will accept this, but it is better suited for testing than for production.
-
-
-
Q: Can I use a self-signed certificate for LDAPS?
- Yes. CSE LDAP TLS integration will work with self-signed certificates.
-
Q: Do I need to upload my AD’s SSL certificate to SonicWall CSE?
- No. There is no need to load or upload your domain controller’s certificate to the CSE platform. CSE is configured to establish the secure LDAPS connection without requiring manual certificate validation, which simplifies setup.
-
Q: What if I must use port 389 and cannot use TLS?
-
We strongly advise against this, as doing so introduces a major security risk. If you disable the Use TLS/SSL toggle and your connection fails, it is likely because your domain controllers are (correctly) configured to reject unsecured Simple Binds.
-
By default, Active Directory’s Domain controller: LDAP server signing requirements policy is set to require signing. To allow unsecured Simple Binds on port 389, you must change this policy to None. This is done via Group Policy (GPO) and is not recommended.
-
Section 2: Bind Credentials
-
Q: Do I need to enable “Simple Bind” on my server?
-
No. Simple Bind is already enabled by default in Active Directory.
-
Modern AD servers are configured to reject a Simple Bind unless it is sent over a secure, encrypted connection (LDAPS). Therefore, you must enable the Use TLS/SSL toggle in order for Simple Bind to work.
-
-
Q: What is the “LDAP Bind User,” and how do I find its “Bind User DN”?
-
The Bind User is a dedicated service account that CSE uses to log in to your Active Directory with read-only permissions. It needs this account to search the directory and validate users.
-
The Bind User DN (Distinguished Name) is the full X.500 path to that user.
-
To find the DN:
-
Open Active Directory Users and Computers (ADUC).
-
Enable View > Advanced Features.
-
Find your bind user (e.g.,
svc_sonicwall). -
Right-click on the user, and select Properties.
-
Navigate to the Attribute Editor tab.
-
Find the
distinguishedNameattribute, and copy its value.- Example:
CN=svc_sonicwall,OU=Service Accounts,DC=mycorp,DC=com
- Example:
-
-
-
Q: I don’t know my “LDAP Bind Password.” How do I find it?
-
You cannot find or retrieve an existing password from Active Directory. It is stored using a one-way hash.
-
You must reset the password:
-
In ADUC, find your bind user.
-
Right-click on the user and select Reset Password.
-
Enter a new, strong password, and store it securely.
-
Update the password in your CSE configuration.
-
-
-
Q: My bind is still failing even with TLS enabled. What else could be wrong?
-
A successful TLS connection creates a secure tunnel. The Simple Bind (the login) can still fail inside that tunnel. This is almost always an
Invalid Credentials(LDAP Error 49) issue, which can be caused by the following: -
Incorrect Password: The password in the LDAP Bind Password field is wrong.
-
Incorrect Bind User DN: The
distinguishedNamein the LDAP Bind User field is incorrect. -
Account Disabled: The service account is disabled in Active Directory.
-
Account Locked Out: The service account is locked from too many failed login attempts.
-
Password Expired: The service account’s password has expired. We recommend checking Password never expires on the account in ADUC.
-
Section 3: User Search & Attributes
-
Q: How do I find my “User Base Distinguished Name (DN)”?
-
The User Base DN is the starting point in your directory where CSE will begin its search for users. This is typically the Organizational Unit (OU) that contains your user accounts.
-
To find the User Base DN:
-
Open Active Directory Users and Computers.
-
Enable View > Advanced Features.
-
Navigate to the OU that holds your main user accounts (e.g.,
UsersorEmployees). -
Right-click on the OU itself and select Properties.
-
Navigate to the Attribute Editor tab.
-
Find the
distinguishedNameattribute, and copy its value.- Example:
OU=Employees,OU=myOrg,DC=mycorp,DC=com
- Example:
-
-
-
Q: What is the “Username Filter”?
-
This is an LDAP query used to find the user object in your directory.
-
The default, (i.e.,
objectClass=user), is a broad filter that will find all user objects. -
See Section 5 in FAQ for how to use this field to filter users by a specific group.
-
-
Q: What is the “Username Attribute Mapping”?
-
This tells CSE which AD attribute holds the username that your users will type when logging in.
-
userPrincipalName(Recommended): Use this if your users log in with their email-style UPN (e.g.,john.smith@mycorp.com). -
sAMAccountName: Use this if your users log in with their pre-Windows 2000 name (e.g.,mycorp\jsmithorjsmith).
-
-
Q: What is the “Name Attribute Mapping”?
- This tells CSE which AD attribute to use for the user’s “full name.” The default, cn (Common Name), is standard and works for most set-ups (e.g.,
John Smith).
- This tells CSE which AD attribute to use for the user’s “full name.” The default, cn (Common Name), is standard and works for most set-ups (e.g.,
-
Q: What is the “Email Address Attribute Mapping”?
-
This tells CSE which AD attribute holds the user’s email address.
-
The default, mail, is correct for standard Active Directory.
-
Note: This attribute is mandatory. You must ensure that every user who needs to authenticate via CSE has their email address populated in the E-mail field in Active Directory.
Section 4: Group Search & Attributes
-
Q: How do I find my “Group Base Distinguished Name (DN)”?
-
This is the starting point for CSE to search for groups, which are used to determine user permissions and policies.
-
In ADUC (with Advanced Features on), find the OU that contains your security groups (e.g.,
Security Groups). -
Right-click on the OU itself and select Properties.
-
Navigate to the Attribute Editor tab and copy the
distinguishedName.- Example:
OU=Security Groups,OU=myOrg,DC=mycorp,DC=com
- Example:
-
-
Q: What is the “Group Filter”?
- This is an LDAP query used to find group objects. The default,
(objectClass=group), is standard and will find all group objects within your Group Base DN. You typically do not need to change this.
- This is an LDAP query used to find group objects. The default,
-
Q: What is the “Group Attribute Mapping”?
- This tells CSE which attribute on a group object lists all its members. The default, member, is correct for Active Directory and should not be changed.
Section 5: Advanced Filtering
-
Q: How do I limit authentication to users in a specific AD group?
-
You can limit which users can log in by replacing the Username Filter with a query for group membership.
-
This will make end users’ ability to log in conditional on belonging to this specific group.
-
Filter Template:
(memberOf=[DN of a Group])-
Example:
-
First, find the full Distinguished Name of your group (e.g.,
SonicWall-Users). See the steps below. -
Paste that DN into the template.
-
Enter the complete string into the Username Filter field:
-
(memberOf=CN=SonicWall-Users,OU=Security Groups,DC=mycorp,DC=com)
-
-
-
-
Q: How do I find the full Distinguished Name of a specific group (for the filter)?
-
In ADUC (with Advanced Features on), find the specific security group (e.g.,
SonicWall-Users). -
Right-click on the group itself and select Properties.
-
Navigate to the Attribute Editor tab.
-
Find the
distinguishedNameattribute and copy its value.- Example:
CN=SonicWall-Users,OU=Security Groups,DC=mycorp,DC=com
- Example:
-
Section 6: Other Questions
-
Q: Does LDAP support nested groups?
- Yes, if the group filters and group base DN are configured properly. However, be aware that the
(memberOf=[DN of a Group])filter (described in Section 5) typically only checks for direct group membership, not nested groups.
- Yes, if the group filters and group base DN are configured properly. However, be aware that the
-
Q: My LDAP Page disappeared – what happened?
- Your Connector was likely deleted, or is down. Please check your Connector status in the CSE Command Center.
-
Q: Do end user devices need to load certificates for LDAP authentication?
- Not required.
-
Q: Do you support MFA for LDAP authentication?
- Yes – see Enable Certificate-based MFA for LDAP users.
-
Q: Is LDAP supported on Private Edge?
- No, please contact sales for this feature request.