SSH Certificate Authentication
Leverage SonicWall Cloud Secure Edge (CSE) SSH certificates capabilities to manage end user access to individual SSH servers
- Updated on Jul 30, 2024
Motivation
Cloud Secure Edge’s (CSE) default approach is to treat SSH like any other TCP service and be agnostic to the underlying SSH authentication method. You can retain your current SSH authentication mechanism - be it password, public-key, host-based, GSSAPI, etc. CSE then creates zero-trust connectivity at the TCP layer using Mutually Authenticated TLS (MTLS), so end users can conveniently yet securely connect to an internal SSH server using their existing client and authentication mechanism without needing to rely on a VPN.
In many zero-trust scenarios, security and/or operational requirements may need you to change how SSH authentication and authorization is set up.
Some example scenarios include:
- If your current SSH authentication mechanism is via public keys, and requires copying the public key from every client to every server that the client intends to log into, which does not scale well and is an administrative burden.
- If your current SSH authentication mechanism relies on Active Directory but your servers are moving to Cloud IaaS environments that will not be connected to your AD domain.
In such cases, using SSH certificate authentication is a well established, secure, and scalable method to manage SSH, popularized by engineering teams at Facebook, Netflix and Uber.

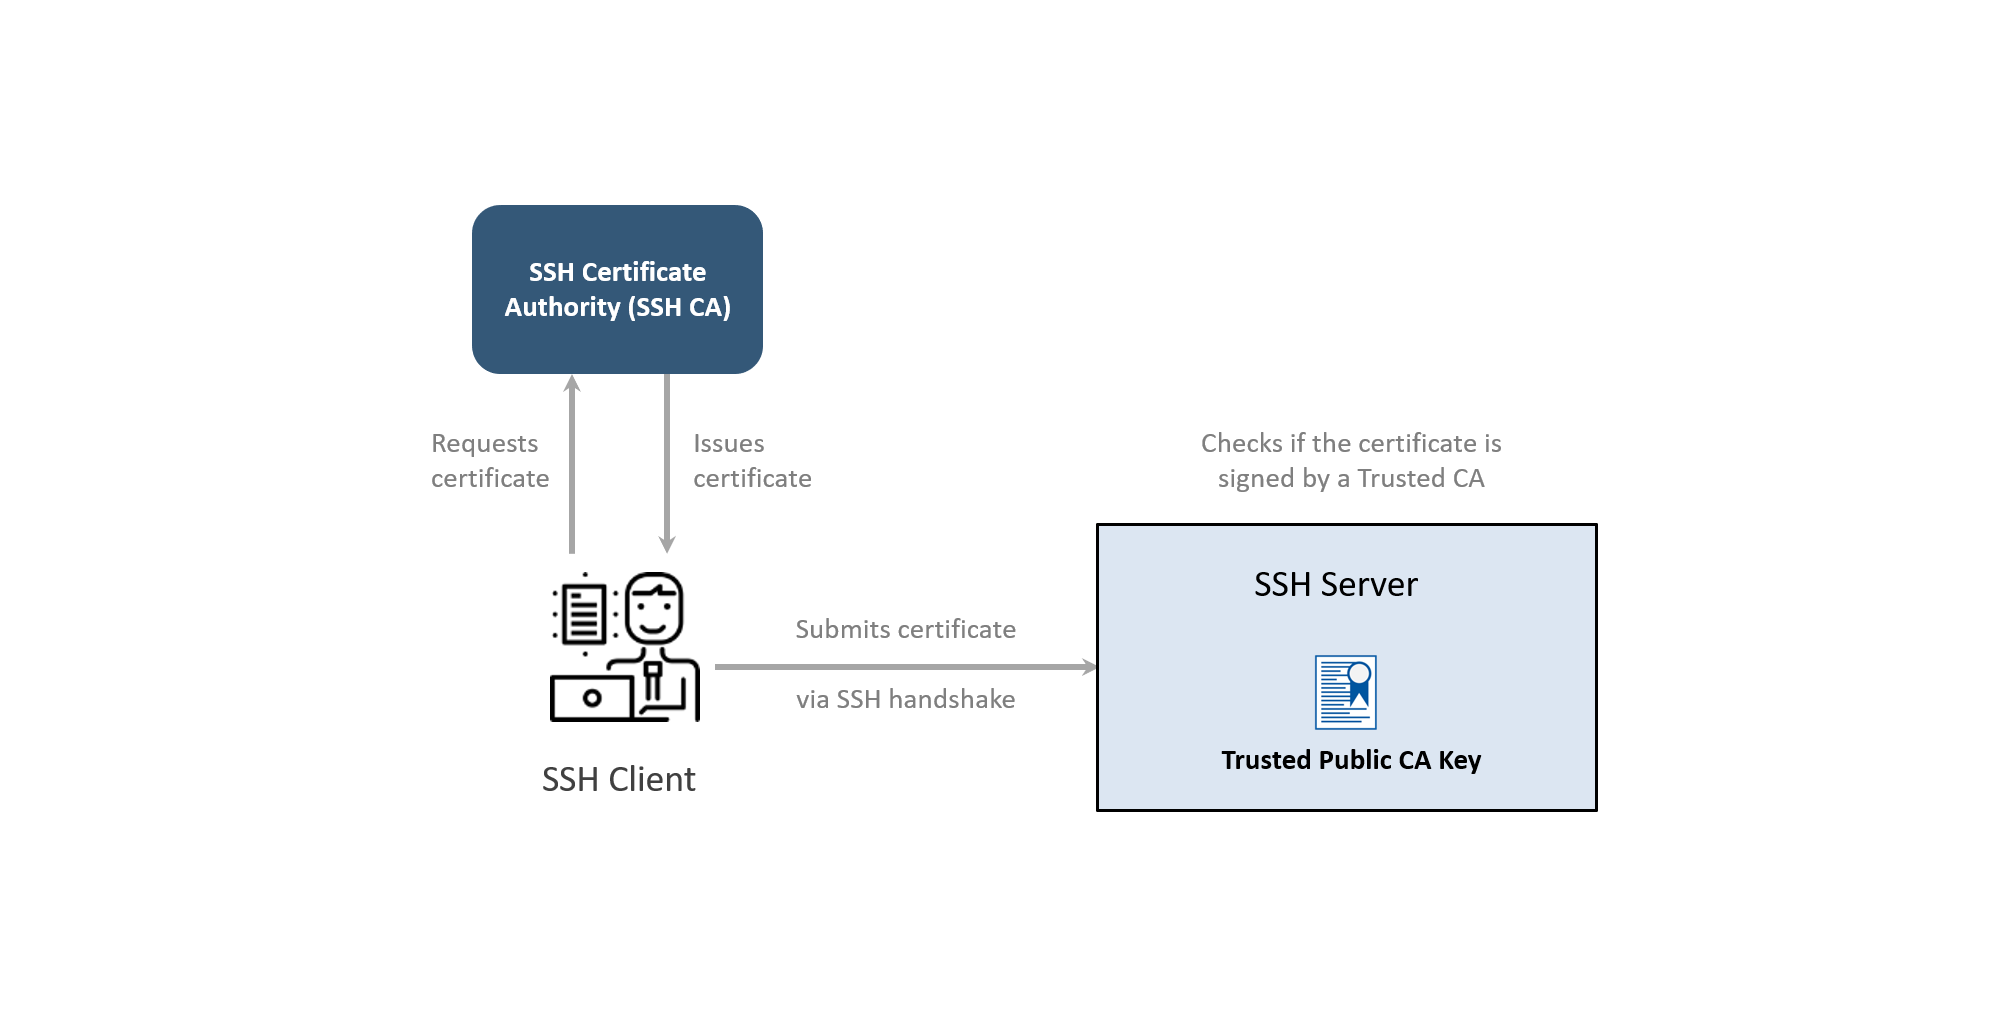
CSE can be configured to enable SSH certificate authentication using an SSH CA. Cloud Secure Edge leverages a Private PKI (Public Key Infrastructure), also known as a Internal CA (Certificate Authority), to distribute X.509 Certificates to also distribute SSH certificates.
Best of all, the SSH certificate authentication mechanism works seamlessly with the Mutually Authenticated TLS (MTLS) mechanism, letting you choose one or both capabilities based on your needs.
How It Works
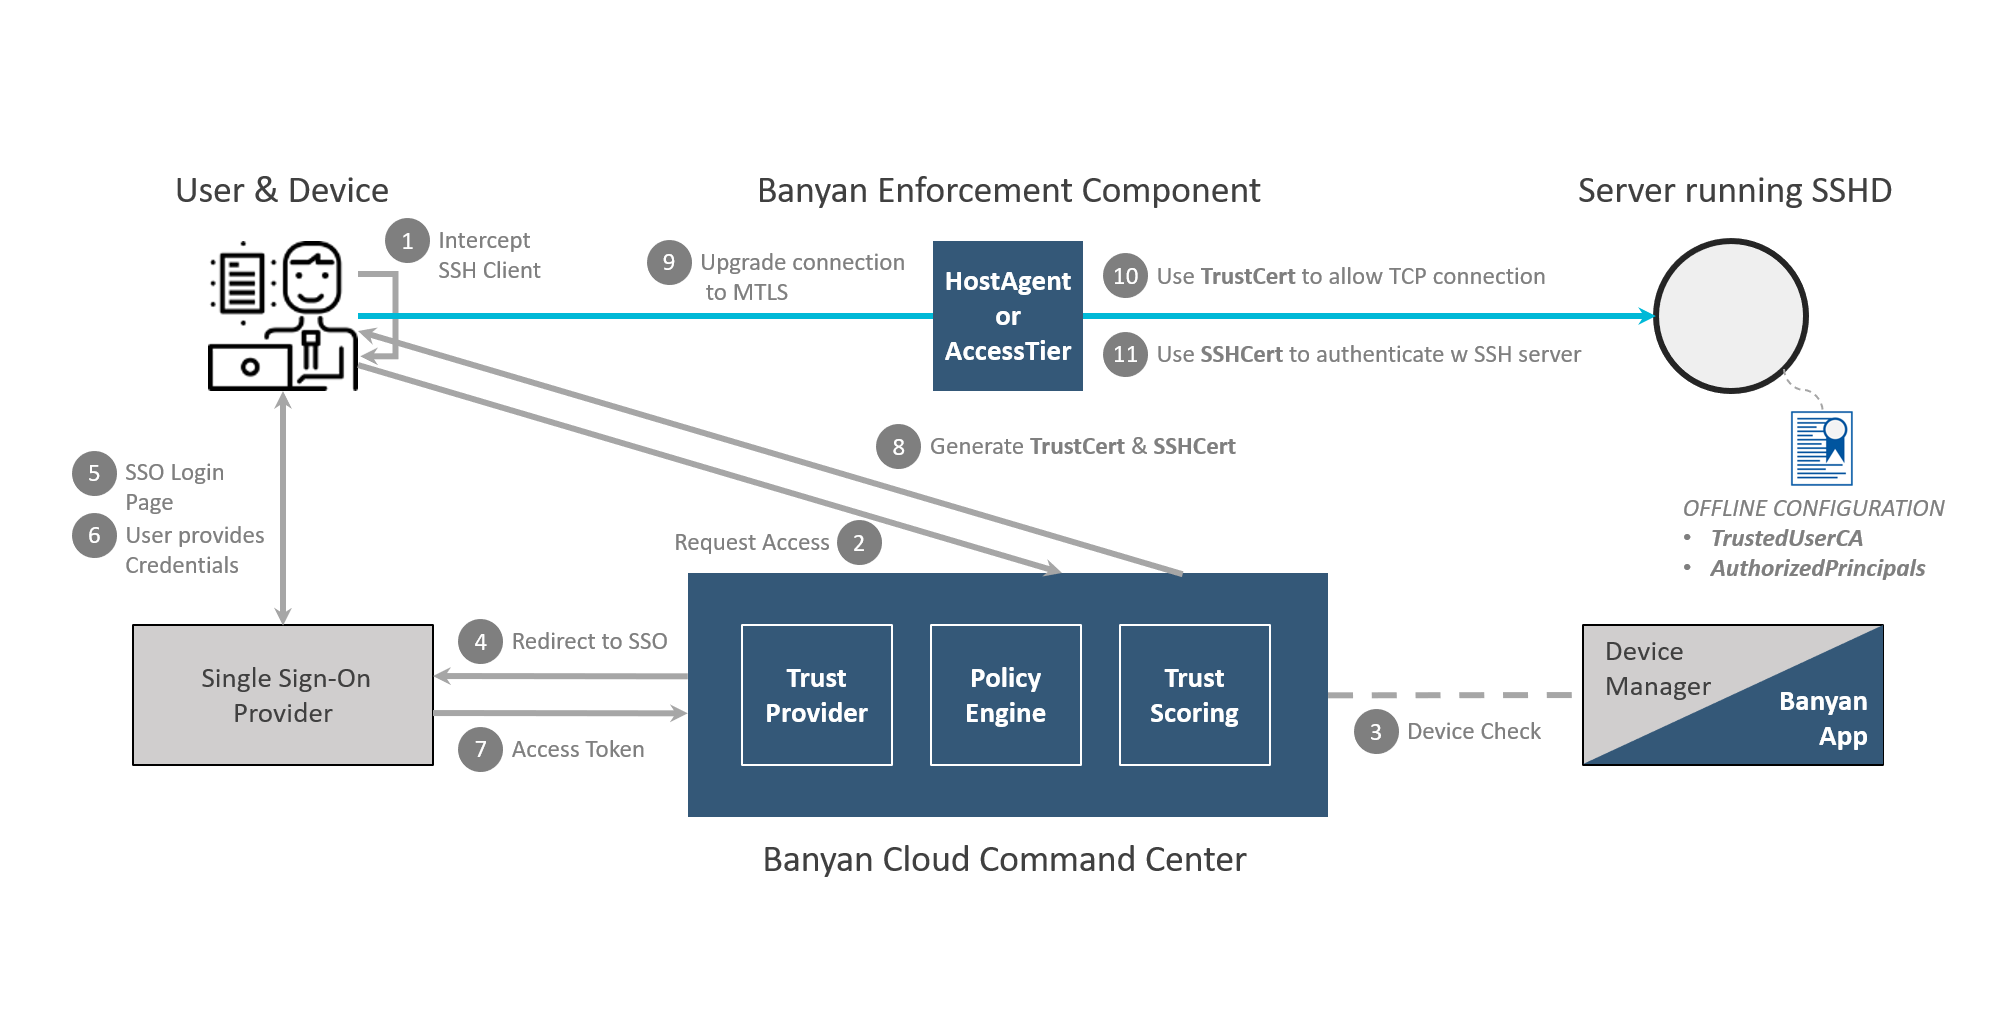
The diagram below details how the VPN-free Access + SSH certificate authentication flow works in CSE.

When an end user logs into the desktop app, it generates a cryptographic key-pair and obtains a short-lived SSH format client certificate (known as the SSHCert) for use in SSH certificate authentication.
On the server side, you have to configure OpenSSH to authenticate users using SSH certificates signed by your organizations Internal Issuing CA. In addition, you can configure OpenSSH to specify which roles a user needs to have in order to access the server.
Your end user can now use their CSE-issued SSHCert to SSH into the configured servers.
Steps
First follow the steps described in the Zero Trust Access to an Individual SSH Server article:
- 1. In the Command Center, create a Role
- 2. In the Command Center, create a Policy
- 3. In the Command Center, define a Service
- 4. On the end user device, click “Connect” in the desktop app
Them, there are a few additional steps to enable SSH Certificate Authentication:
- 5. On the SSH Server, configure OpenSSH for a Trusted CA
- 6. In the Command Center, update the Service Definition so the desktop app will use the SSHCert
- 7. On the end user device, click “Connect” in the desktop app
5. Configure OpenSSH on your Server
OpenSSH must be configured to authenticate SSH certificates that have been signed by the Cloud Secure Edge (Banyan) CA and have the necessary roles and users created.
You will require root access to configure OpenSSH and modify the /etc/ssh/ directory.
i. Copy the CSE (formerly Banyan) CA Public Key onto the server
In the Command Center, navigate to Settings > Advanced Settings > SSH CA Public Key. Copy the value and create the file /etc/ssh/banyan_ca.pub on your server with the CSE SSH CA Public Key.
ii. Update sshd_config
OpenSSH could be configured to use the SSH CA by modifying the config file at /etc/ssh/sshd_config.
Add the following lines to /etc/ssh/sshd_config:
TrustedUserCAKeys /etc/ssh/banyan_ca.pub
AuthorizedPrincipalsFile /etc/ssh/%u_roles
Restart the OpenSSH service by running systemctl restart sshd for the settings to take effect.
iii. Set up the authorized roles for each user
The short-lived signed SSH certificate that is delivered by the desktop app contains the authenticated user’s roles embedded in the certificates Principals field. We can create an AuthorizedPrincipalsFile for each user which OpenSSH will check against to allow role-based access to the server.
For example, say the user ubuntu exists on the server and the contractor role has been configured through the Command Center in Step A. Now, you can create the authorized principals file for the ubuntu user at /etc/ssh/ubuntu_roles to say:
contractor
This means that end users with the role contractor can SSH into your server as the ubuntu user.
Additional authorized roles can be added by appending new lines to this file, and additional users can be configured by creating authorized principals files for each user at /etc/ssh/<username>_roles.
The target user must already exist on the system and only users with an authorized principals file will be able to authenticate with an SSH certificate. For more advanced configurations (such as automatic home directory creation, root checking, and auditing) please see Advanced Configurations.
6. Update the Service Definition
Return to the Hosted Service you defined in Step-3, and update the Desktop App Settings section to indicate that user connections to this Service should “Use both the TrustCert and the SSHCert”.
The will tell the Desktop App to correctly set up the entry in the end user’s SSH config file to also use the SSHCert.
7. Connect via the desktop app
Now, when the end user clicks “Activate”, the Desktop App will add an entry to SSH config file located in ~/.ssh/config so connections will use both the TrustCert and SSHCert.
The user can continue to access the SSH Server as:
ssh user@myserver.corp.example.com
OpenSSH will automatically validate the signed SSH certificate using SSH CA public key and enforce the roles as configured on the server.
Additional Notes
The desktop app stores short-lived cryptographic certs and key files in a specific directory depending on your Operating System:
| Operating System | Short-lived Certificate Location |
|---|---|
| macOS | $HOME/Library/Application\ Support/banyanapp/ |
| Windows | %APPDATA%\Roaming\banyanapp |
| Linux | ~/.config/banyanapp |
You can use standard openssl and ssh-keygen commands to examine the short-lived certificates.
$> openssl x509 -in login-cert.pem -noout -text

Certificate:
    Data:
        Version: 3 (0x2)
        Serial Number:
            17:dd:b3:7c:3a:aa:71:42:90:1d:a7:ab:43:db:2d:df:69:fc:52:3d
        Signature Algorithm: sha512WithRSAEncryption
        Issuer: O = novpntest, OU = Certificate Authority, CN = testorg Banyan Private Root CA
        Validity
            Not Before: Jul  2 04:57:00 2020 GMT
            Not After : Jul  3 03:57:00 2020 GMT
        Subject: OU = "Banyan Client carly@banyanops.com", CN = Banyan Client carly@banyanops.com
        Subject Public Key Info:
            Public Key Algorithm: rsaEncryption
                RSA Public-Key: (2048 bit)
                Modulus:
                    00:c7:10:a7:8d:9f:18:06:f3:4e:1f:4b:20:f6:27:

...
$> ssh-keygen -L -f login-key.pem-cert.pub

login-key.pem-cert.pub:
        Type: ssh-rsa-cert-v01@openssh.com user certificate
        Public key: RSA-CERT SHA256:yv/nypkONDQF+rS8pJd5pJvItB7Y7wol1KjJfIxhMdE
        Signing CA: RSA SHA256:LGvtbCthk48jqxuggCJKAw6stao7VDIvd2OuRipczcs
        Key ID: "carly@banyanops.com ABCD8BL00KH"
        Serial: 0
        Valid: from 2020-07-01T22:02:21 to 2020-07-02T21:02:21
        Principals:
                ANY
                new-role
        Critical Options: (none)
        Extensions:
                permit-X11-forwarding
                permit-agent-forwarding
                permit-port-forwarding
                permit-pty
                permit-user-rc
The desktop app also updates the SSH Config file with the correct setting to access your SSH servers. The location of the SSH Config file depends on the Operating System of the device:
| Operating System | SSH Config File Location |
|---|---|
| macOS | $HOME/.ssh/config |
| Windows | %USERPROFILE%\.ssh\config |
| Linux | $HOME/.ssh/config |