DNS and Routing for Service Tunnels
How DNS and traffic routing works when using Service Tunnel
- Overview
- DNS Resolution & Traffic Steering
- Split Tunnel with Include Domains
- Domain-level Controls
- Additional Notes
This article describes how DNS and routing works for Service Tunnels. To understand how DNS routing works when securing private resources using an identity-aware proxy, review our doc on DNS and routing for Published Services.
Overview
SonicWall Cloud Secure Edge (CSE) Service Tunnel is a cloud-first VPN built on WireGuard. SonicWall provides several domain-based configuration options (in addition to typical IP/CIDR and Port/Protocol configurations). You can configure private DNS resolution and domain-based routing, and you can specify network policies in terms of Fully Qualified Domain Names (FQDNs).
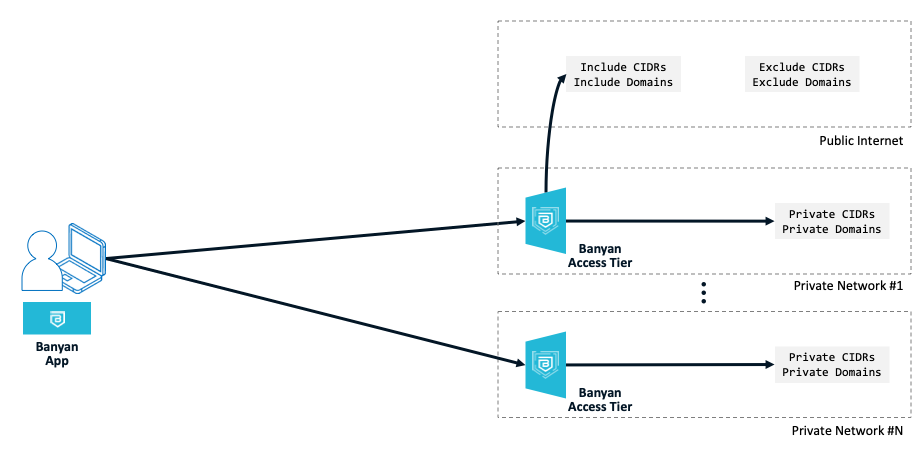
A Service Tunnel provides network-level connectivity into private networks as well as the public internet. In SonicWall Cloud Secure Edge, a network is defined by its IP/CIDR ranges as well as its domains:
- A Private Network is defined by its Private CIDRs - allocated from the RFC-1918 IP address space of
10/8,172.16/12,192.168/16- as well as its Private Domains - domains that resolve only at private DNS server in your private network. - The Public Network is a subset of the Internet that Banyan should tunnel, and is specified when defining a Service Tunnel. Public CIDRs and Public Domains can be explicitly included or excluded from a Service Tunnel.
For Self-hosted Private Edge deployments, Private CIDRs and Private Domains are specified when defining your private network by installing an Access Tier. Most organizations have multiple private networks, and so will install multiple Access Tiers. Traffic to Public CIDRs and Public Domains flows through a selected Access Tier(s).
For Global Edge deployments, Private CIDRs and Private Domains are specified when defining your private network by installing an Connector. Most organizations have multiple private networks, and so will install multiple Connectors. Traffic to Public CIDRs and Public Domains flows through the Global Edge.
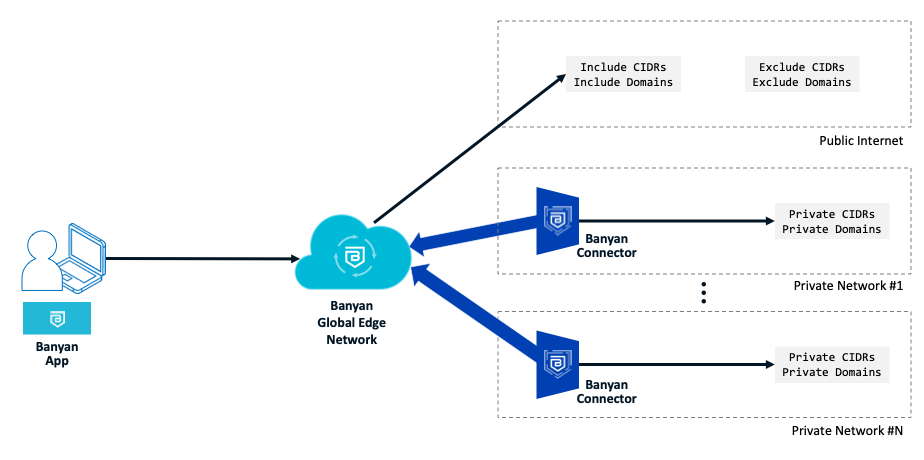
Public domains resolve using public DNS servers so their IP/CIDR ranges are typically not well known. These domains are resolved over the tunnel on the device when the tunnel is started, and the resolved IPs are dynamically added to the Service Tunnel’s routes.
DNS Resolution & Traffic Steering
A step-by-step description of how DNS is resolved and how traffic in steered to private and public networks is shown below.
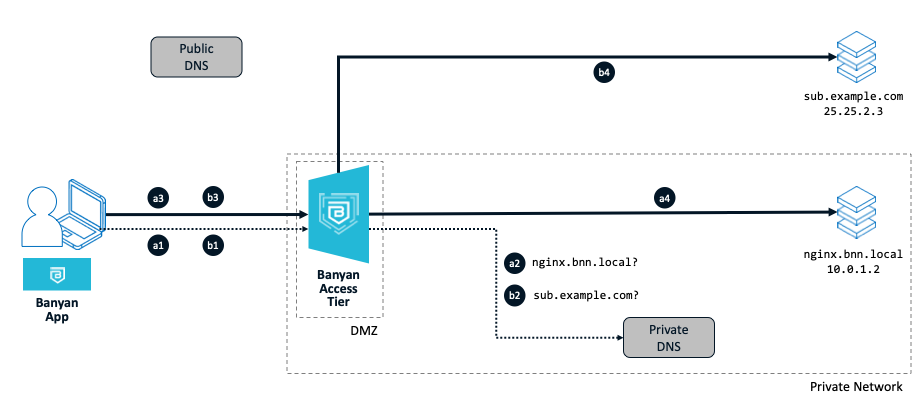
Setup:
As in the diagram above, a user needs to access a resource nginx.bnn.local in the private network. The user also needs to be on the tunnel to access an IP-whitelisted internet website at sub.example.com
The Access Tier spec has 10.0.0.0/16 set as its Private CIDRs and bnn.local set as a Private Domain. sub.example.com is set as a Public Domain Include in the the Service Tunnel spec. The user uses the app to connect to the Service Tunnel.
Steps (a1-a4) to access a private resource:
-
The user on the device make a request for the private resource (at
nginx.bnn.local). The app running on the device is has configured local DNS on the device to intercept requests for thebnn.localdomain. -
The DNS request flows through the Access Tier to the private DNS server for resolution. The private DNS server returns the private IP address (
10.0.1.2). -
Since a route for the entire private network (
10.0.0.0/16) that this private resource belong to already exists on the device, traffic to the private resource flows over the tunnel to the Access Tier. -
The Access Tier forwards the requests to the private resource (
nginx.bnn.local).
Steps (b1-b4) to access an internet resource:
-
The user on the device make a request for the internet resource (at
sub.example.com). The app running on the device is has configured local DNS on the device to intercept requests for theexample.comdomain. -
The DNS request flows through the Access Tier to the private DNS server for resolution. The private DNS server returns the public IP address of the internet resource (
25.25.2.3). -
The app dynamically adds a route for the public IP address, and traffic to the internet resource flows over the tunnel to the Access Tier.
-
The Access Tier forwards the requests to the internet resource (
sub.example.com). The source IP address seen by the internet resource is that of the Access Tier and not of the user’s.
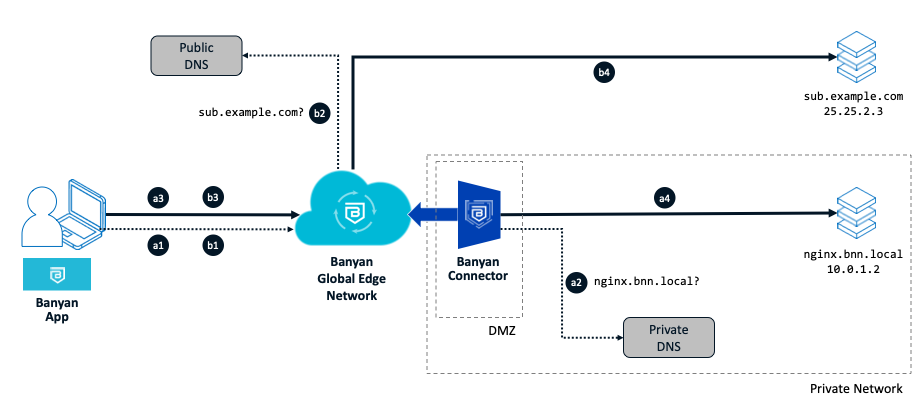
Setup:
As in the diagram above, a user needs to access a resource nginx.bnn.local in the private network. The user also needs to be on the tunnel to access an IP-whitelisted internet website at sub.example.com
The Connector spec has 10.0.0.0/16 set as its Private CIDRs and bnn.local set as a Private Domain. sub.example.com is set as a Public Domain Include in the the Service Tunnel spec.
Steps (a1-a4) to access a private resource:
-
The user on the device make a request for the private resource (at
nginx.bnn.local). The app running on the device is has configured local DNS on the device to intercept requests for thebnn.localdomain. -
The DNS request flows through the Global Edge and Connector to the private DNS server for resolution. The private DNS server returns the private IP address (
10.0.1.2). -
Since a route for the entire private network (
10.0.0.0/16) that this private resource belong to already exists on the device, traffic to the private resource flows over the tunnel to the Global Edge. -
The Global Edge forwards the requests the the Connector which them forwards it onto the private resource (
nginx.bnn.local).
Steps (b1-b4) to access an internet resource:
-
The user on the device make a request for the internet resource (at
sub.example.com). The app running on the device is has configured local DNS on the device to intercept requests for theexample.comdomain. -
The DNS request flows through the Access Tier to a public DNS server for resolution. The public DNS server returns the public IP address of the internet resource (
25.25.2.3). -
The app dynamically adds a route for the public IP address, and traffic to the internet resource flows over the tunnel to the Access Tier.
-
The Access Tier forwards the requests to the internet resource (
sub.example.com). The source IP address seen by the internet resource is one from the Global Edge IP ranges and not of the user’s.
Split Tunnel with Include Domains
Service Tunnels are typically configured in split tunnel mode; the admin sets the specific CIDRs and specific domains that should be part of the tunnel. Traffic that is not specifically included does not flow over the tunnel.
Split tunnels are ideal for the following use cases:
- Provide access to private networks
- Connect to IP-whitelisted cloud applications
DNS Configuration
No explicit DNS configuration is required for split tunnels. When a user connects to a Service Tunnel, the app configures local DNS rules to intercept DNS requests for specified private and public domains. DNS requests that are not intercepted are resolved at the device’s default network resolver.
Example Setup
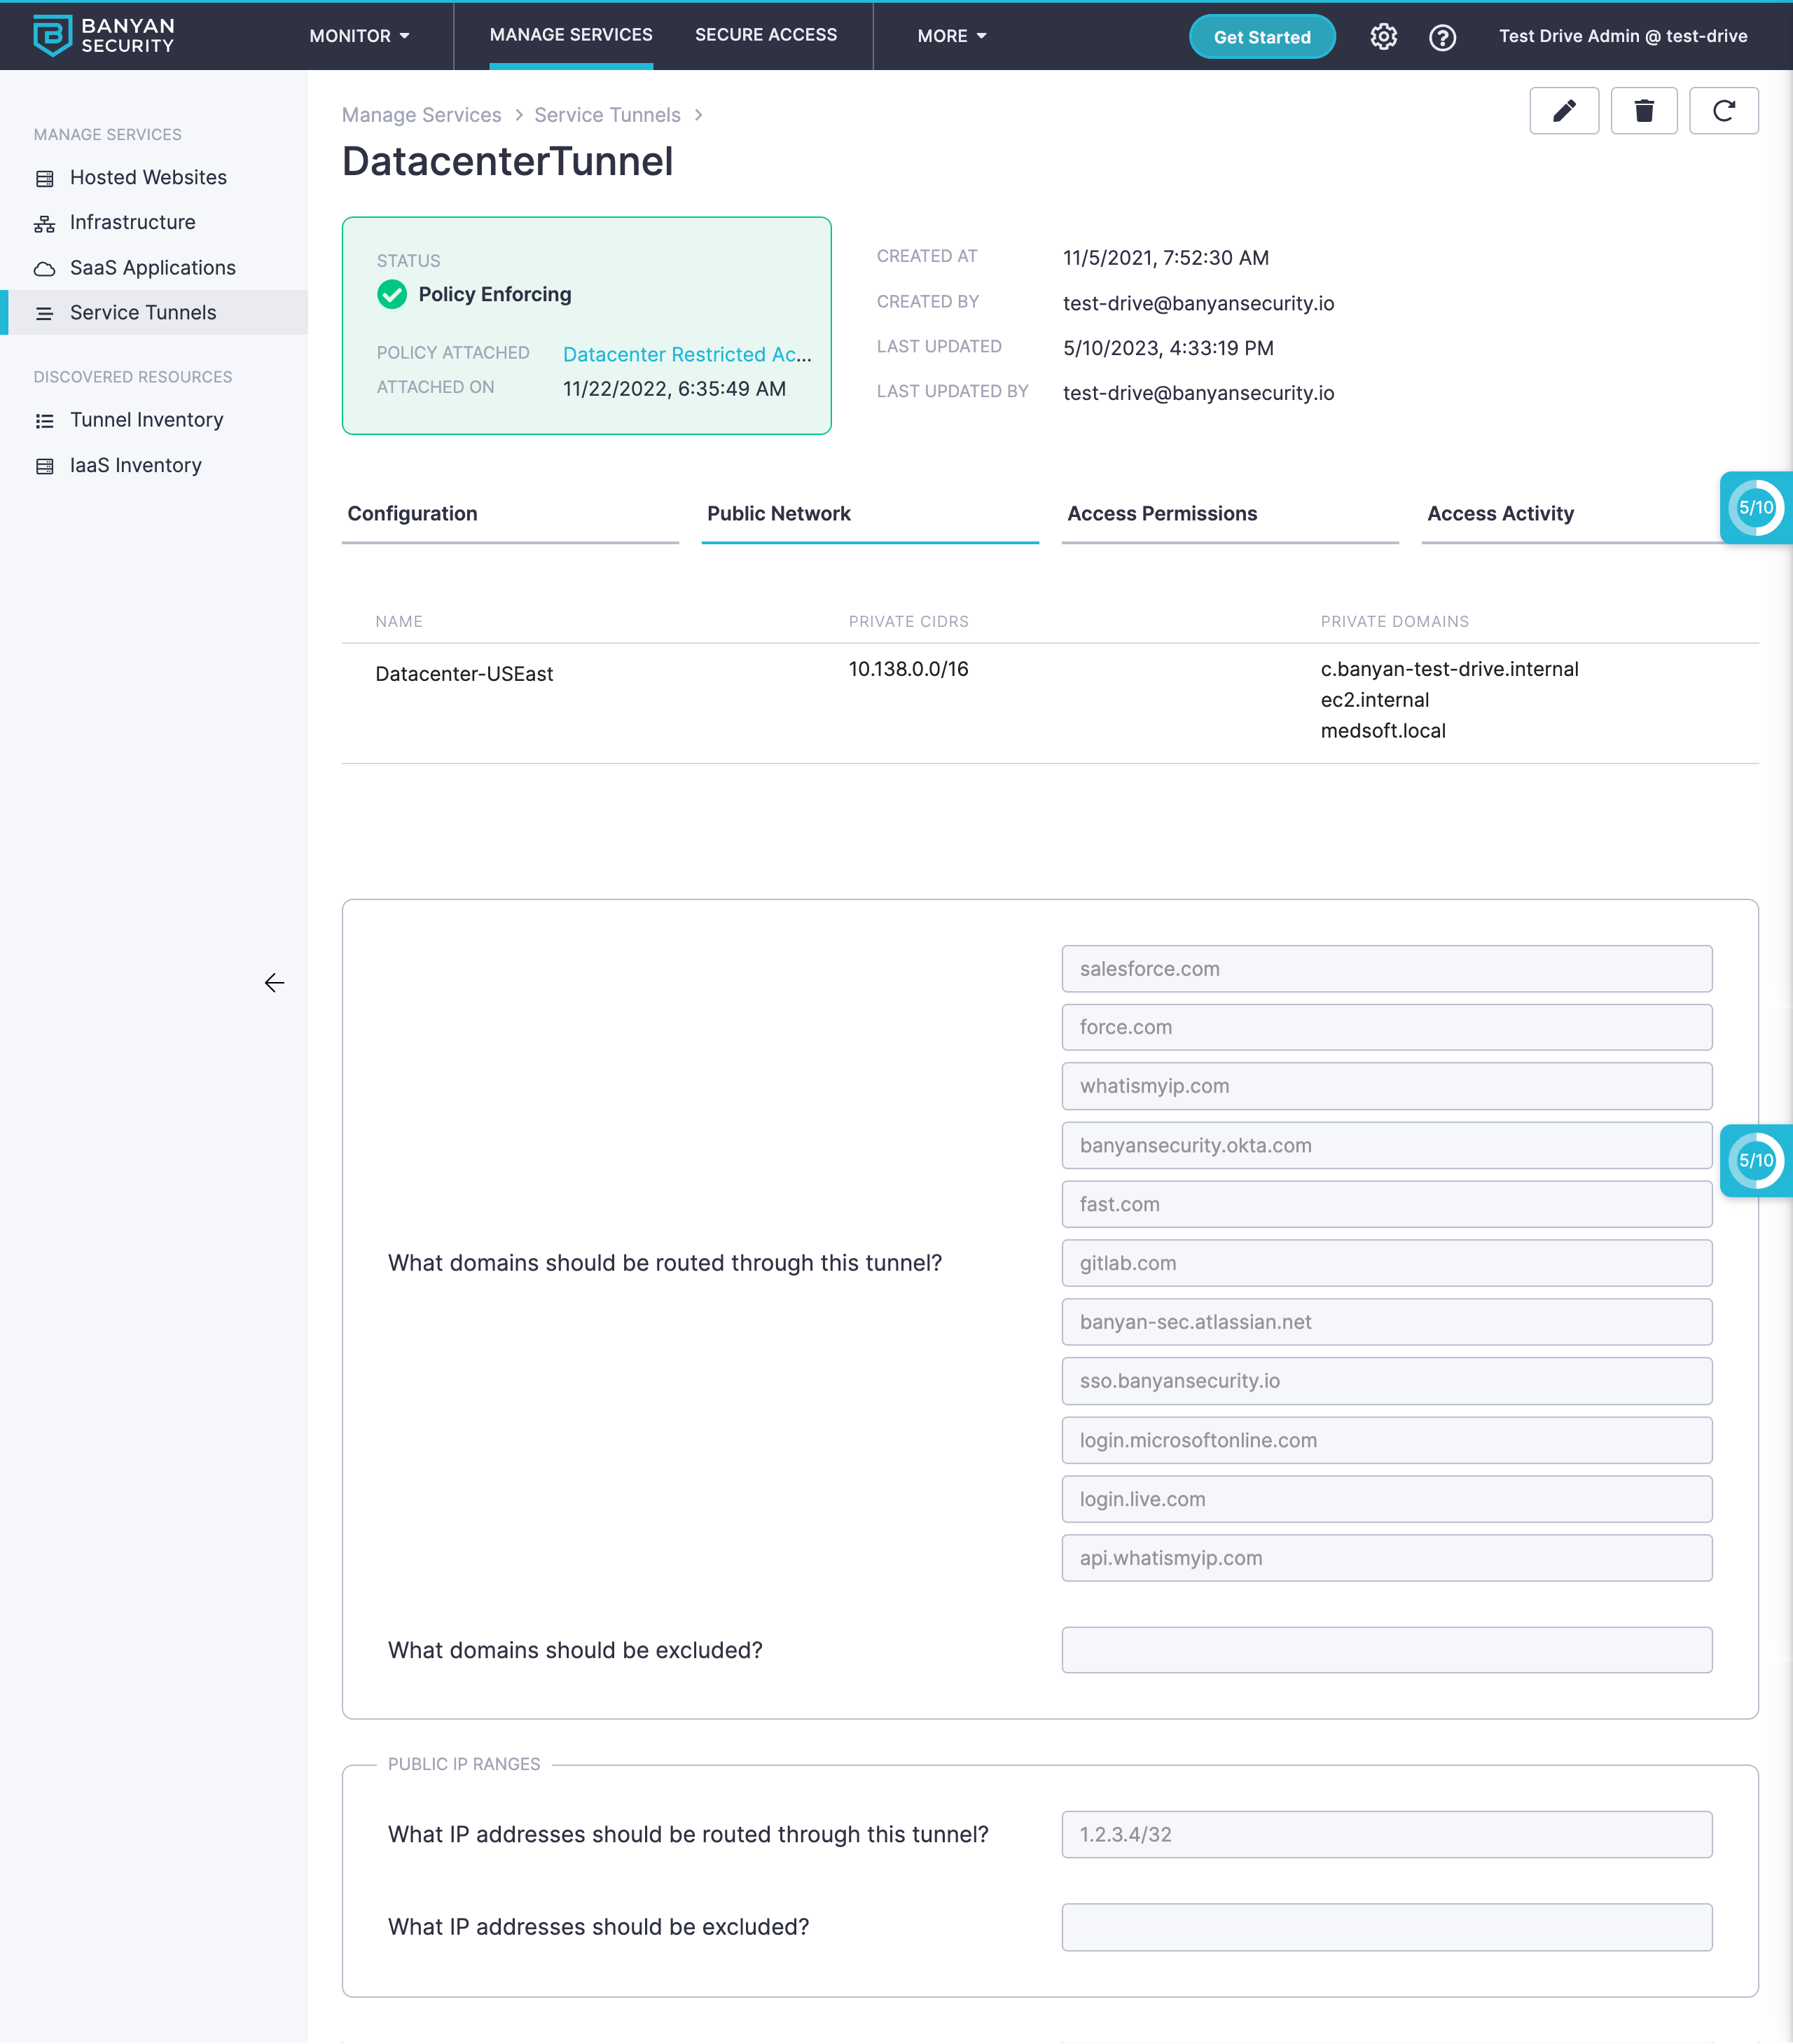
An example of a split tunnel configuration is depicted in the image below. The tunnel configuration covers private domains such as ec2.internal and medsoft.local and well as public domains such as salesforce.com and fast.com. DNS for both private and public domains specified in the tunnel will be resolved at the Access Tier Datacenter-USEast.
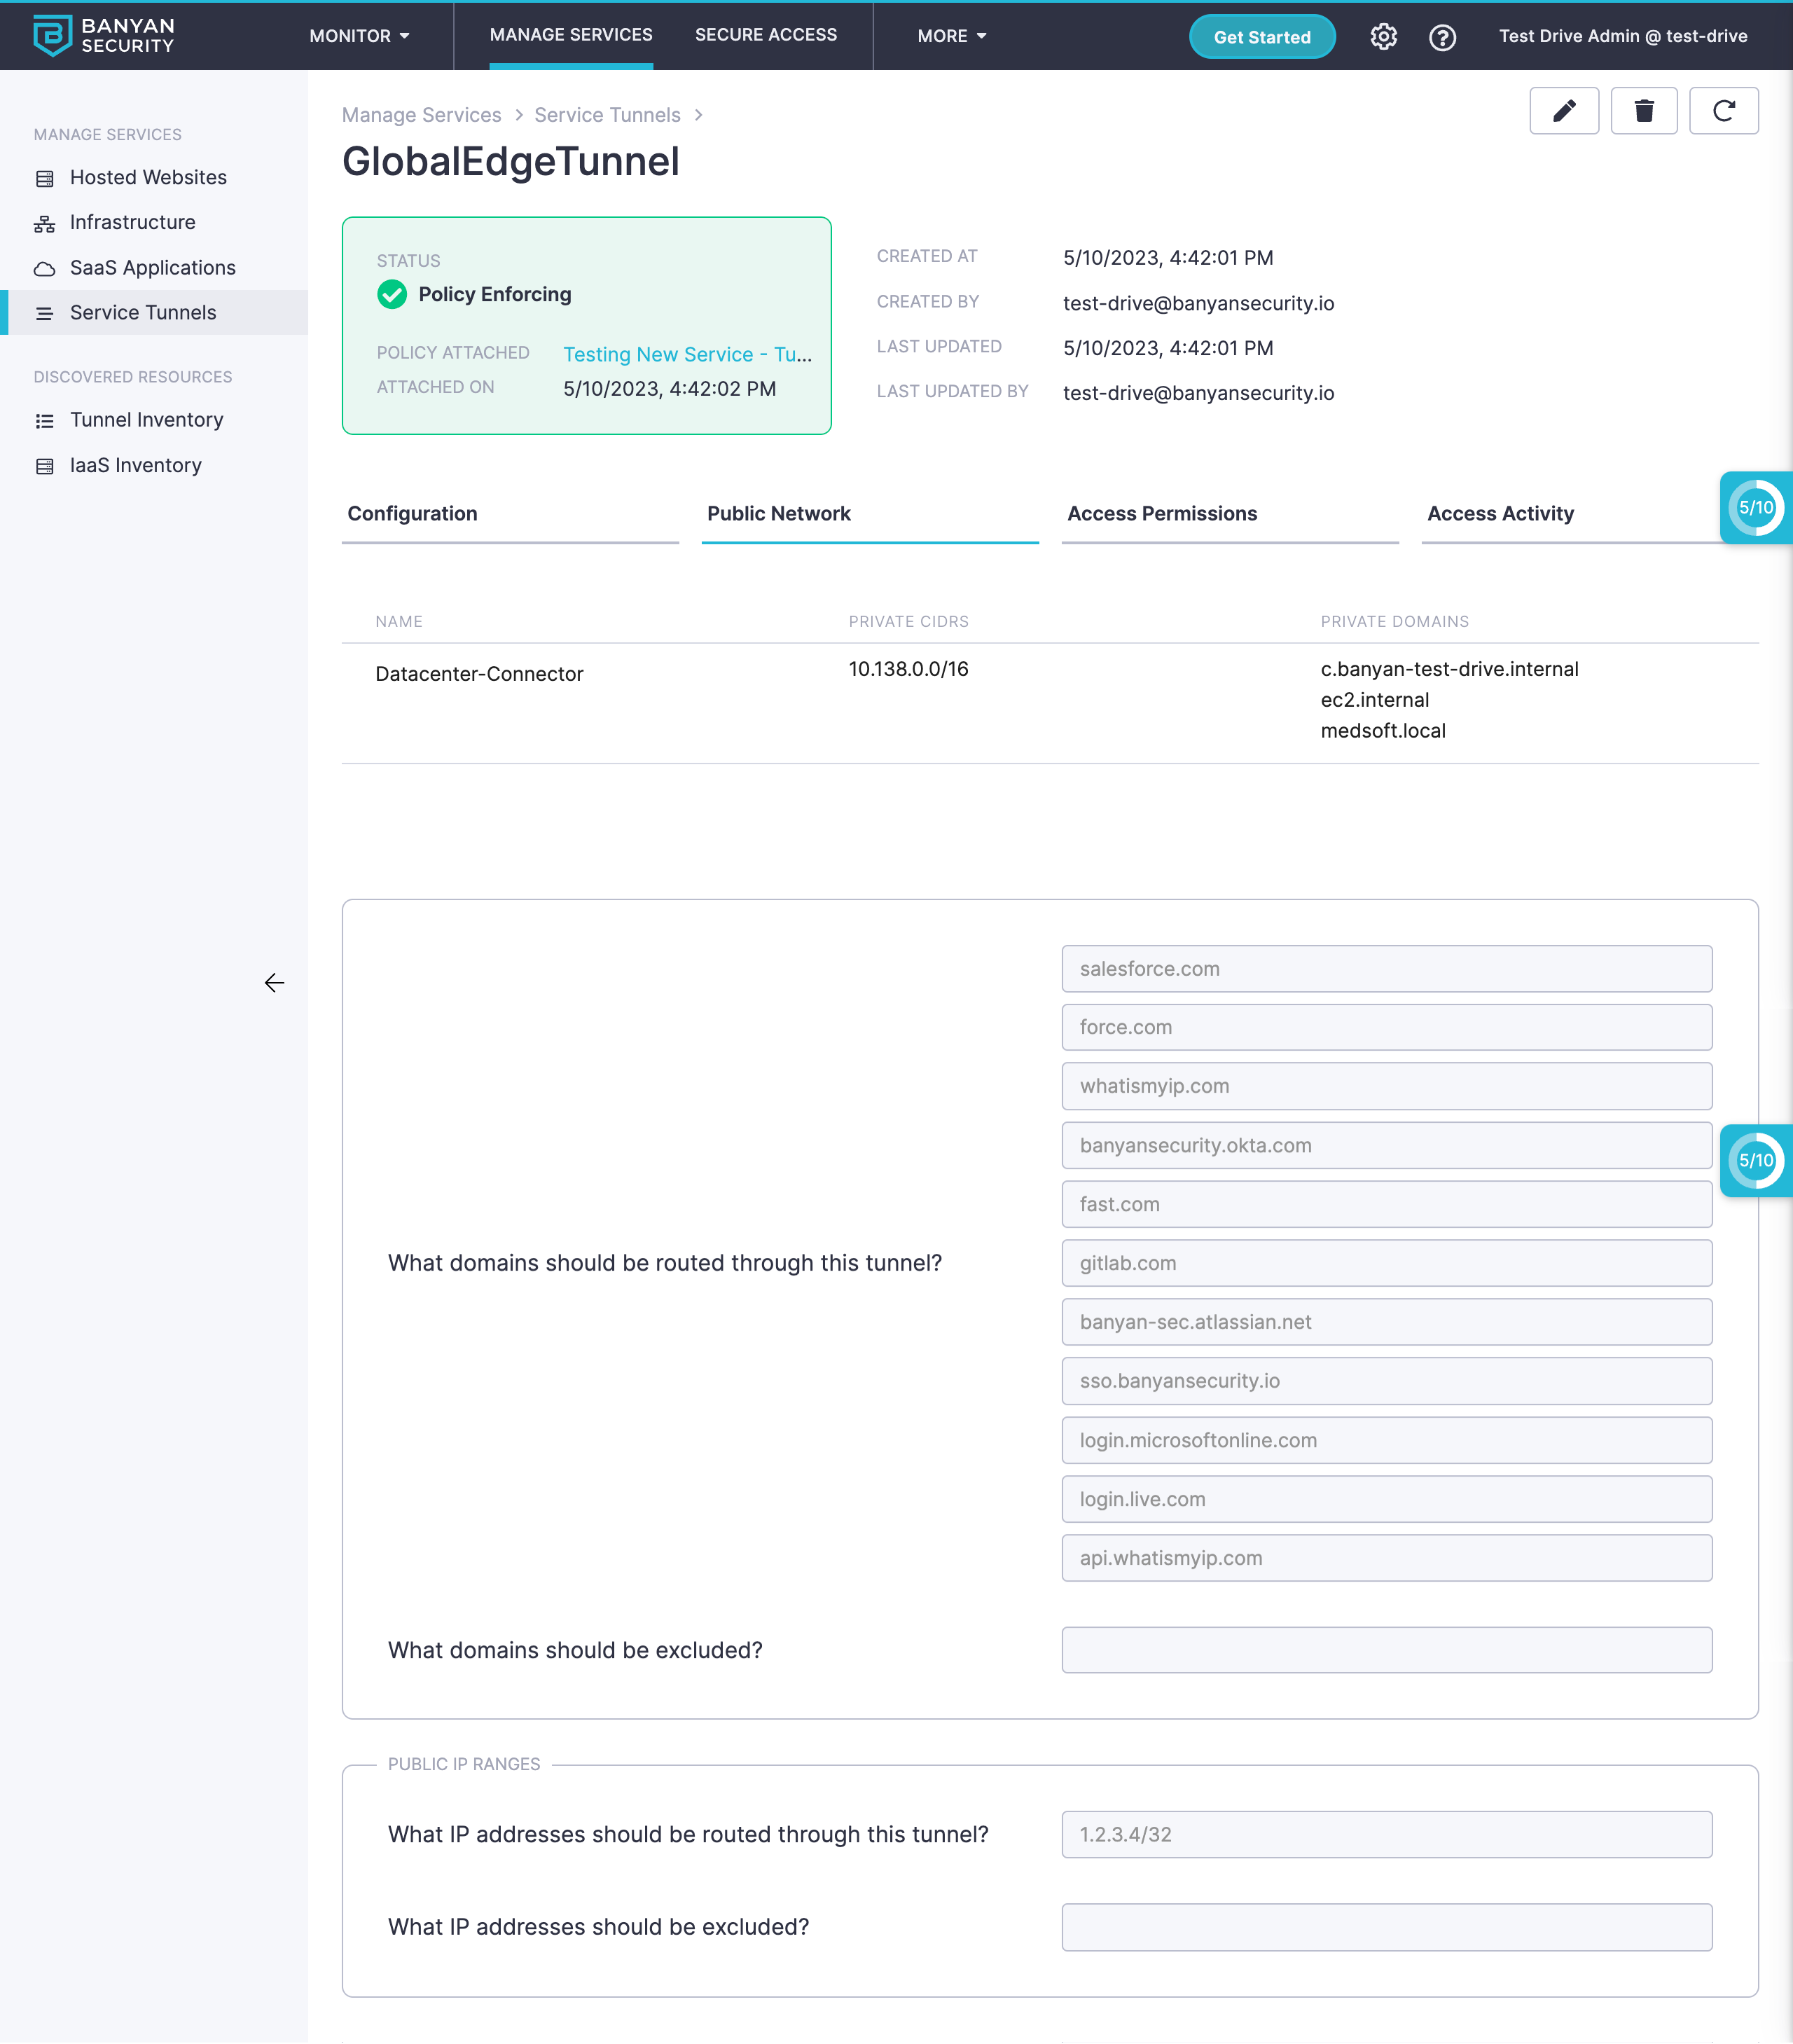
An example of a split tunnel configuration is depicted in the image below. The tunnel configuration covers private domains such as ec2.internal and medsoft.local and well as public domains such as salesforce.com and fast.com. DNS for private domains will be resolved at the private network via the Connector Datacenter-Connector. Public domains will be resolved at the org’s Access Tier in the Global Edge.
Domain-level Controls
For application-level granular definition and assignment of access to resources, we typically recommend using an identity-aware proxy to publish services and enforce zero-trust security policies. This section covers scenarios where you need domain-level controls for resources available only over a Service Tunnel.
Domain-level controls within a service tunnel are helpul in the following use cases:
- Simplifying network policies that were previously written in terms of IPs and CIDRs
- Only allowing certain users and devices to access IP-whitelisted SaaS applications that use 100s of IP addresses, such as Zoom, Office 365, Salesforce, etc
- Only allowing certain users and devices to access IP-whitelisted IaaS applications with changing IP addresses; for example because they use AWS Elastic Load Balancing
CSE offers 2 options to enforce domain-based controls within a Service Tunnel:
- Use FQDN tunnel policy
- Publish a service that is only available over a service tunnel
1. FQDN tunnel policy
Review our doc on Tunnel Policies to see how to construct tunnel policies where you can specify Fully Qualified Domain Names (FQDNs) in addition to the typical IP/CIDR and Port/Protocol options. So, instead of specifying 1000s of IP ranges, tunnel policies can be written in terms of domains, such as zoom.us, login.microsoftonline.com, etc.
There are 2 important caveats when using CSE’s domain-based Tunnel Policies:
- Wildcard domains are not supported. Instead, you need to specify the Fully Qualified Domain Names (FQDNs) that can be explicitly resolved.
- FQDNs that resolve dynamically can result in unpredictable enforcement. DNS records that resolve to different IPs from different geolocations or change very frequently should not be used in tunnel policies; instead, use the underlying IP address pools directly.
2. Publish a service only available over a tunnel
Publishing services in CSE typically entails using public DNS and making the service available on the internet. However, you may also publish a service that is only available over a service tunnel.
In this mode, traffic to the application is tunnelled AND reverse-proxied. The primary benefit is that you can assign fine-grained Layer-7 policies for application access in additional to coarse-grainer tunnel policies.
Review our guide on publishing a service utilizing private DNS to see how to automatically trigger a published service flow for a tunnelled resource.
Additional Notes
Reverse DNS lookups
A reverse DNS lookup is used by clients to find a domain mapped to an IP address.
To send reverse resolution requests to your internal DNS server, add in-addr.arpa to the list of private domains to be resolved at your private network.
Now, for example, to do a reverse lookup of the IP address 10.0.1.2 the PTR record for the domain name 10.0.1.2.in-addr.arpa would be looked up at your internal DNS server. Assuming the record is set, the reverse lookup would be found to point to an internal domain, such as ngnix.bnn.local.
Tunnelling Domains that use “Split-brain” DNS
Split-brain DNS is a DNS mode when a given domain uses two zones - a private zone for users inside a private network and a public zone for users on the internet.
For example, an org could have both a private zone and a public zone for example.com:
- FQDNs like
abc.example.comanddef.example.comcould be defined in the private zone, and only resolve inside the private network to private IP addresses - FQDNs like
xyz.example.comandpqr.example.comcould be defined in the public zone, and resolve for everyone on the internet to public IP addresses
To maintain your current split-brain DNS resolution setup, should specify example.com as a private domain when configuring your private network by installing an Access Tier (for Self-hosted Private Edge deployments) or a Connector (for Global Edge deployments). You need not specify example.com as a public domain in your Service Tunnel spec.
When a user connects to the service tunnel, the app will intercept DNS requests for example.com. DNS resolution for all subdomains of example.com will happen in your private network. Tunnel routes will be dynamically added for every subdomain as well, so all traffic for example.com will flow over the Service Tunnel.