Configure Okta to manage your directory of users in SonicWall Cloud Secure Edge
- Updated on
- Overview
- How It Works
- Supported Features
- Part 1: Configuring Okta for access to CSE Services
- Part 2: Configuring Okta for CSE Device Registration
Overview
Okta is a cloud-based identity management system. This guide shows how Cloud Secure Edge (CSE) integrates with your org’s Okta environment to authenticate users that need to register with the app and access CSE-secured services.
How It Works
There are two parts to CSE’s integration with Okta for users and devices:
1. Configuring Okta for Access to CSE Services
- The CSE (formerly Banyan) TrustProvider app in Okta allows you to configure specific authentication policies for users accessing CSE-protected hosted websites, infrastructure, and Service Tunnels.
2. Configuring Okta for CSE Device Registration
- The CSE (formerly Banyan) Device Registration app in Okta allows you to configure specific authentication policies for users registering their devices with the app.
Supported Features
The Okta-Cloud Secure Edge integration currently supports the following features:
- IDP-initiated SSO
- SP-initiated SSO
- JIT (Just-In-Time) Provisioning: CSE’s IDP integrations allow for Just-In-Time (JIT) provisioning of User accounts, as well as Group and Role information updating upon login. Updates to the User directory or IDP are reflected in CSE with each new login, allowing for changes in Users’ authorization without requiring admins to make any manual changes to Roles or Access policies.
Part 1: Configuring Okta for access to CSE Services
Step 1: Create the CSE TrustProvider app in Okta
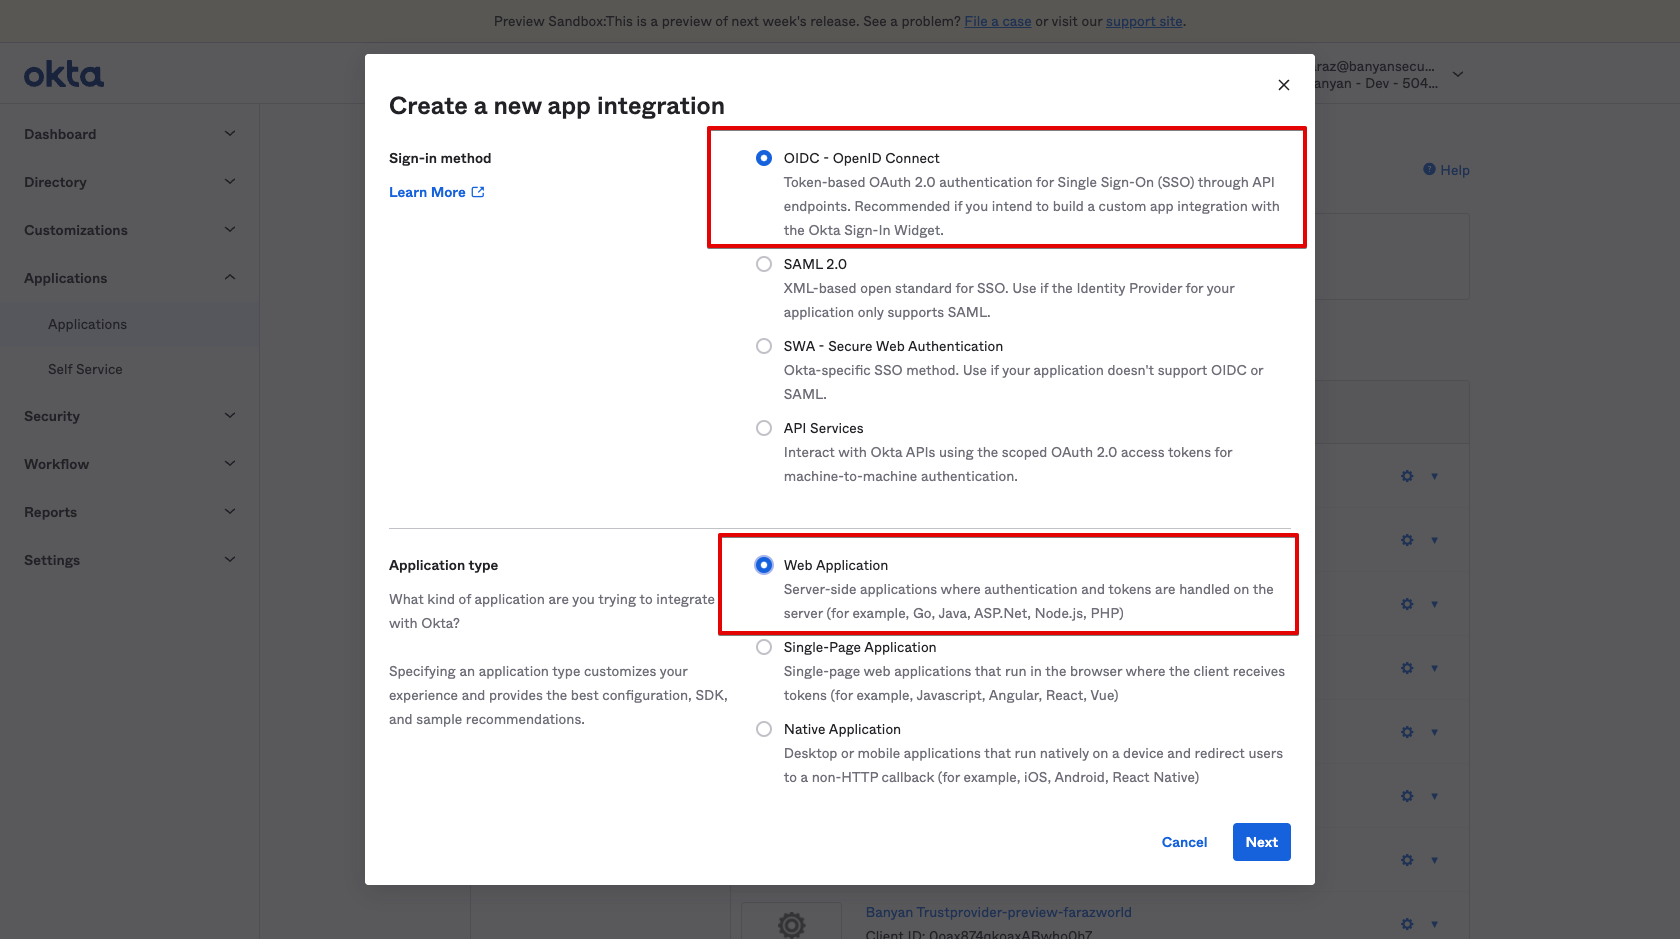
1.1 In Okta, navigate to Applications, and then select Create App Integration.
1.2 Select the OIDC sign-in method and the Web Application type.
1.3 Name the app integration CSE TrustProvider, and upload the CSE logo.
1.4 Enter the Sign-in Redirect URI
The format for the redirect URI is https://{ORGNAME}.trust.banyanops.com/v2/callback. Your ORGNAME can be found at the top right of the Command Center.

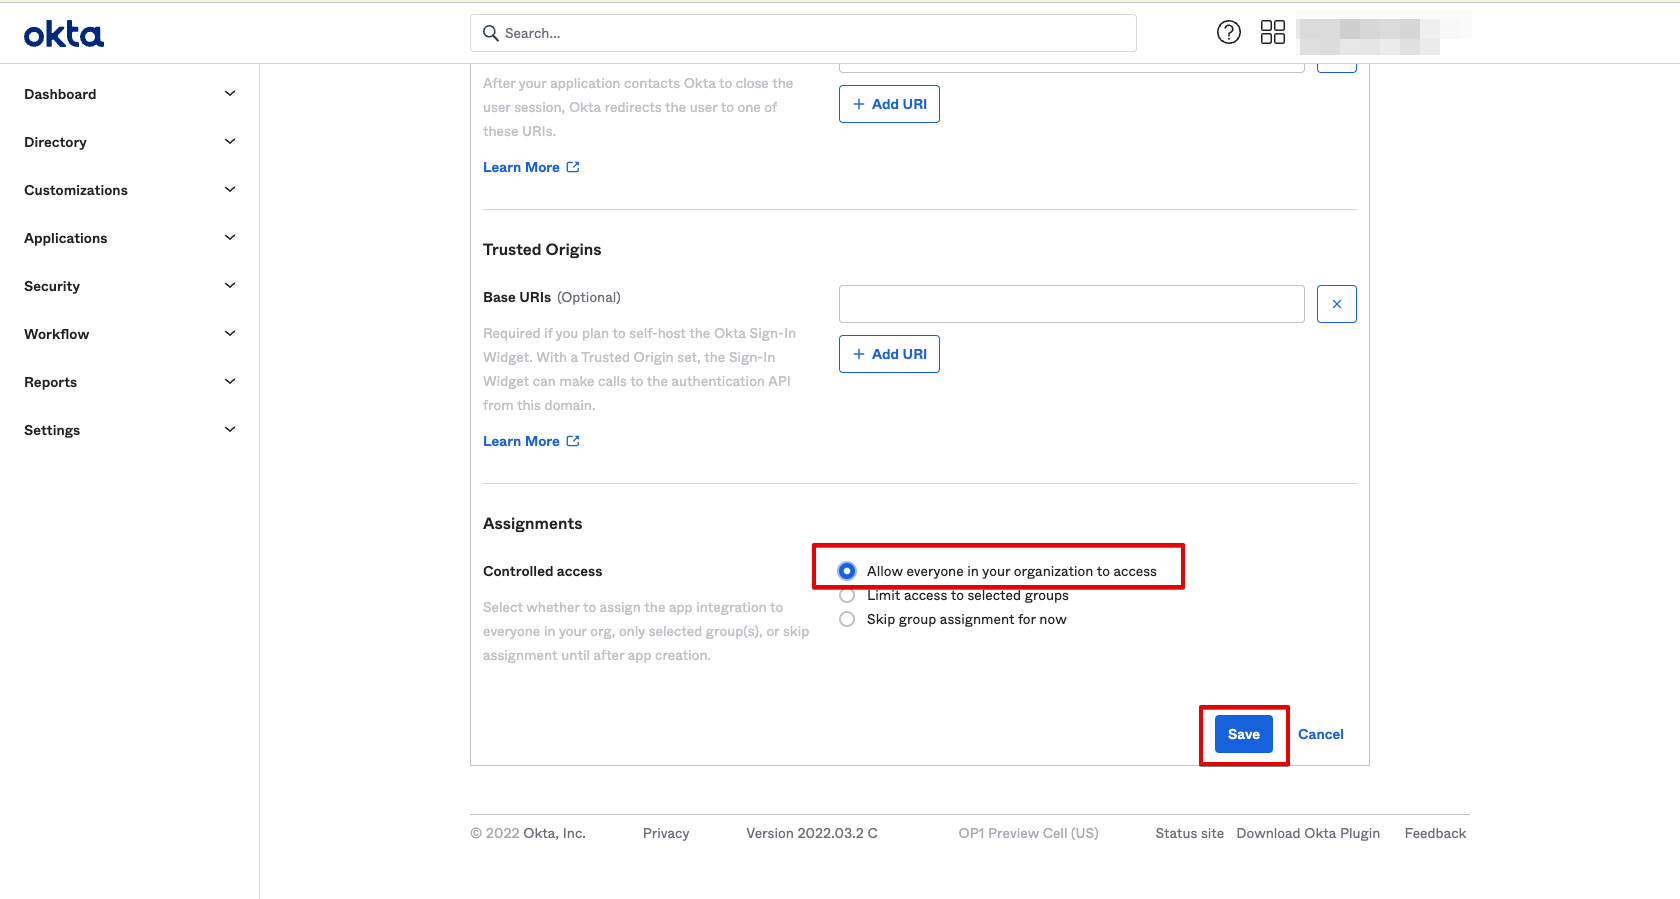
1.5 Assign the CSE TrustProvider app to “Everyone”, and then Save.
This will allow CSE to federate authentication of all users in your org to Okta.
Step 2: Update Group Claims for the Okta Token
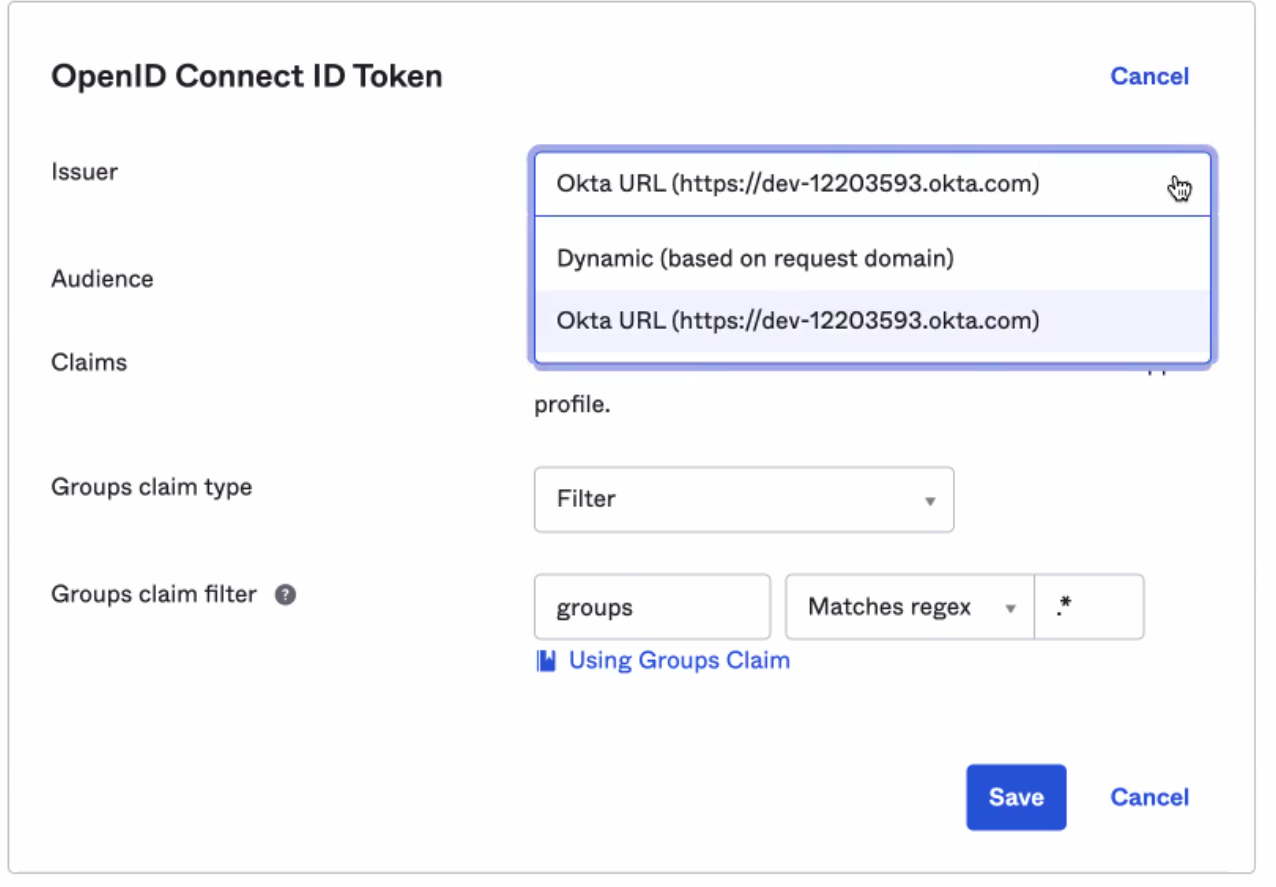
2.1 Navigate from Sign On > OpenID Connect ID Token, and then select Edit.
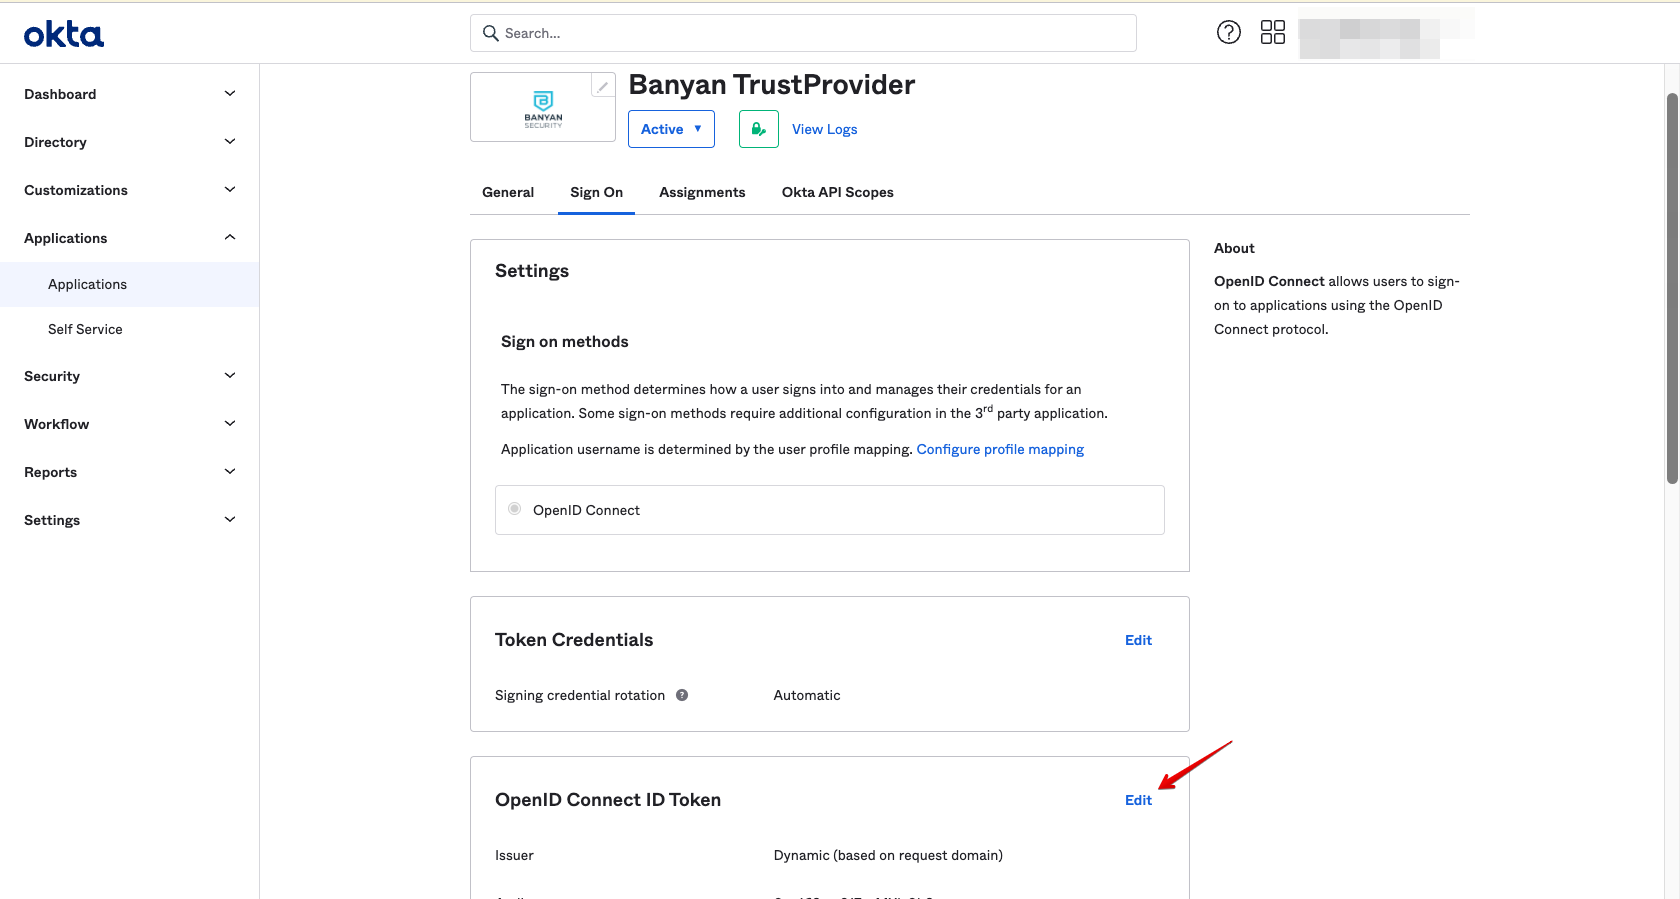
2.2 Select Okta URL as the Issuer. Then, set the Group claims type to Filter, name the claim groups, and set the Matches regex to .*. Finally, select Save.
This updates the group claims, ensuring the token issued by Okta contains all of the user’s group information that will be used in Banyan policies.
Step 3: Configure your User Identity Provider in CSE
3.1 From the CSE TrustProvider app in Okta, take note of the Issuer URL field from the Sign On tab.
Note: CSE currently does not support Okta Custom URLs that aliases your Okta organization’s domain name to a subdomain that you own. An IssuerURL of the form example.okta.com or example.oktapreview.com will work; however, an aliased IssuerURL of the form login.example.com will not work.
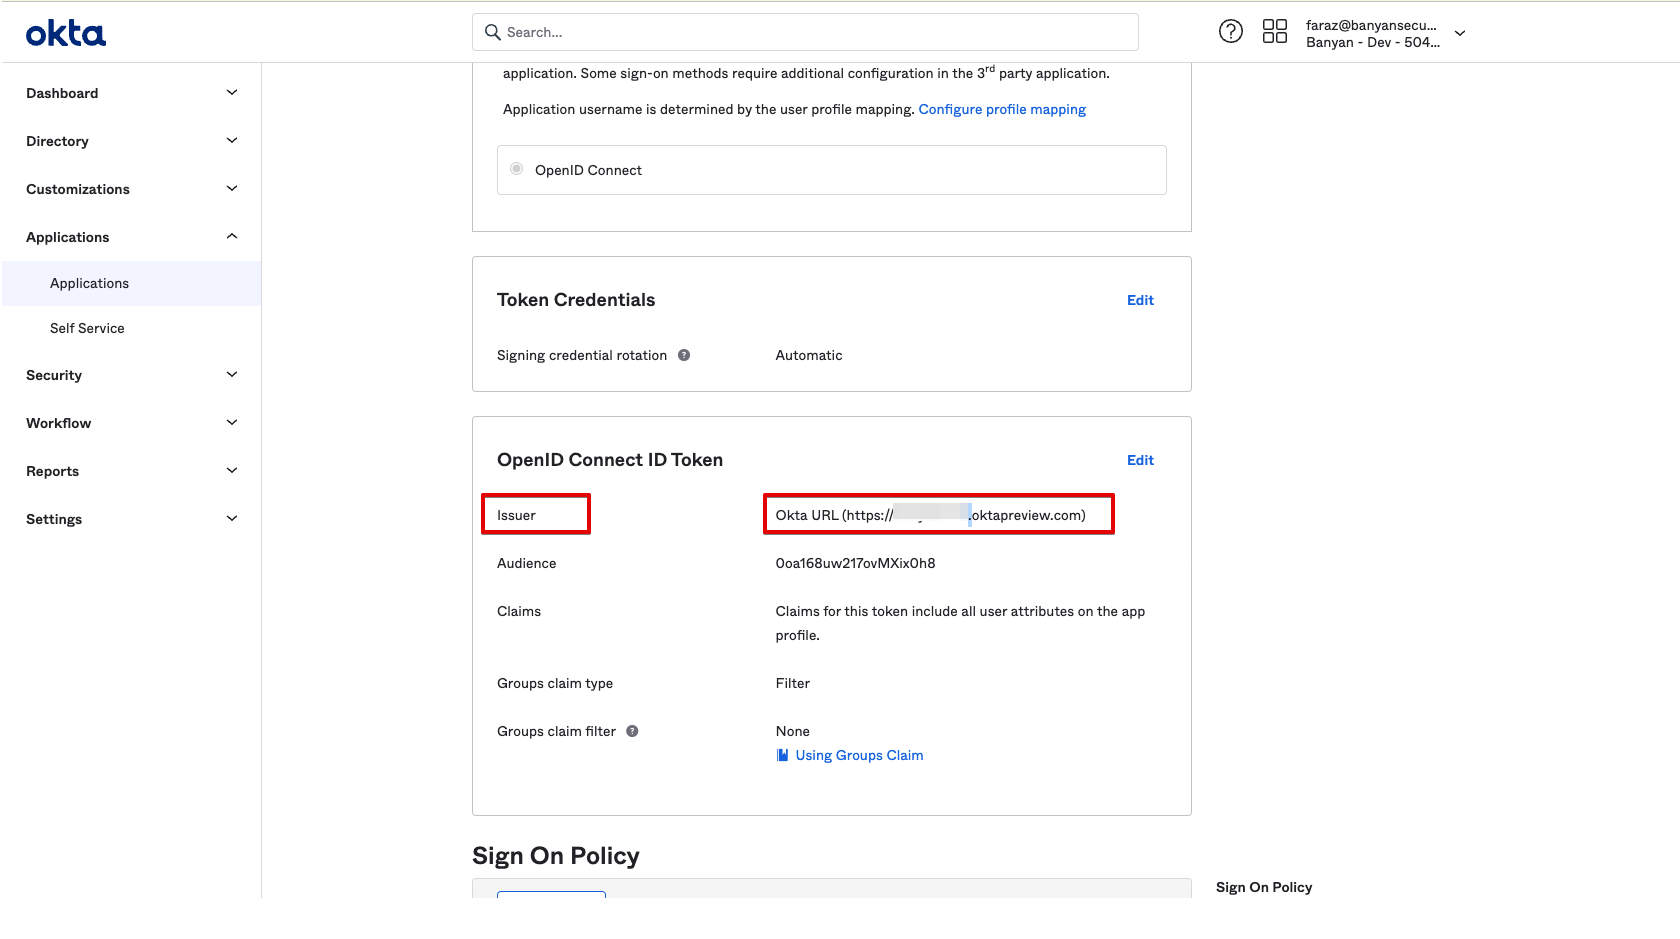
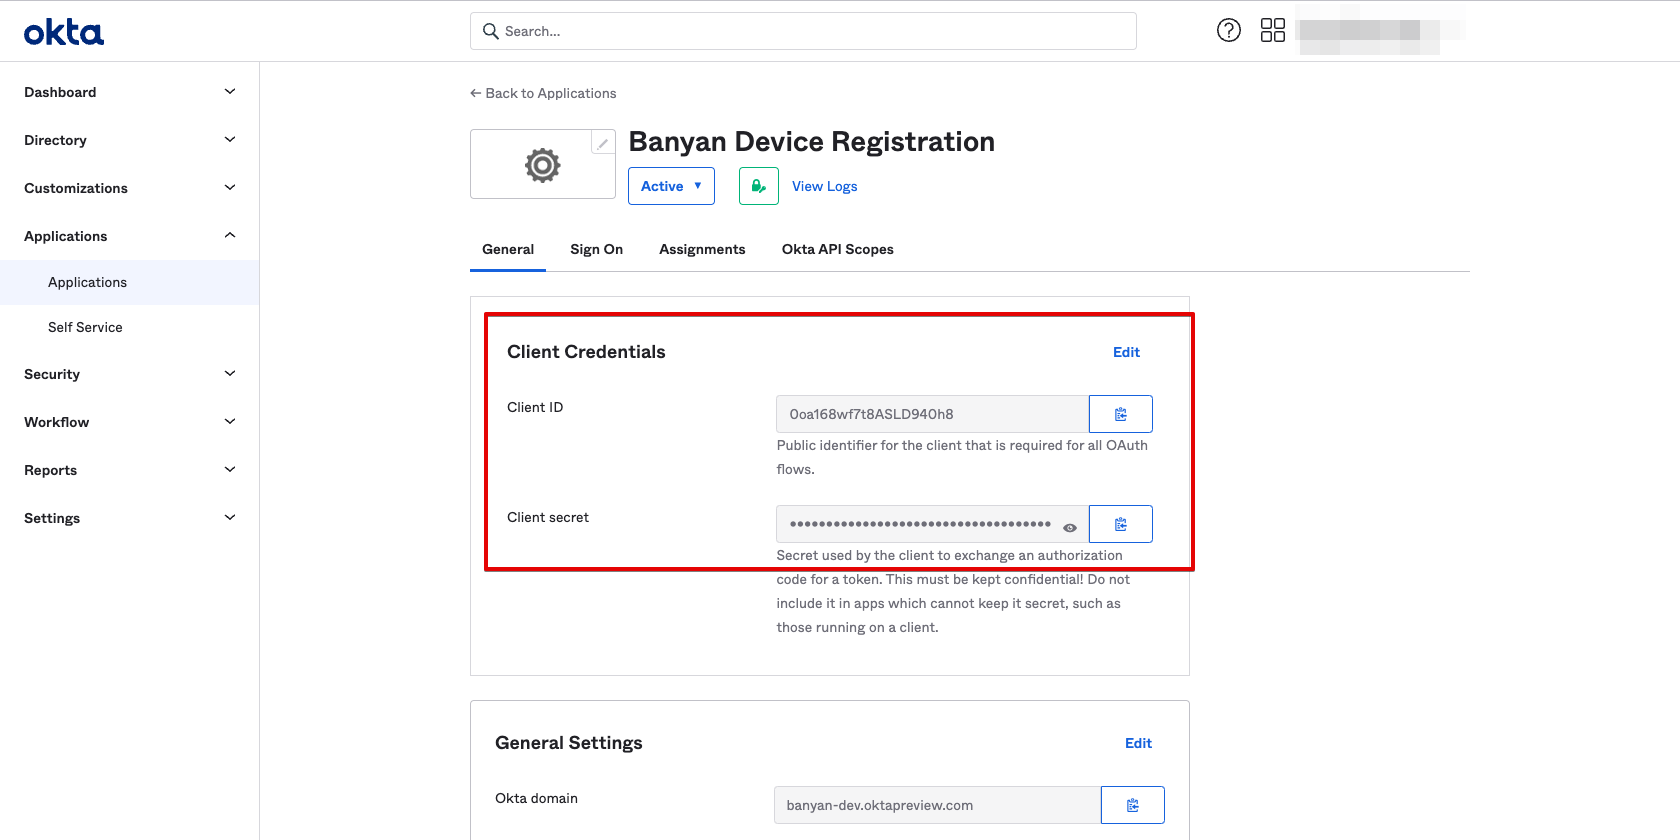
3.2 Navigate to the General tab, and take note of the Client ID and Client Secret fields.

3.3 In CSE, navigate from Settings > Identity and Access tab > End User tab.
- Set your Provider Name to Okta
- Ensure that your Provider Protocol is set to OIDC (this should be automatically selected).
3.4 Enter the CSE TrustProvider app parameters from Okta:
- Enter the Issuer URL (from Step 3.1)
- Enter the Client ID (from Step 3.2)
- Enter the Client Secret (from Step 3.2)

3.5 Save your user IDP configuration.
Part 2: Configuring Okta for CSE Device Registration
Step 1: Create the CSE Device Registration app in Okta
1.1 In Okta, navigate to Applications, and then select Add Application.
1.2 Select the OIDC sign-in method and the Web Application type.
1.3 Name the app integration CSE Device Registration.
1.4 Enter the same Sign-in Redirect URI used in Step 1.4.
The format for the redirect URI is https://{ORGNAME}.trust.banyanops.com/v2/callback. Your ORGNAME can be found at the top right of the Command Center.

1.5 Assign the CSE Device Registration app to “Everyone”, and then Save.
This will allow all end users in your organization to register with the app when required.
Step 2: Complete Device Registration Provider Config in CSE
2.1 From the CSE Device Registration app in Okta, take note of the Issuer URL field from the Sign On tab.
Note: CSE currently does not support Okta Custom URLs that aliases your Okta organization’s domain name to a subdomain that you own. An IssuerURL of the form example.okta.com or example.oktapreview.com will work; however, an aliased IssuerURL of the form login.example.com will not work.
2.2 Navigate to the General tab, and take note of the Client ID and Client Secret fields.
2.3 In CSE, navigate from Settings > Identity and Access > Device tab and select Edit.
2.4 Configure the Device Registration Provider Config with the parameters from Okta:
- Set your Provider Name to Okta
- Ensure that your Provider Protocol is set to OIDC (this should be automatically selected).
- Edit the Redirect URL to:
https://{ORGNAME}.trust.banyanops.com/v2/callback, replacing{ORGNAME}with your own org name. - Enter your Issuer URL (from Step 2.1)
- Enter your Client ID (from Step 2.2)
- Enter your Client Secret (from Step 2.2)
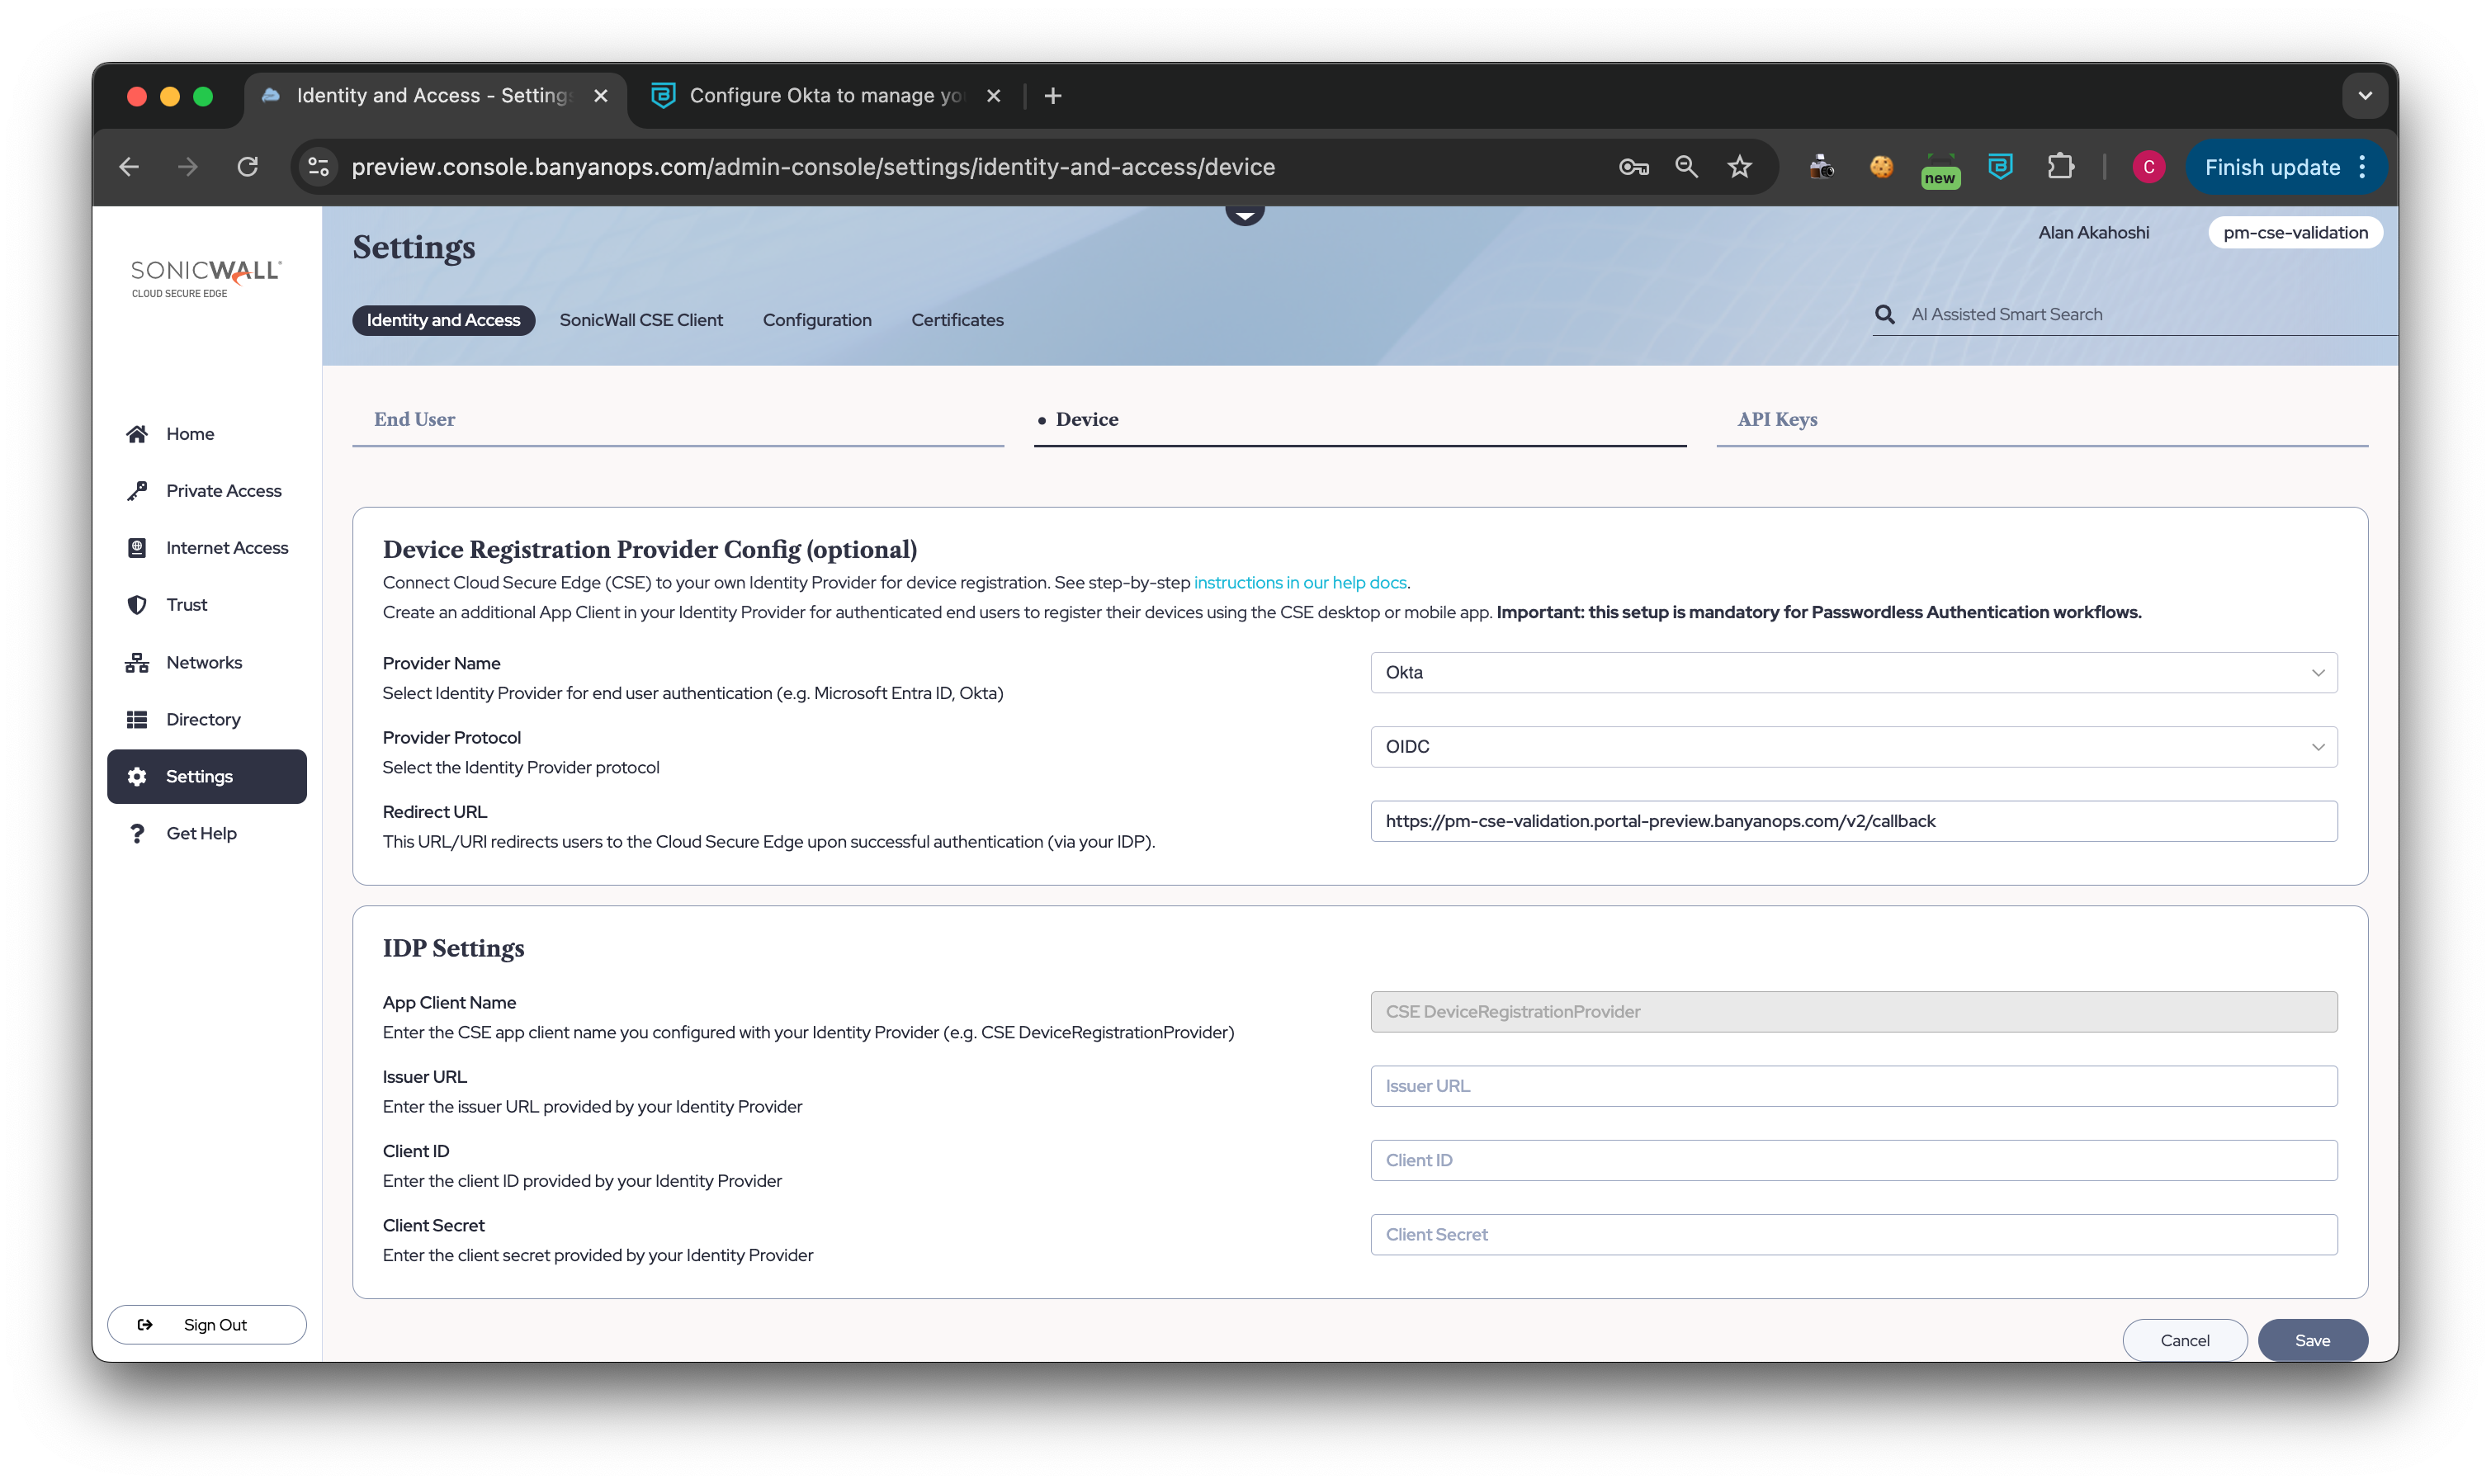
2.5 Save your device registration configuration.