Install CSE Access Tier with Netagent v1 using DEB/RPM packages
Install the Access Tier on virtual or physical 64-bit Linux servers, on-prem or cloud
- Last validated: May 19, 2026
- Network Reachability Checklist
- Pre-install Checklist
- Supported Operating Systems
- Download and Extract
- Configure
- Install
- Verify Installation
Network Reachability Checklist
-
The Access Tier server(s) should be located in your internet-facing DMZ and have a Public IP Address so it can be reached from anywhere on the internet.
- Configure a Public Wildcard DNS Record that follows your corporate domain name convention to map to the Access Tier’s Public IP Address
- A common pattern is to use
*.corp.example.com. Then, corporate services can be exposed to your users aswebsite1.corp.example.com,sshserver2.corp.example.com, etc. - If you’re deploying multiple Access Tiers across multiple locations, you can further scope the subdomains into
*.east.corp.example.com,*.west.corp.example.com, etc.
- A common pattern is to use
- Expose the following ports to the internet so the Access Tier can accept inbound connections from the internet:
| Ingress Port | Protocol | Traffic | Used by CSE Service Type |
|---|---|---|---|
80 |
tcp | HTTP | n/a (will be redirected to HTTPS) |
443 |
tcp | HTTPS | Hosted Websites |
8443 |
tcp | MTLS | Infrastructure (SSH, RDP, etc) |
51820 |
udp | WireGuard | Service Tunnel |
- Ensure the Access Tier can make outbound connections to following addresses:
The netagent binary supports HTTP Proxy settings. If an Egress Proxy is configured on the host via the HTTP_PROXY environment variable, outbound connections from the Access Tier will automatically use it.
| Egress Address | Protocol | Purpose |
|---|---|---|
tcp://{shield-address}:{shield-port} |
tcp | connect to its Shield (Cluster Coordinator) to receive Policies and send Event data (you can find the Shield Address for your Access Tier in the Cluster Settings page) |
https://net.banyanops.com/api/v1/… |
https | connect to the Command Center for installation and configuration |
https://{orgname}.trust.banyanops.com/v2/... |
https | connect Command Center TrustProvider component to authenticate OIDC JWT tokens used for web access |
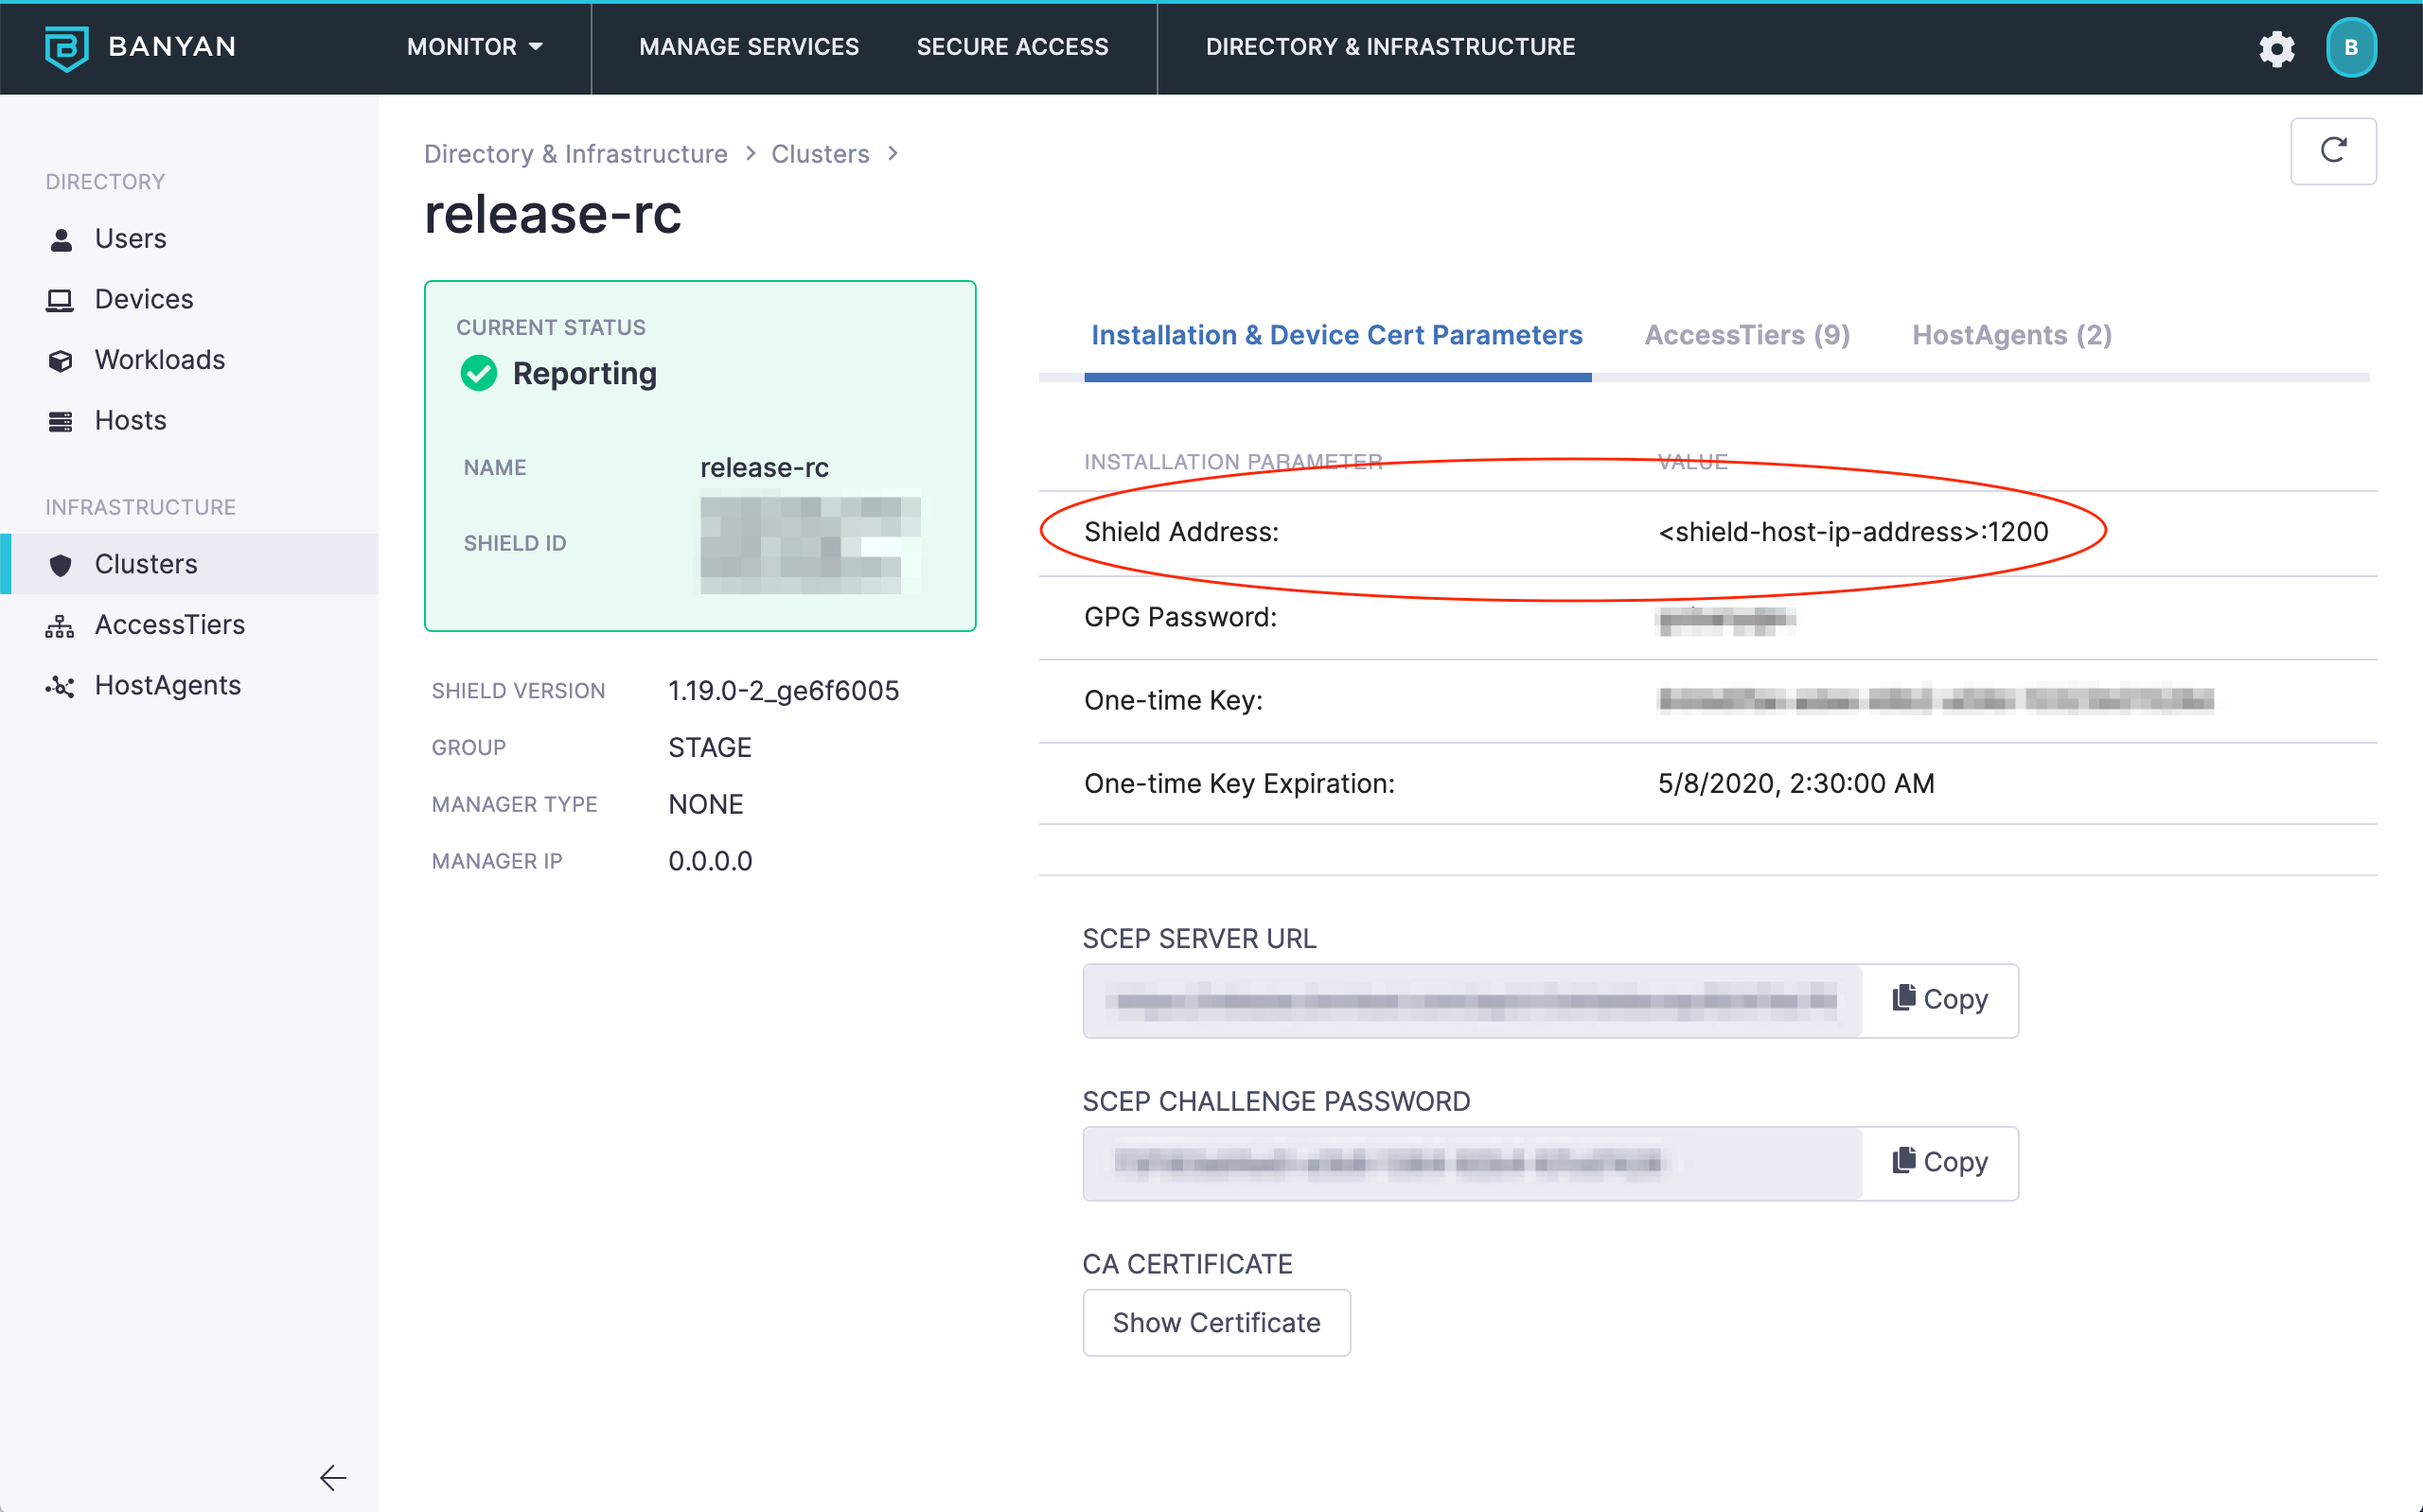
Shield Address - Infrastructure > Cluster
- Ensure your networking policies allow traffic to flow from the Access Tier server to backend machines running the applications and services you need to secure access to.
Pre-install Checklist
-
Ensure you have an Organization set up in CSE and that you have admin access via the Command Center.
-
In the CSE Command Center, navigate to Networks > Clusters and ensure you have a Cluster with a running Shield that the Netagent or Access Tier can connect to. The Clusters section of the Web Console lists all cluster parameters such as Cluster Name, Shield Address, etc.
-
In the Command Center, navigate to the My Profile tab by selecting your user name (in the bottom left corner of the Command Center). Ensure that you have generated a Refresh Token. You will need your Refresh Token if/when you use the automated bootstrap scripts to install Netagent or Access Tier.
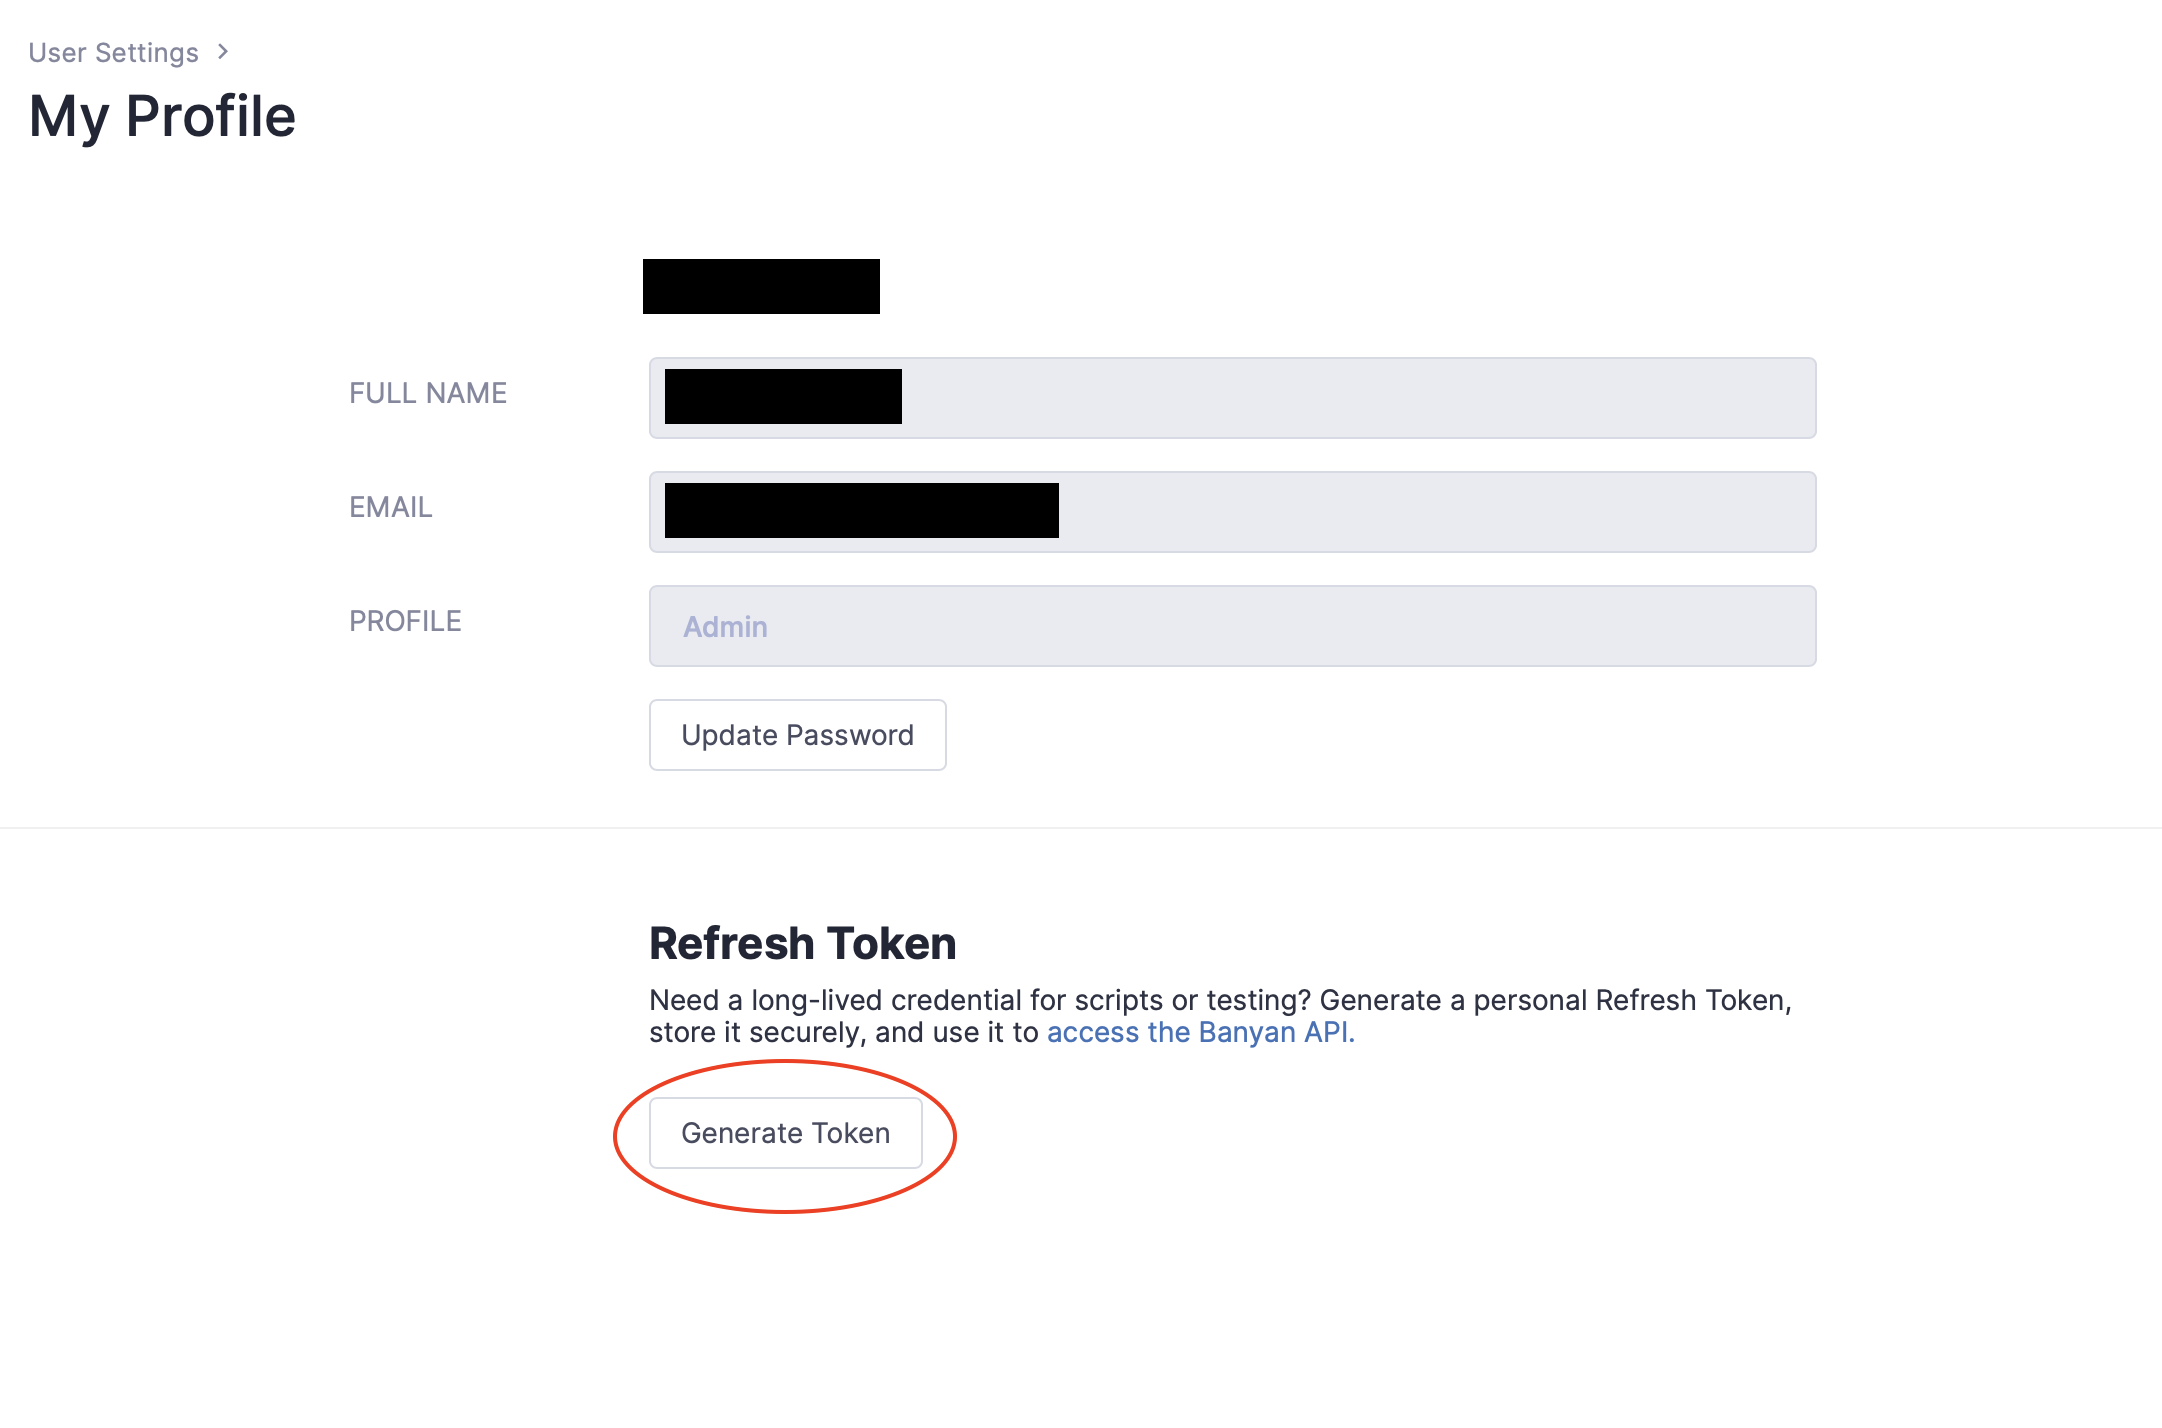
Refresh Token - My Profile
Supported Operating Systems
The CSE netagent binary, which is the core component of a Access Tier, can be installed on Virtual or Physical 64-bit Linux Servers on most Linux distributions.
Officially Supported: the following distros are officially supported:
- Amazon-Linux-2
- CentOS 7.x and RHEL 7.x
- Ubuntu 16.04, 18.04, 20.04
Support Deprecated: the following Linux distros are no longer supported:
- CentOS 6.x
- Ubuntu 12.04, 14.04
Download and Extract
Ensure you have assumed root privileges:
user@host$ sudo su -
root@host#
On CentOS/RHEL hosts, grab the RPM package:
# add the CSE RPM repo
yum-config-manager --add-repo https://www.banyanops.com/onramp/repo/
rpm --import https://www.banyanops.com/onramp/repo/RPM-GPG-KEY-banyan

# install it
yum install banyan-netagent-1.49.2
On Debian/Ubuntu hosts, grab the DEB package:
# add the CSE DEB repo
curl https://www.banyanops.com/onramp/deb-repo/banyan.key | apt-key add -
apt-add-repository "deb https://www.banyanops.com/onramp/deb-repo xenial main"

# install it
apt install banyan-netagent=1.49.2
Then, cd into /opt/banyan-packages directory, extract the Tarball installer that has been placed there, and cd into the directory:
cd /opt/banyan-packages

tar zxf netagent-1.49.2.tar.gz
cd netagent-1.49.2
Configure
Before you start the netagent binary you need to specify its configurations via a config.yaml file. There are two methods to do this - (a) manually edit the file, or (b) use the automated bootstrap script.
a) Manual Configuration
You can manually create the config.yaml file used to configure the Netagent.
# copy the template `config.yaml.tpl` to `config.yaml`
cp config.yaml.tpl config.yaml

# edit the `config.yaml` file to specify Shield connectivity parameters
#   shield_address    # CNAME:PORT or IP:PORT of the host running Shield
#   one_time_key      # if secure_bootstrap is set, you need to a one_time_key
#                     # provided under Settings in your Command Center

# edit the `config.yaml` file to specify Access Tier parameters
#   site_name           # display name of Site secured by Access Tier
#   site_address        # canonical domain name of the Site,
                        # ex: "corp-dns-cname.example.com"
vi config.yaml
b) Automated Bootstrap
Instead of manually creating the config.yaml file used to configure the Netagent binary, you can instead automatically “bootstrap” the file creation process. This automatic bootstrapping method is particularly useful for automated deployments.
Note: Instead of using a Refresh Token, you can now create an API key using an Access Tier scope. For more detailed instructions on how to authenticate with an API key, refer to our API documentation.
# set env vars to connect to your Command Center account
export BANYAN_API=        # API path to Command Center, such as https://net.banyanops.com/api/v1
export REFRESH_TOKEN=     # provided under Settings in your Command Center; Note: API keys can be used instead
export CLUSTER_NAME=      # specify the Cluster to register with

# set env vars to specify Access Tier parameters
export BANYAN_SITE_NAME=          # display name of Site secured by Access Tier
export BANYAN_SITE_ADDRESS=       # canonical domain name of the Site,
                                  # ex: "corp-dns-cname.example.com"
export BANYAN_SITE_DOMAIN_NAMES=  # comma-separated list of domain names that
                                  # can alias the site_address,
                                  # ex: "*.corp.example.com,web1.example.com"

# bootstrap the config file
x/bin/configure-bootstrap $REFRESH_TOKEN $CLUSTER_NAME
Install
# double check the configuration params
cat config.yaml

# run the setup script so netagent can be managed using systemctl
./setup-netagent.sh

# manage using systemctl
sudo systemctl [start|stop|status] netagent

# on old distros (CentOS 6, Ubuntu 14) use initctl instead of systemctl
# sudo initctl [start|stop|status] netagent
Verify Installation
Once the Access Tier is installed, you can check its logs on the host at /var/log/banyan/netagent.log to ensure it is functioning as expected.
You can check the Networks > Access Tiers section of the CSE Command Center to see the list of all the registered Access Tiers.
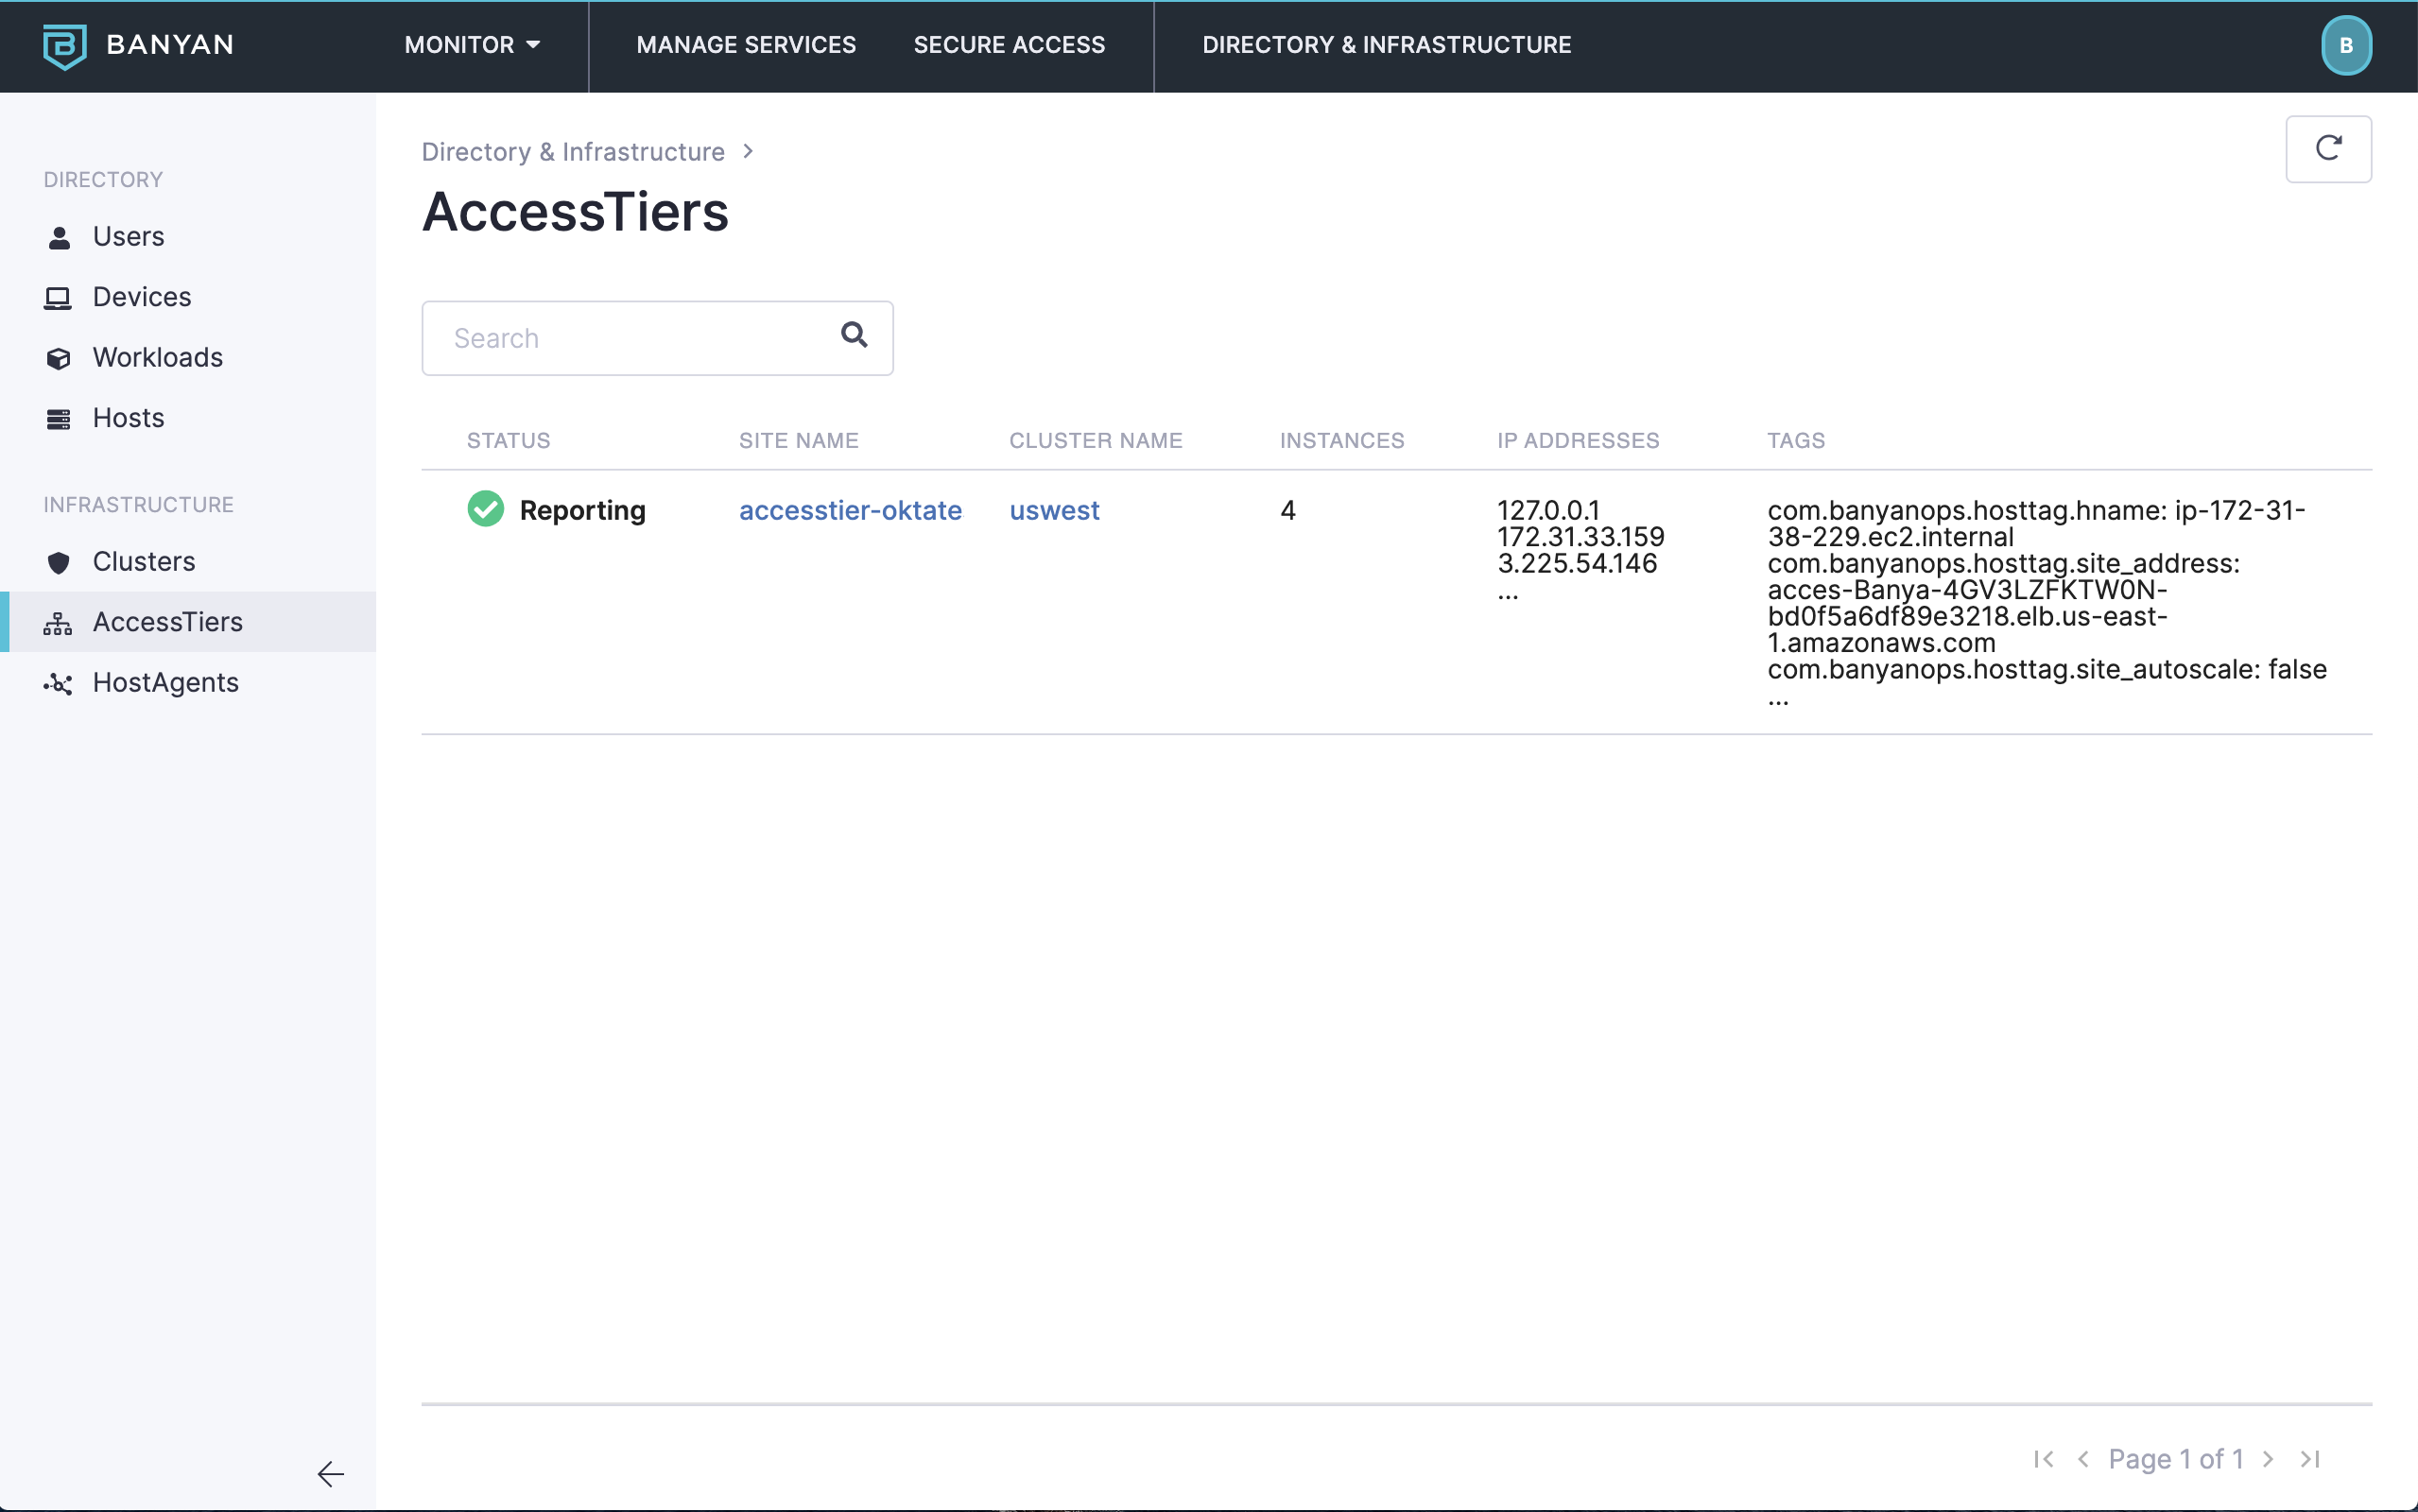
Infrastructure - Sites