Access Policy Examples
Tunnel Policy Configuration Scenarios
- Updated on
- 12 minutes to read
-
Contributors

- Access Policy Overview
- Comparing CSE Access Policies to Firewall Access Rules
- Service Tunnel Policy Examples
- Designate access to resources based on role
- Provide selective access (i.e., one group from a larger pool of users) to resources
- Grant users access to a CIDR except one IP, while granting a specific group access to the full CIDR
- Grant all users access to internet CIDRs, while granting one group access to one private network and another group access to another private network
Access Policy Overview
Cloud Secure Edge (CSE) Access Policies enforce which devices have access to protected services. Admins can configure Access Policies by defining which user Roles and device Trust Levels are required in order to grant access to a resource or network. Once configured, the Access Policy needs to be applied to the relevant service or Service Tunnel in order to become active.
Comparing CSE Access Policies to Firewall Access Rules
A CSE Access Policy acts as a single container for multiple access rules: each Access Policy can contain multiple Access Groups, each of which have their own set of rules for accessing protected resources or networks.
Compared to traditional firewall configurations – which typically consist of a hierarchical list of rules, each specifying their own individual access rules –, a CSE Access Policy is like a consolidated firewall rule list that does not work sequentially but instead evaluates all rules within the policy against the same policy logic. Therefore, rule order within a CSE Access Policy does not affect policy evaluation.
For instance, if a user in an org has 2 Roles and belongs in 2 separate Access Groups, and one Access Group grants access to a specific CIDR while the other Access Group denies access to an IP address in this same CIDR, the user’s granted access will always take precedence over their denied access; The ordering of the Access Groups or Access Policies does not affect the outcome.
This doc outlines some common scenarios that require Service Tunnel policy (i.e., Tunnel Policy) configurations and lists the steps required for a successful configuration.
Service Tunnel Policy Examples
Tunnel Policies define user access to network locations based on CIDR ranges, ports, and protocols from a Service Tunnel.
Note: Allow Lists and Exception Lists accept network locations in CIDR format only. A single host must be entered as a /32 CIDR (e.g., 192.168.0.15/32).
Designate access to resources based on role
An admin wants Group A (e.g., Role = Dev) to be able to RDP into Server 1 and Group B (e.g., Role = Contractors) to RDP into Server 2.
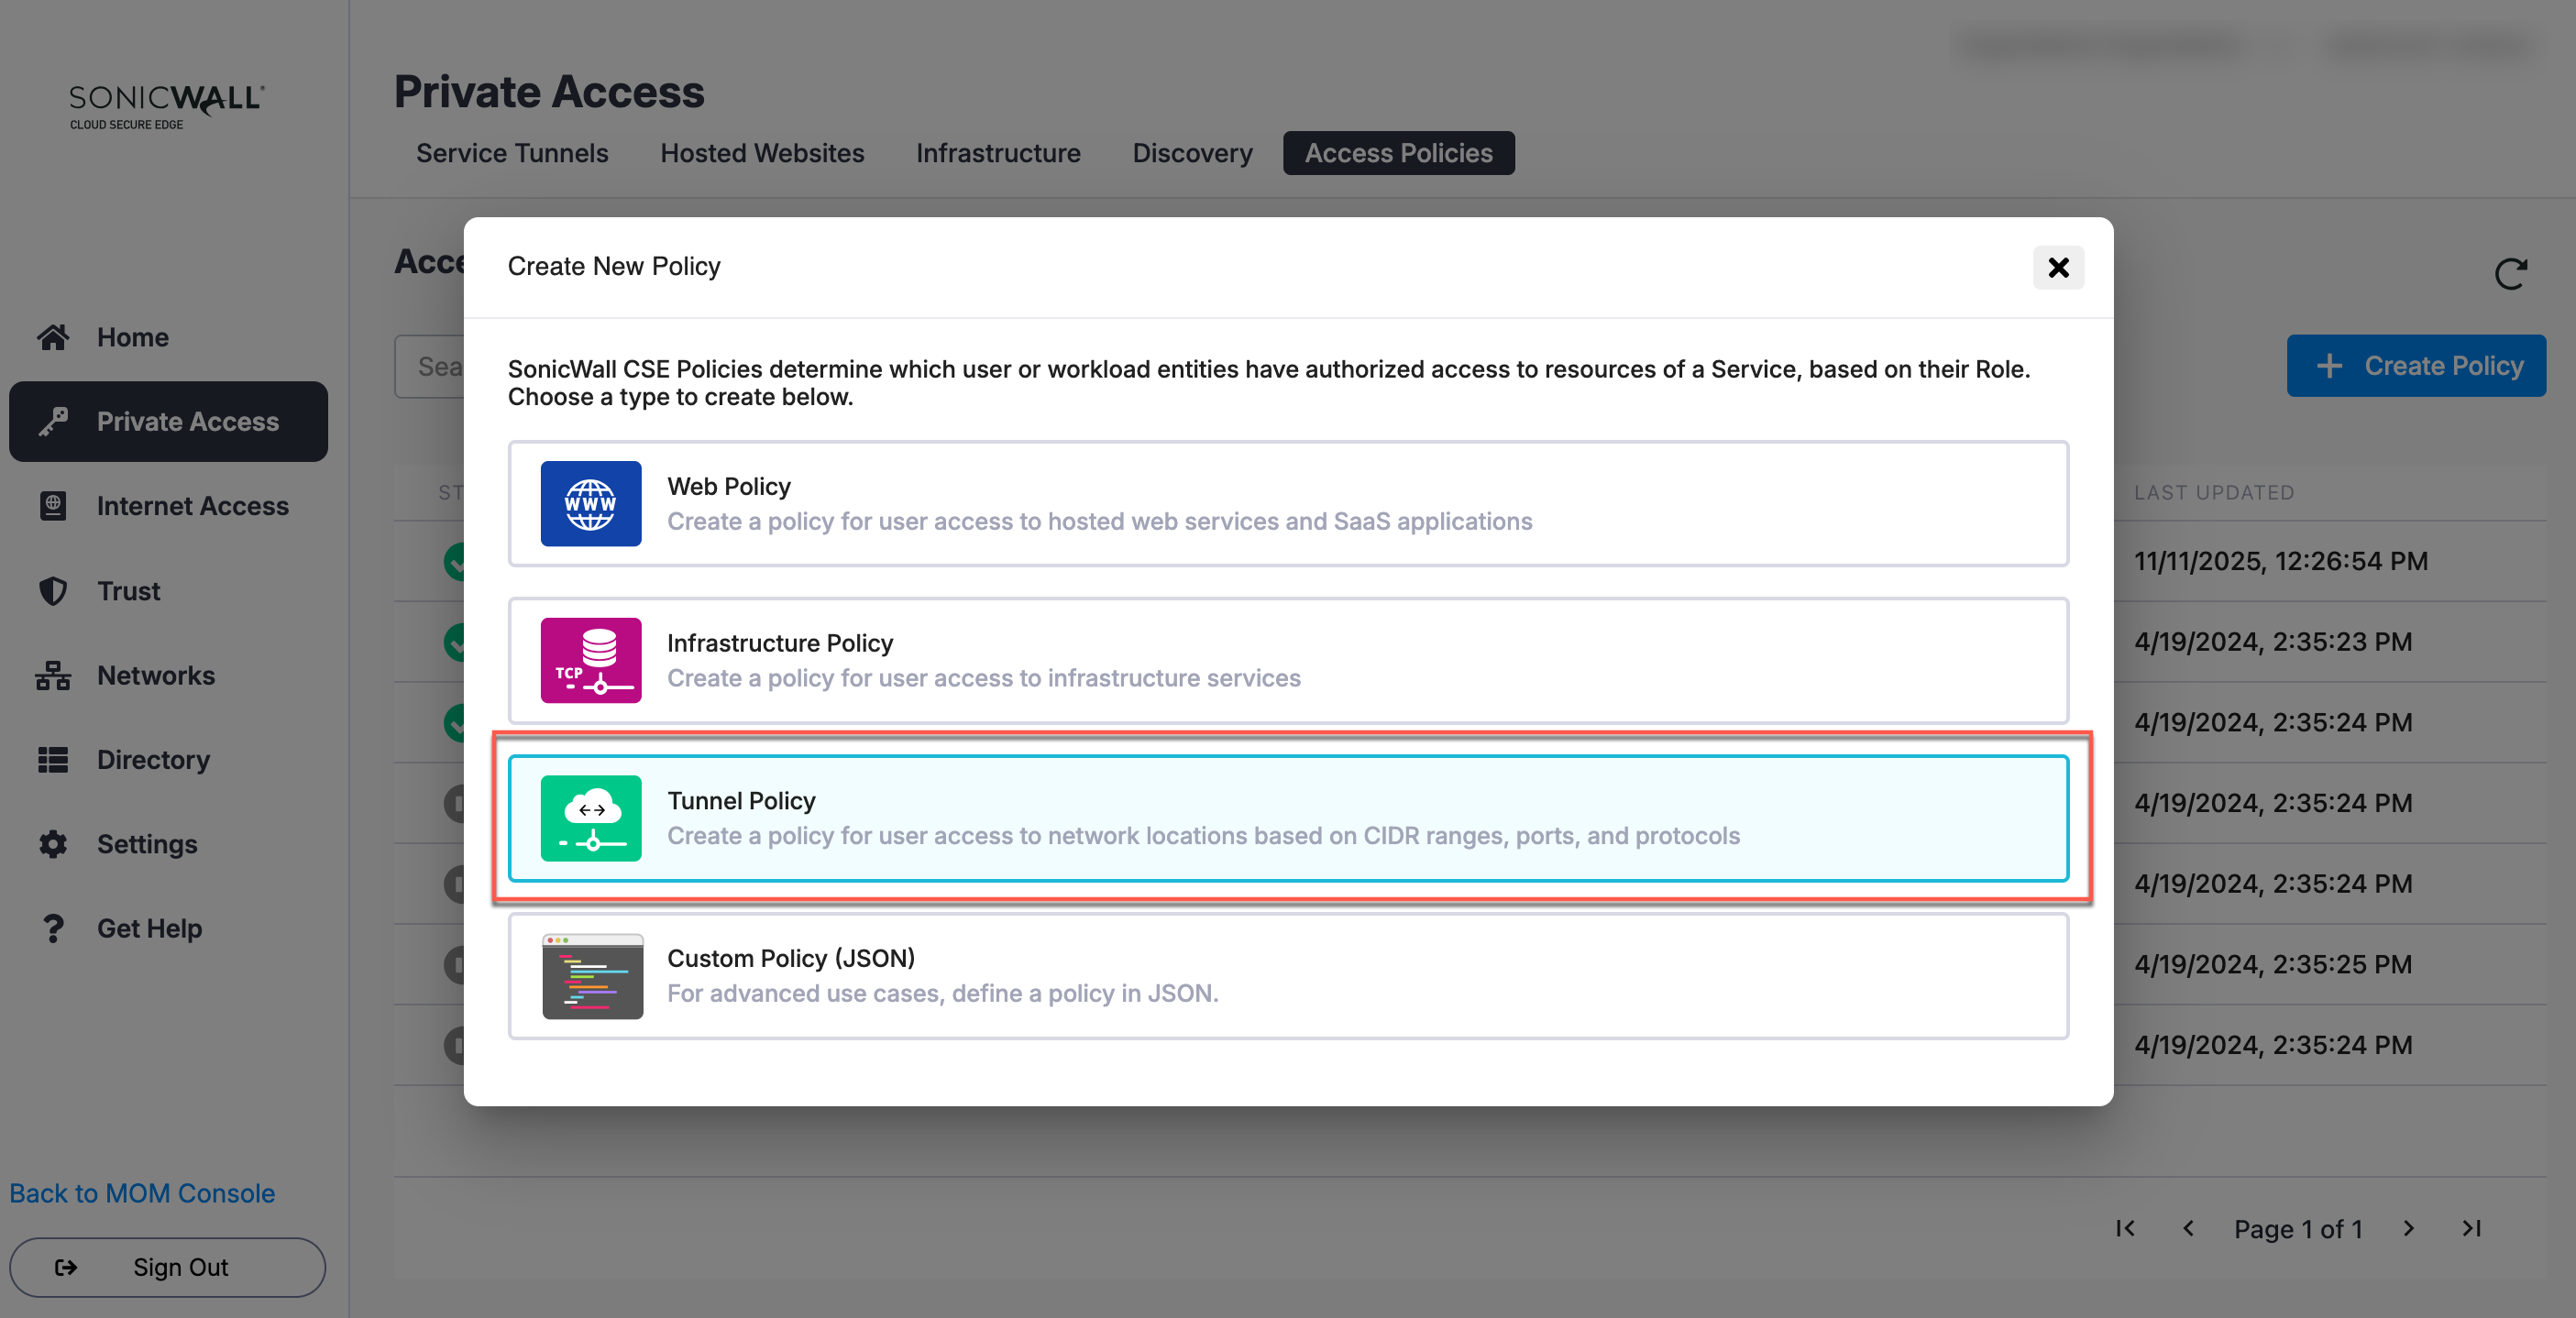
1. Create a Tunnel Policy: Enter a relevant Name and Description.
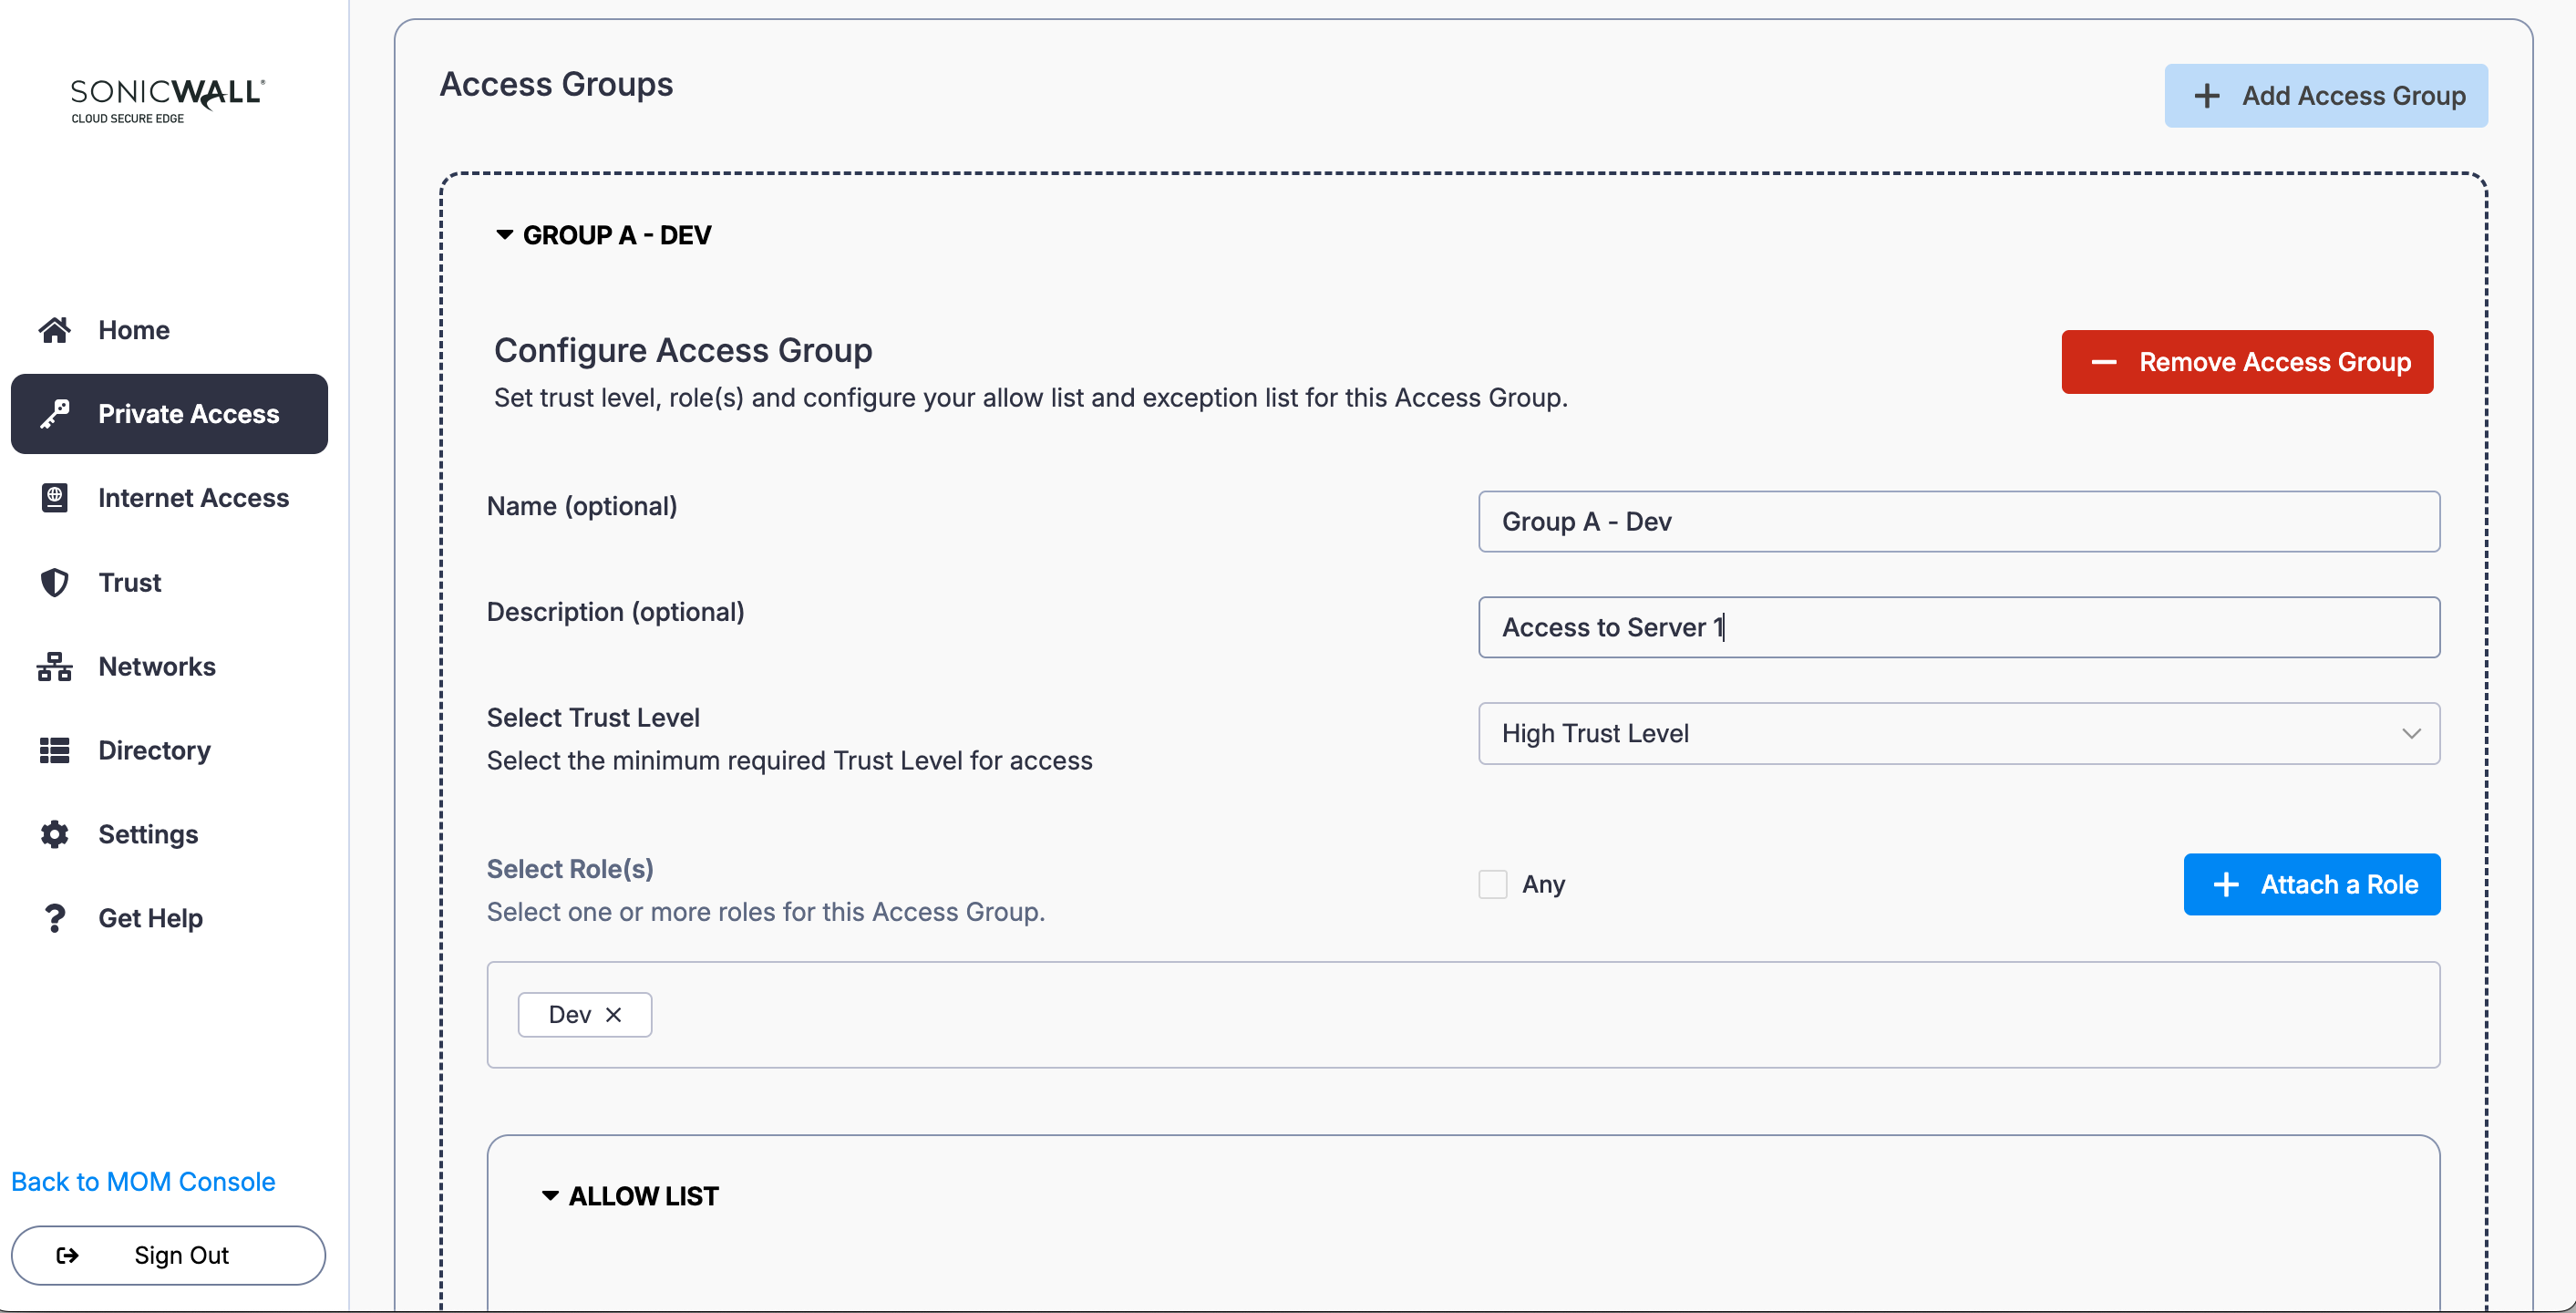
2. In the Access Group configuration, name the Access Group (i.e., Group A - Dev) and enter a meaningful description (i.e., Access to Server 1). Set a required device Trust Level.
3. Select + Attach a Role and select the relevant Role (i.e., Dev).
4. Under Allow List, select IP Ranges/IPs: Enter the IP of Server 1 (i.e., 192.168.0.15), and select the relevant protocol (i.e., TCP) and port (i.e., 3389).

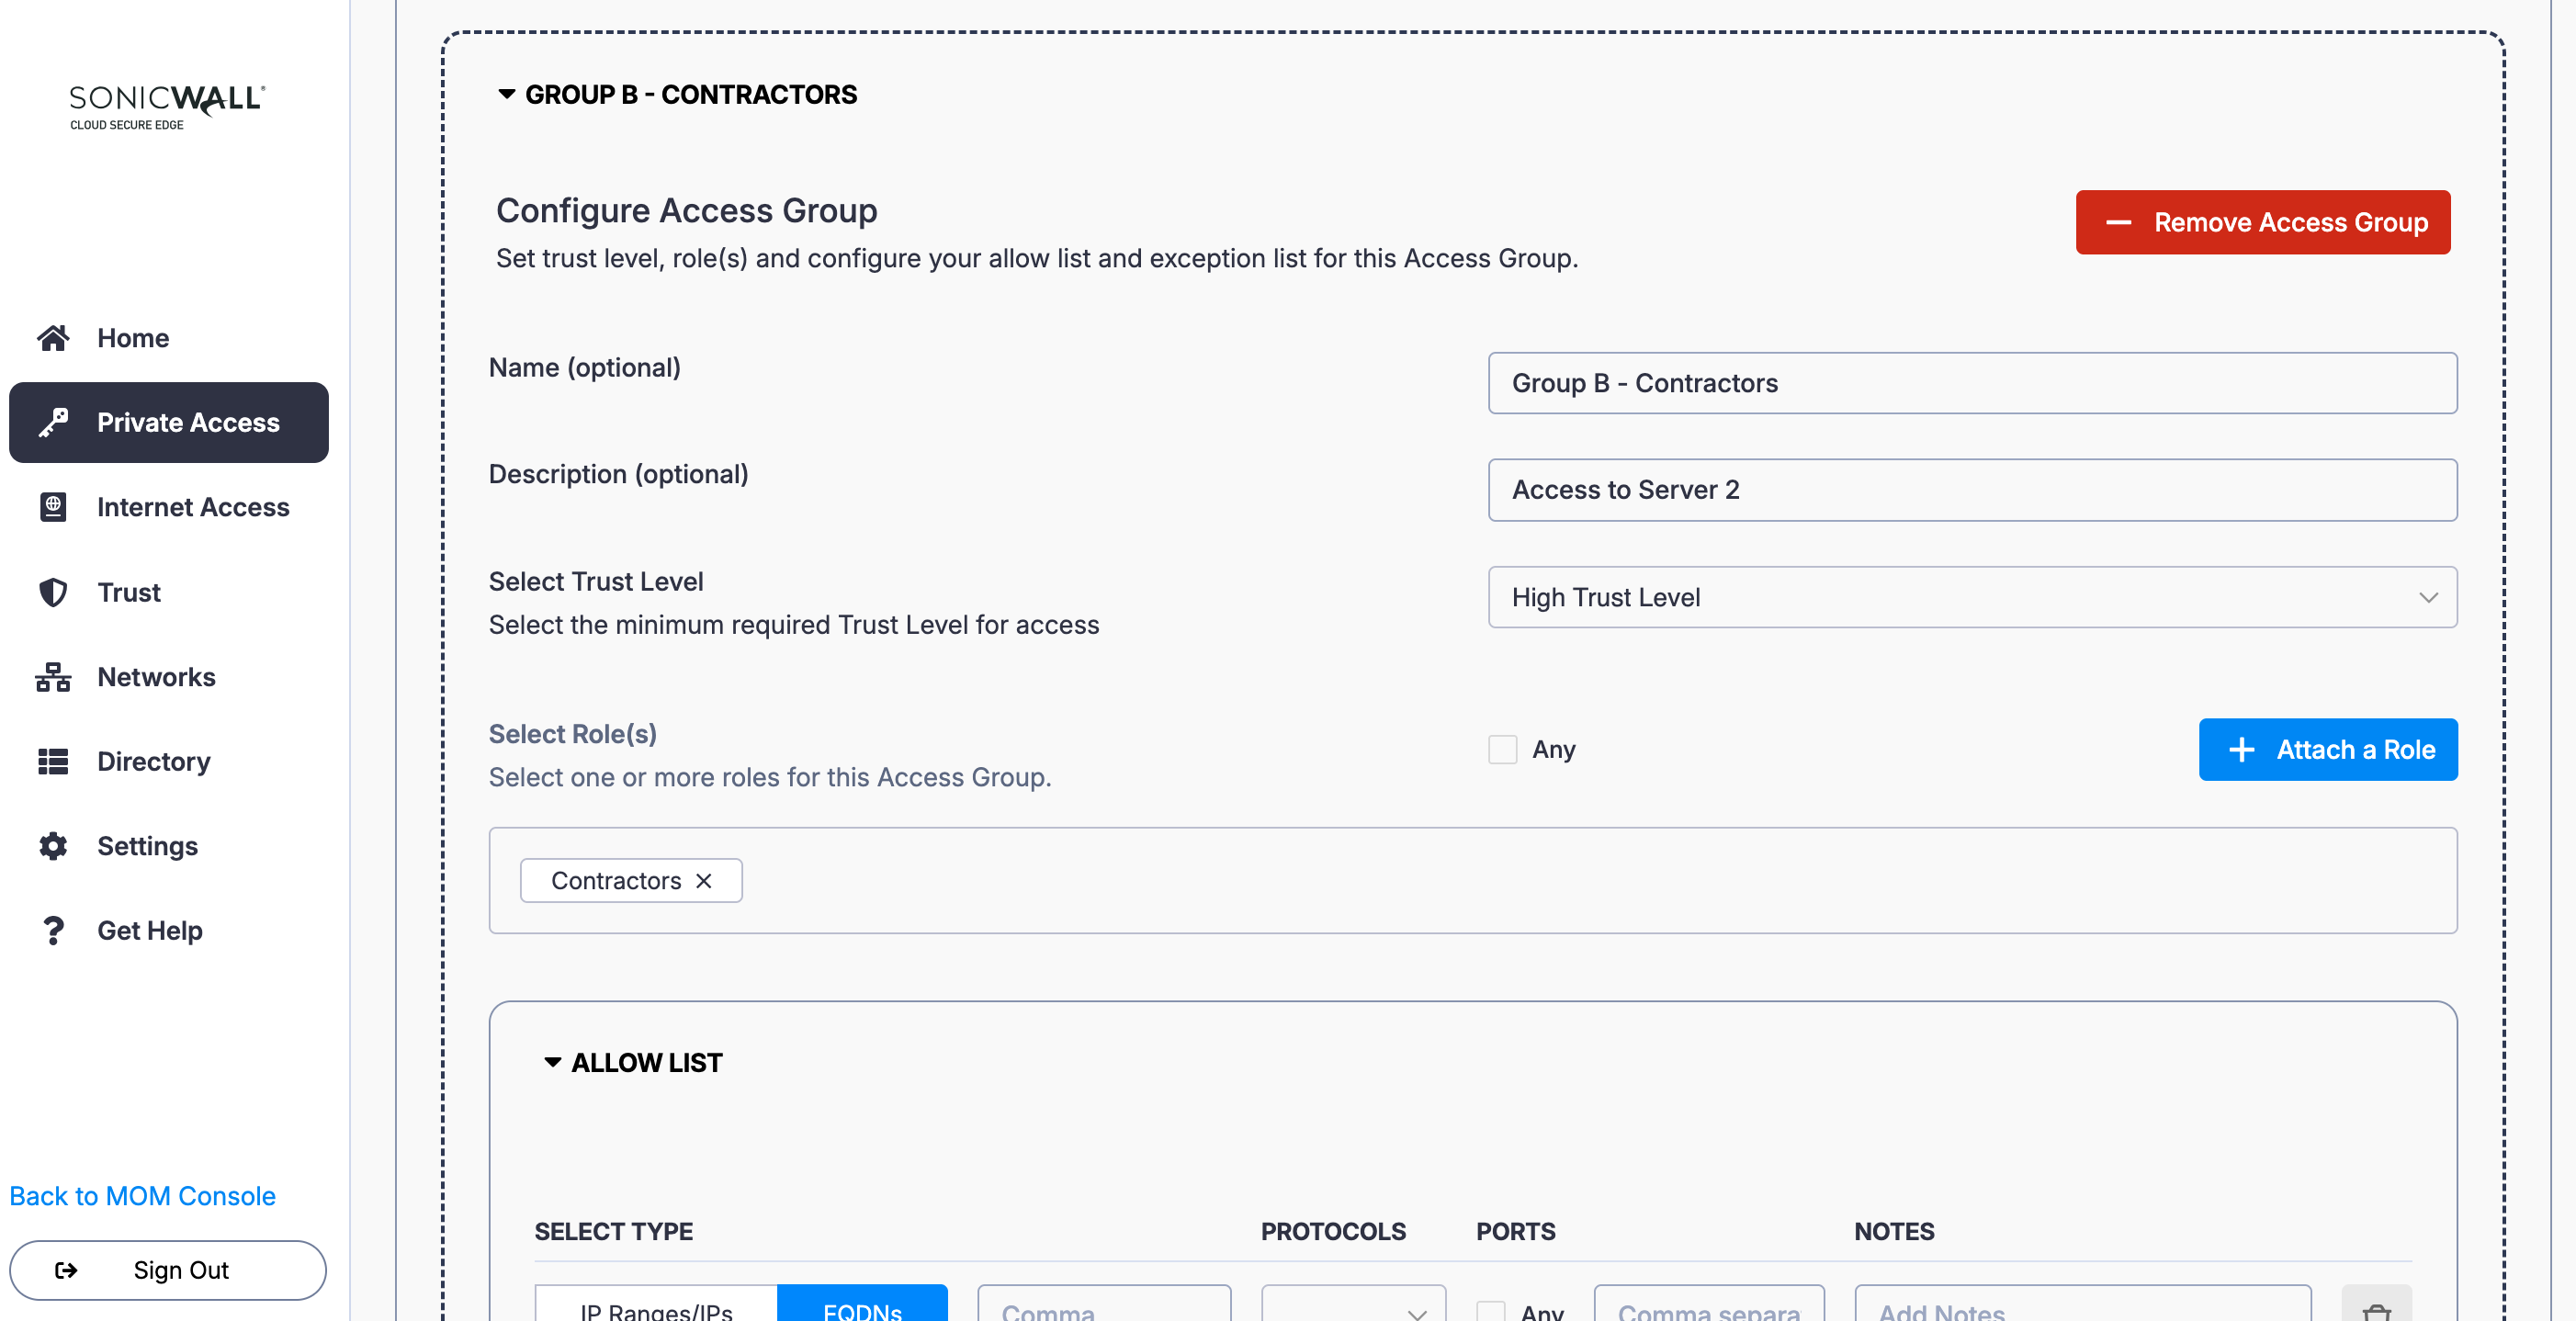
5. Add a second Access Group (i.e., select the + Add Access Group button again): Name the Access Group (i.e., Group B - Contractors) and enter a meaningful description (i.e., Access to Server 2). Set a required device Trust Level.
6. Select + Attach a Role and select the relevant Role (i.e., Contractors).
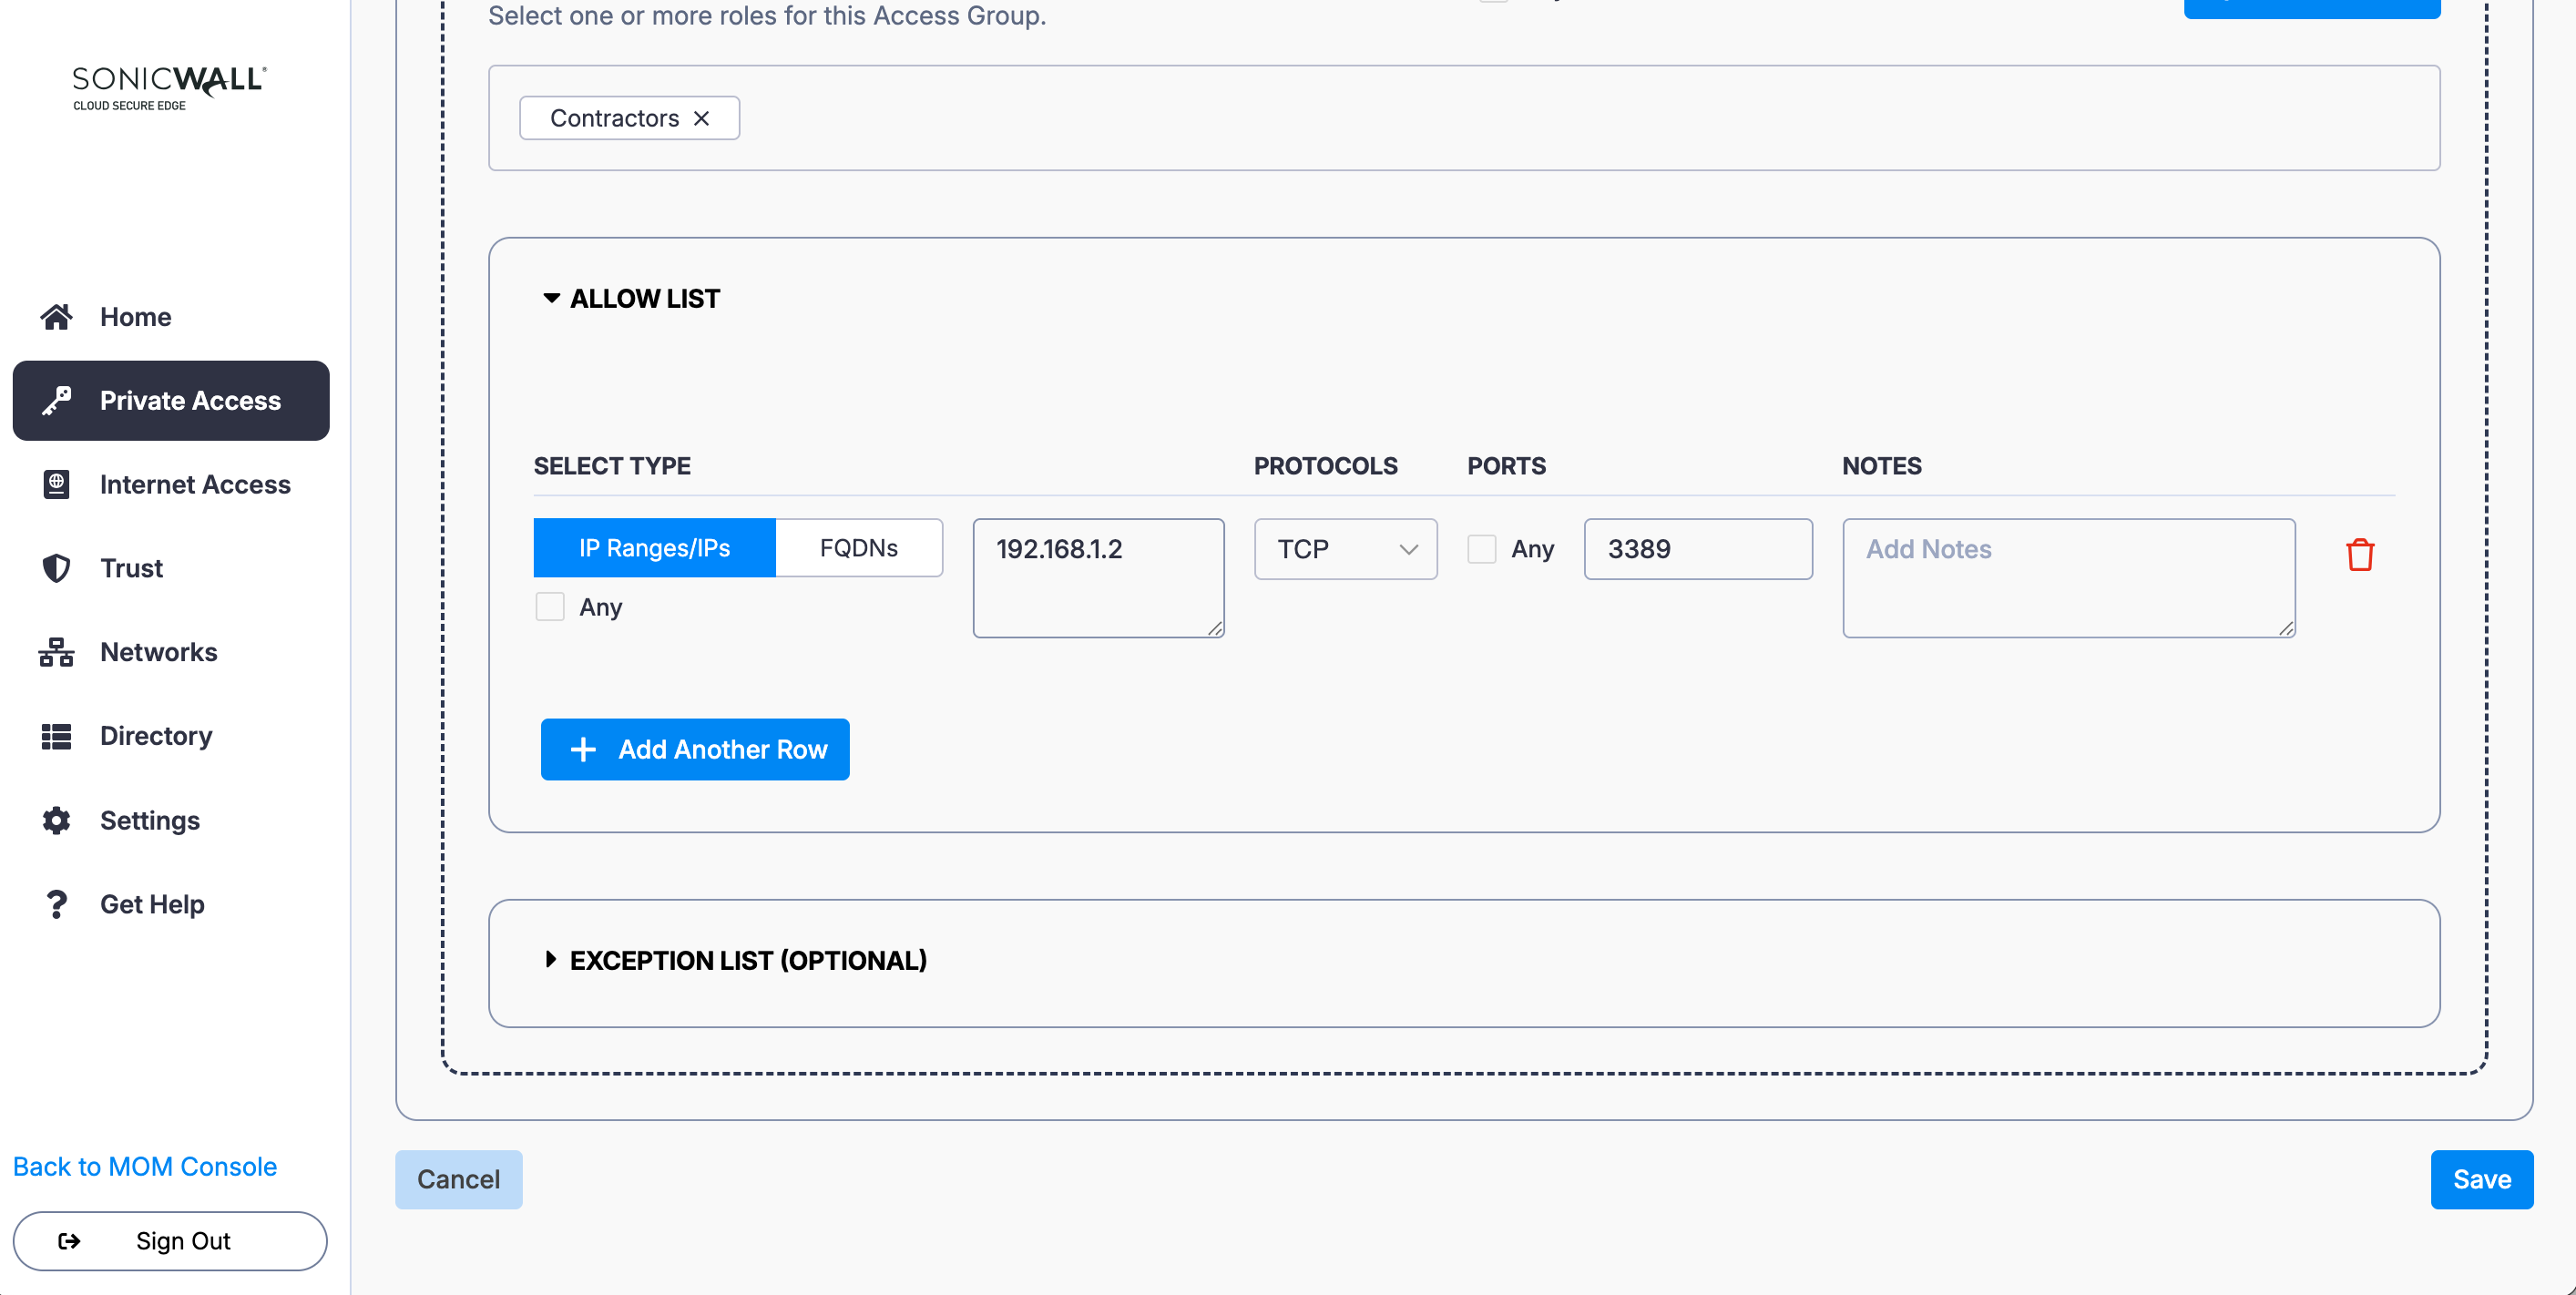
7. Under Allow List, select IP Ranges/IPs: Enter the IP of Server 2 (i.e., 192.168.1.2), select the relevant protocol and port (i.e., 3389).
8. Save your Access Policy configuration with its 2 Access Groups.
Provide selective access (i.e., one group from a larger pool of users) to resources
An admin wants to provide all users (e.g., Role = AllUsers) in an org with access to file shares on Server 1. From this total pool of users, the admin also wants to exclusively provide the IT team (e.g., Role = IT) access to Server 2 and Server 3.
1. Create a Tunnel Policy: Enter a relevant Name and Description.
2. In the Access Group configuration, name the Access Group (i.e., File Shares) and enter a meaningful description (i.e., Access to File Shares on Server 1). Set a required device Trust Level.
3. Select + Attach a Role and select the relevant Role (i.e., AllUsers).

4. Under Allow List, select IP Ranges/IPs: Enter the IP of Server 1 (i.e., 192.168.0.15), and select the relevant protocol (i.e., TCP) and port.
5. Add a second Access Group (i.e., select the + Add Access Group button again): Name the Access Group (i.e., IT Servers) and enter a meaningful description (i.e., Access to Server 2 and Server 3 for IT Team). Set a required device Trust Level.
6. Select + Attach a Role and select the relevant Role (i.e., IT).
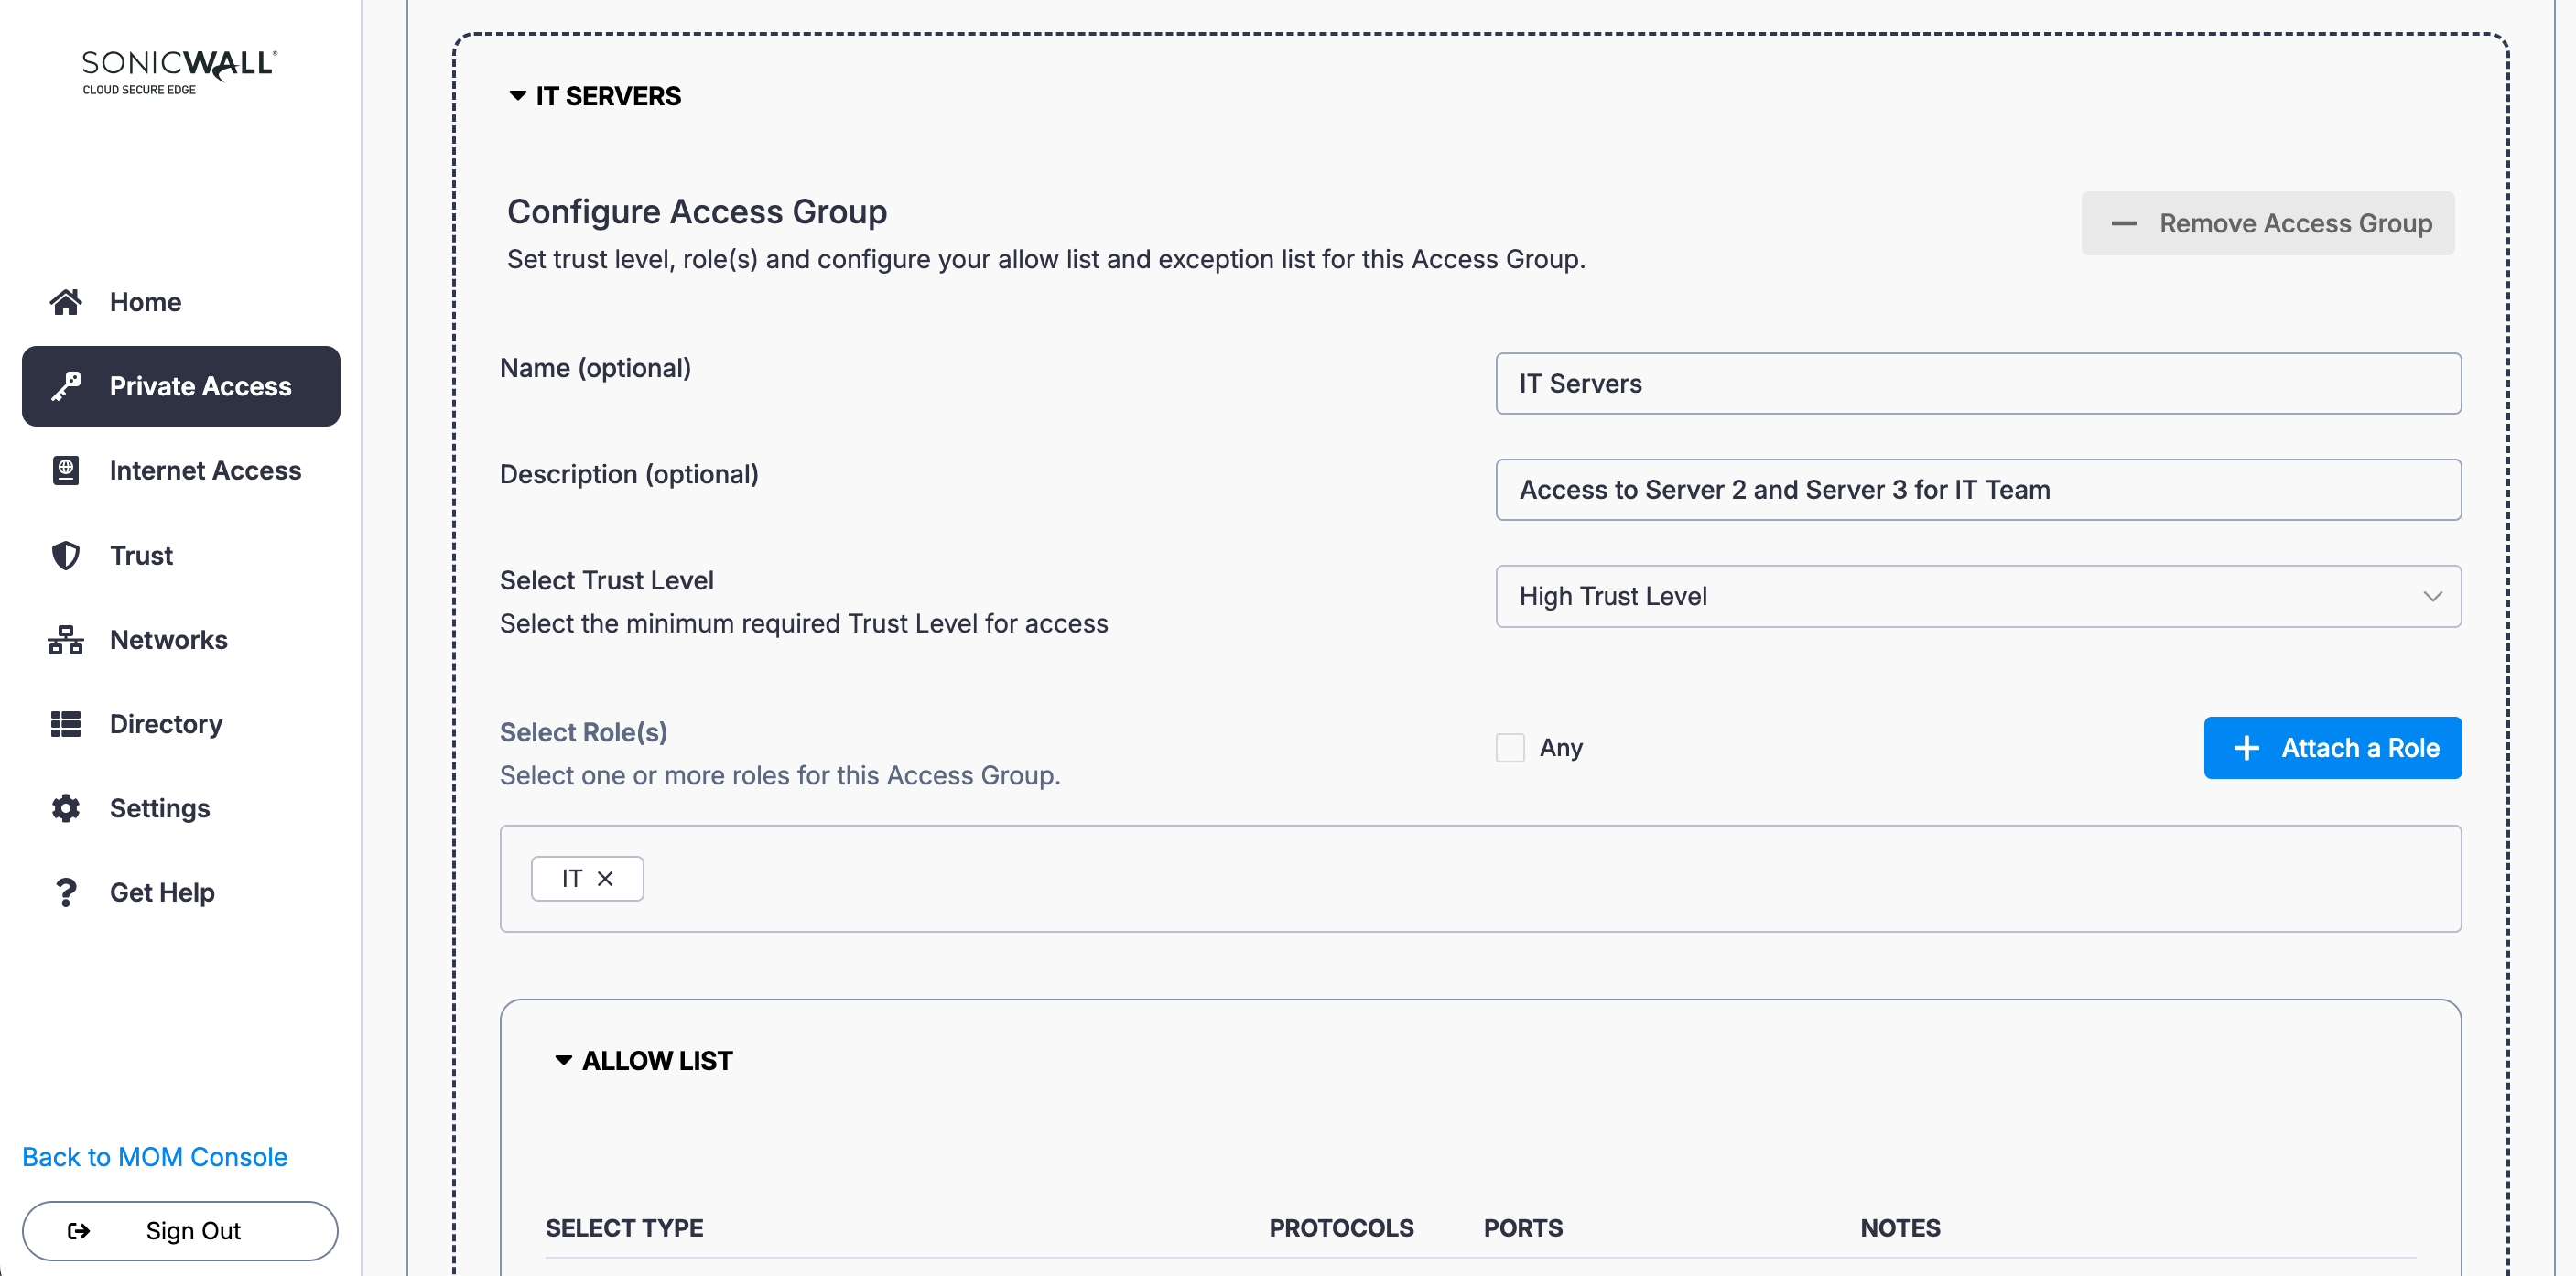
7. Under Allow List, select IP Ranges/IPs: Enter the IP of Server 2 (i.e., 192.168.1.2) and Server 3 (i.e., 192.168.1.3), and select the relevant protocol and port.
8. Save your Access Policy configuration with its 2 Access Groups: in this configuration, AllUsers should have access to Server 1, and IT should have access to Server 1, Server 2, and Server 3.
Grant users access to a CIDR except one IP, while granting a specific group access to the full CIDR
An admin wants all users (e.g., Role = AllUsers) to be able to access a network with CIDR 192.168.168.0/24, except for host 192.168.168.168; however, the admin wants the IT team (e.g., Role = IT) to be able to access all IPs in this CIDR.
1. Create a Tunnel Policy: Enter a relevant Name and Description.
2. In the Access Group configuration, name the Access Group (i.e., Corporate Network) and enter a meaningful description (i.e., Users Access to Corporate Network). Set a required device Trust Level.
3. Under Select Role(s), select Any.
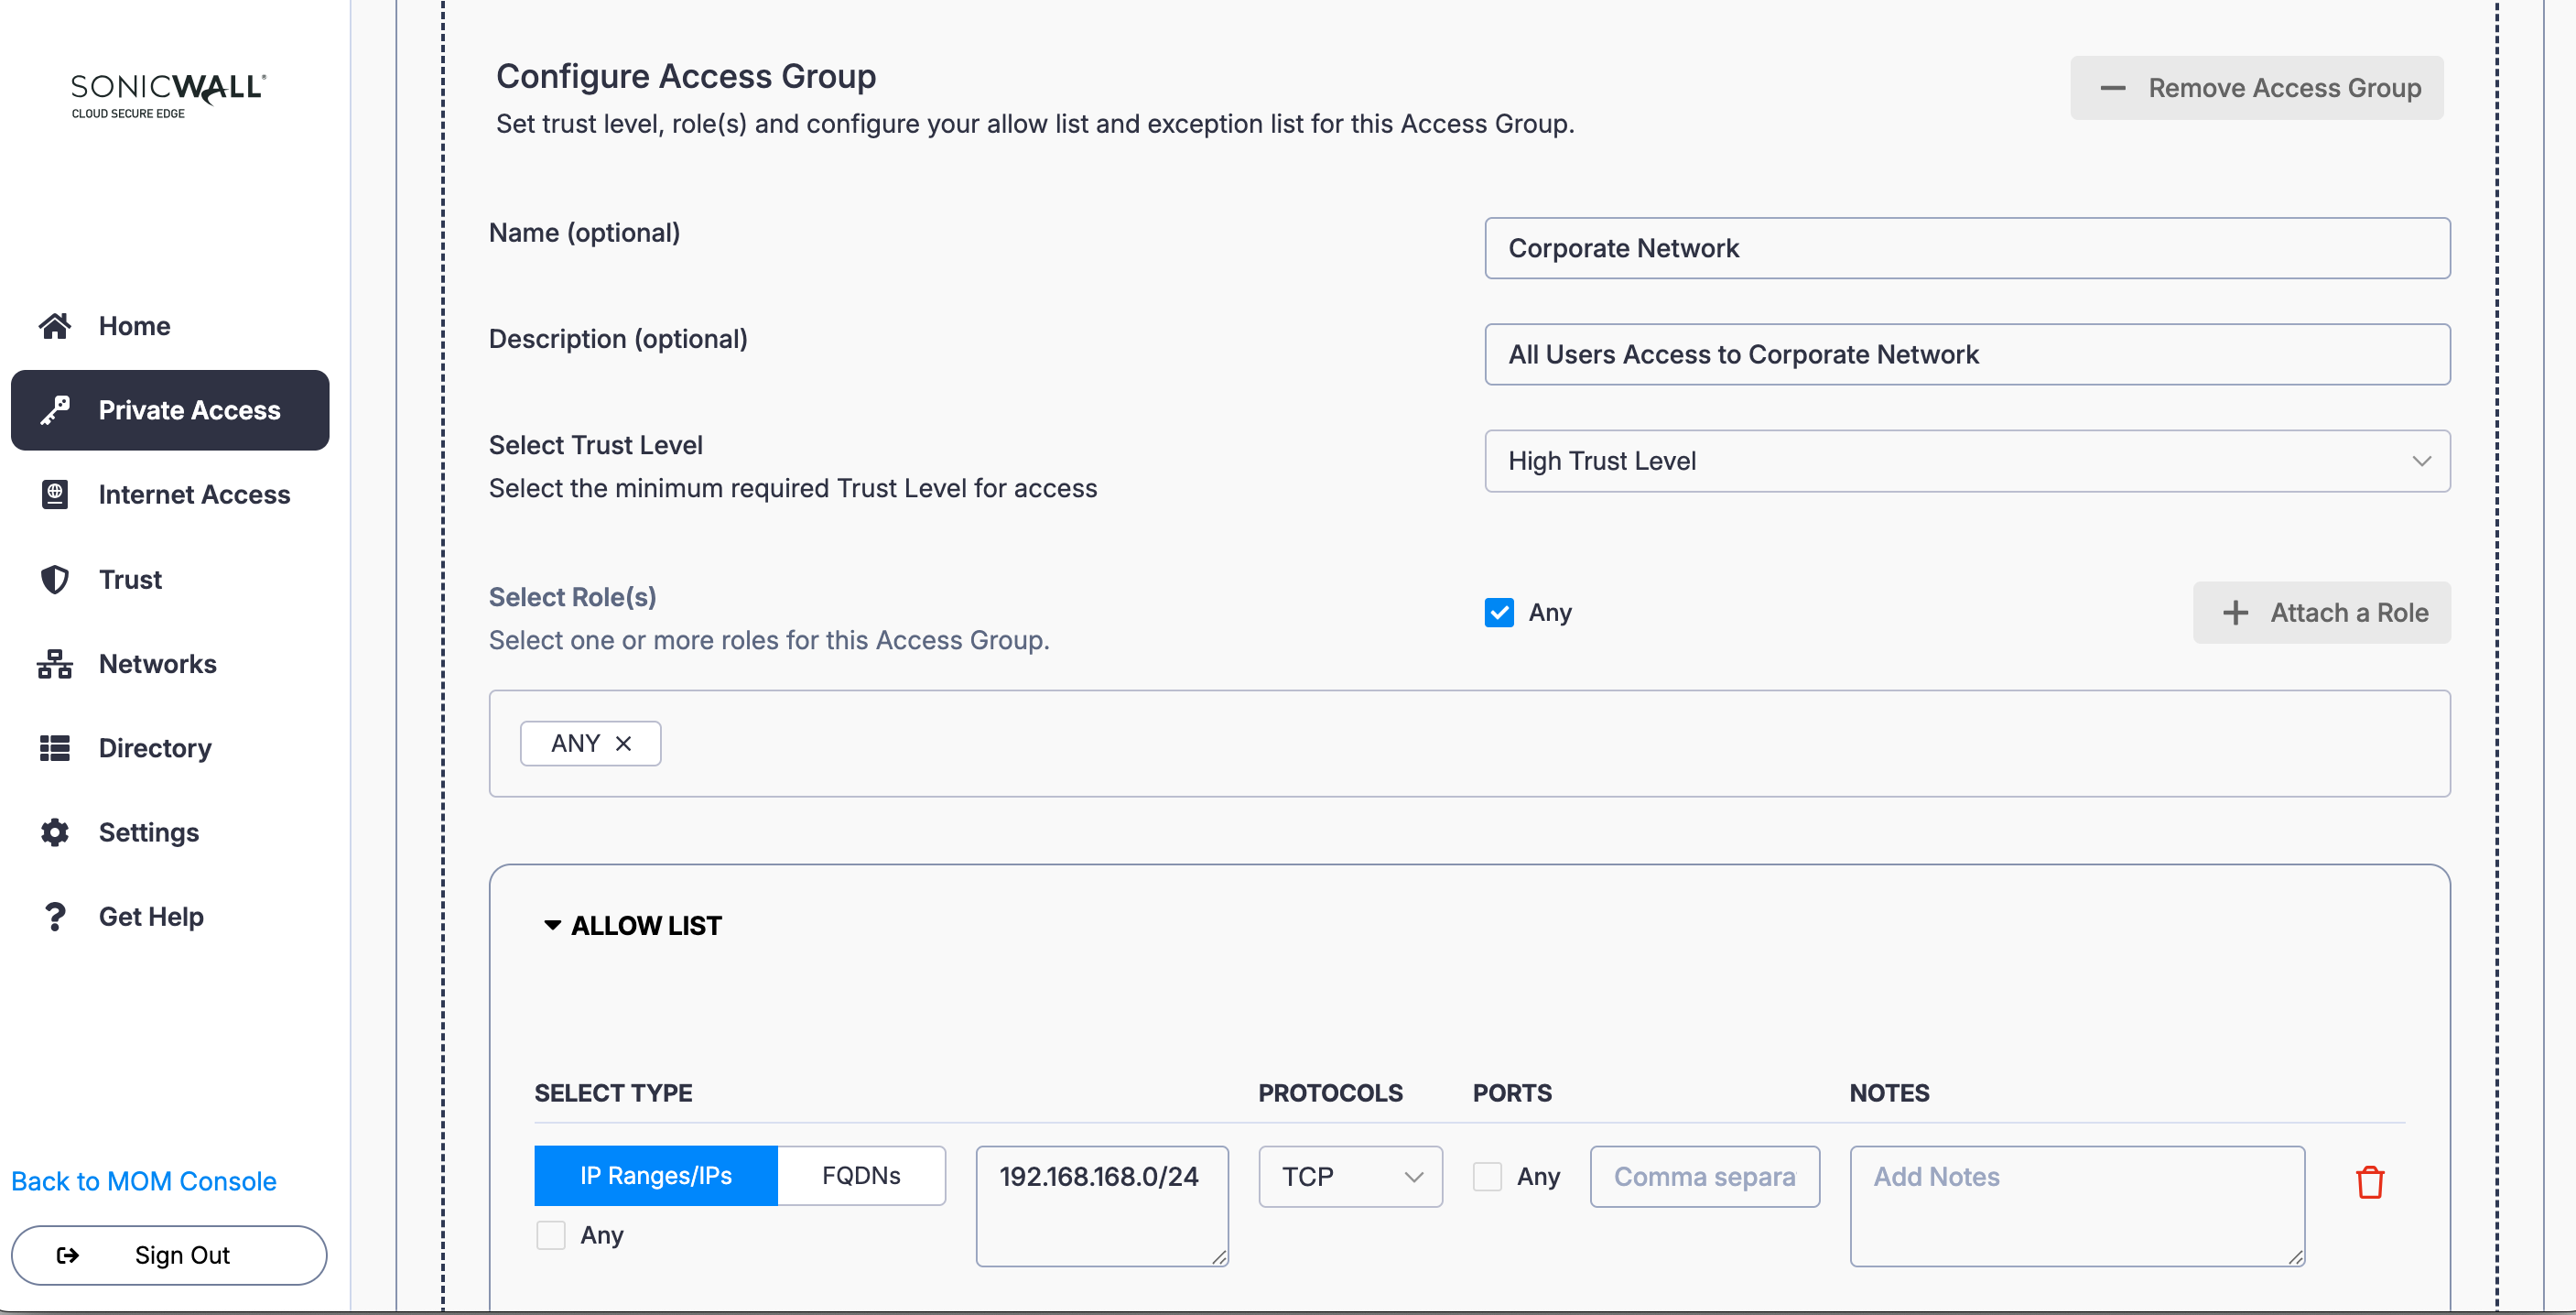
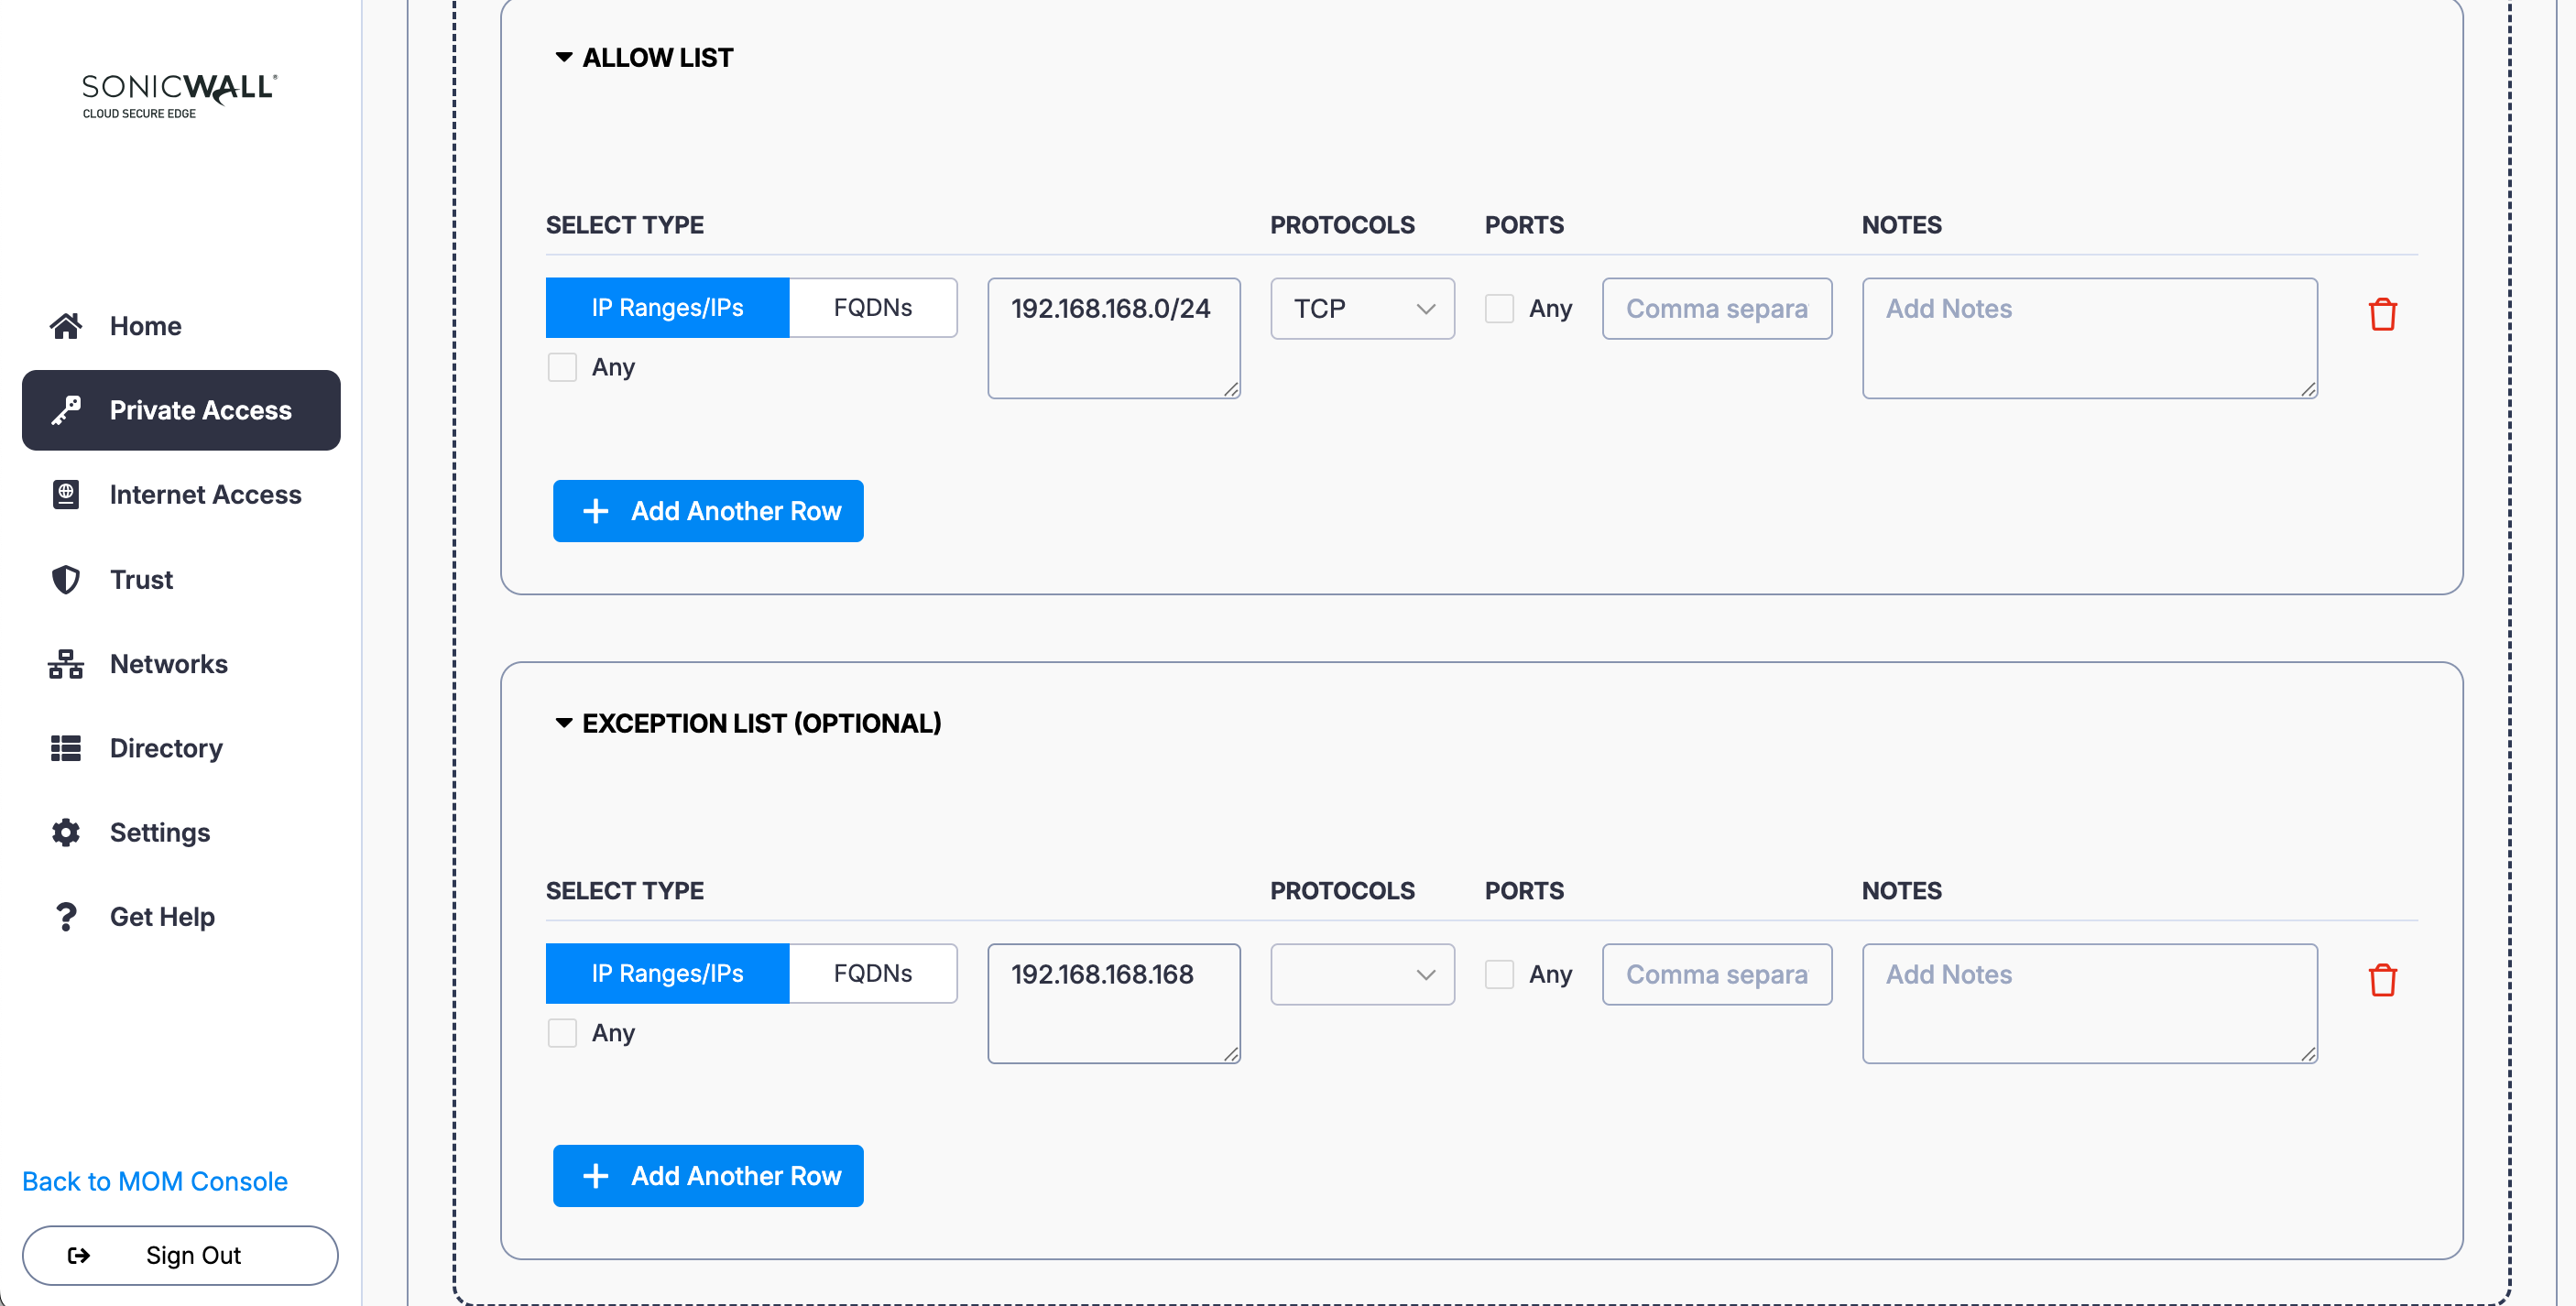
4. Under Allow List, select IP Ranges/IPs: Enter the CIDR (i.e., 192.168.168.0/24), and select the relevant protocol (i.e., TCP) and port.
5. Under Exception List, select IP Ranges/IPs and enter 192.168.168.168.
6. Add a second Access Group (i.e., select the + Add Access Group button again): Name the Access Group (i.e., IT Team) and enter a meaningful description (i.e., IT Team). Set a required device Trust Level.
7. Select + Attach a Role and select the relevant Role (i.e., IT).
8. Under Allow List, select IP Ranges/IPs: Enter the IP 192.168.168.168, and select the relevant protocol and port.
9. Save your Access Policy configuration with its 2 Access Groups: in this configuration, any user should have access to IPs within 192.168.168.0/24 except for 192.168.168.168, and IT should have access to all IPs within this CIDR.
Grant all users access to internet CIDRs, while granting one group access to one private network and another group access to another private network
An admin wants all users (e.g., Role =AllUsers) to be able to access internet CIDRs, while Group A has access to Private Network 1 and Group B has access to Private Network 2.
1. Create a Tunnel Policy: Enter a relevant Name and Description.
2. In the Access Group configuration, name the Access Group (i.e., Full Tunnel) and enter a meaningful description (i.e., Full Tunnel Access for All Users). Set a required device Trust Level.
3. Under Select Role(s), select Any.
4. Under Allow List, select IP Ranges/IPs: Enter the CIDRs that cover the full internet (i.e., 0.0.0.0/1 and 128.0.0.0/1), and select the relevant protocol (i.e., TCP) and port.
5. Under Exception List, select IP Ranges/IPs and enter all private network CIDRs: 10.0.0.0/8, 172.16.0.0/12, 192.168.0.0/16.
6. Add a second Access Group (i.e., select the + Add Access Group button again): Name the Access Group (i.e., Private Network 1) and enter a meaningful description (i.e., Private Network 1 Access for Group A). Set a required device Trust Level.
7. Under Select Role(s), select the relevant role (i.e., Dev).
8. Under Allow List, select IP Ranges/IPs: Enter the private network CIDR (i.e., 192.168.168.0/24), and select the relevant protocol (i.e., TCP) and port.
9. Add a third Access Group (i.e., select the + Add Access Group button again): Name the Access Group (i.e., Private Network 2) and enter a meaningful description (i.e., Private Network 2 Access for Group B). Set a required device Trust Level.
10. Under Select Role(s), select the relevant role (i.e., IT).
11. Under Allow List, select IP Ranges/IPs: Enter the second private network CIDR (i.e., 10.0.0.0/24), and select the relevant protocol (i.e., TCP) and port.
12. Save your Access Policy configuration with its 3 Access Groups.